Season 9 came out in 2014 in two parts. Part 1 was about competition: the Battle Core cross-server arena with its Plaza of Trials championship, a fourth Acheron region in Uruk Mountain, the Tetra tier of seed spheres, rideable muuns and, at long last, widescreen. Part 2 turned inward and rebuilt the characters — stat specialization, a filled-out Fist Master tree, the Gremory Case for rewards, and permanent versions of the Wings of Conqueror and the Ring of Dark Transformation.
Battle Core
Battle Core is a stand-alone server that players from every regular server can enter together. To get in you apply through NPC Elin in Lorencia market (113, 132) (or the notice pop-up), open a second client and choose the Battle Core server with the same account. What arrives there is a copy of your character: name, stats, skills, cash-shop items and the equipped and normal inventory. What stays behind: the vault, quests, friend lists, MU Helper settings and your zen.
| Battle Core rule | Detail |
|---|---|
| Level requirement | None — any level can apply |
| Characters per account | 2 |
| Time until entry | About 3 minutes after applying |
| Starting zen on Battle Core | 100,000,000 |
| NPC prices | Every purchase, sale and repair costs 1 zen |
| Disabled while applied | Trade, personal store and vault (on both servers) |
| Community | No 1:1 chat or mail; whisper only inside the same server; no guild or Gens changes |
| Premium services | Character/server transfer or a name change resets your Battle Core points |
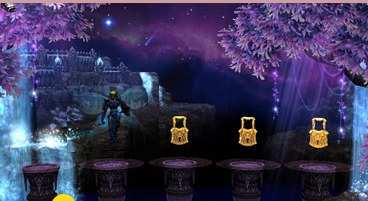
Releasing the entry application shuts the Battle Core client and switches trading back on. Nothing is lost by doing so: your tournament progress is stored, and the next application picks it up again.
Chaos Castle (Battle)
The everyday Battle Core event is Chaos Castle (Battle). The ticket is the Guardsman's Armor Set, sold by any shop NPC in Battle Core's Lorencia market; right-click it in the inventory from five minutes before the round begins. The rules are the classic ones — a cap of 70 players, 100 minus the player count monsters, and the last one alive wins. Rounds start at 20:30 and 22:00.
| Castle | Level range | Monster drop | Winner |
|---|---|---|---|
| Chaos Castle 1 | 50 – 179 | Guardsman's Box ×4 | Guard Captain's Box |
| Chaos Castle 2 | 180 – 269 | Guardsman's Box ×4 | Guard Captain's Box |
| Chaos Castle 3 | 270 – 349 | Guardsman's Box ×4 | Guard Captain's Box |
| Chaos Castle 4 | 350 – 399 | Guardsman's Box ×4 | Guard Captain's Box |
| Chaos Castle 5 | 400 – 500 | Guardsman's Box ×5 | Guard Captain's Box |
| Chaos Castle 6 | 501 – 650 | Guardsman's Box ×5 | Guard Captain's Box |
| Chaos Castle 7 | 651 + | Guardsman's Box ×6 | Guard Captain's Box |
Inside a Guardsman's Box is a Blessing of Light of lower, medium or higher grade; the Guard Captain's Box carries only the medium and higher grades and adds jewel bundles. A round with no survivor pays no winner's box.
| Blessing of Light | Effect |
|---|---|
| Lower | +50% experience for 30 minutes |
| Medium | +100% experience for 30 minutes |
| Higher | +200% experience for 30 minutes |
A regular Chaos Castle runs on Battle Core as well, twenty times a day, scored at 2 points per monster, 3 per player and 50 for winning.
The Plaza of Trials
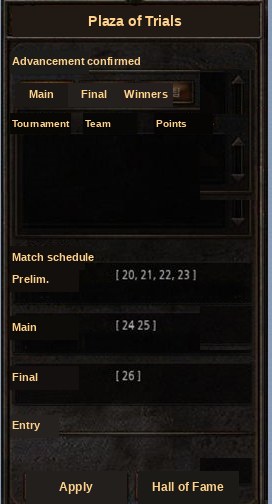
The Plaza of Trials is Battle Core's monthly championship: a punishing, two-player version of Devil Square. A match lasts 15 rounds of two minutes each with 10–20 second pauses between them, and rounds 5, 10 and 15 are boss rounds that flood the arena with more than 200 stronger monsters. Between two and ten teams share an instance.
| Stage | Days | Times | Format |
|---|---|---|---|
| Preliminary | 20th – 23rd | 18:00, 19:00, 20:00, 21:00, 22:00 | 5 matches a day, top 2 advance — up to 40 teams |
| Main round | 24th – 25th | 18:00, 19:00, 20:00, 21:00, 22:00 | 5 matches a day, winner advances — up to 10 teams |
| Final | 26th | 22:00 | 1 match; the winning team is champion |
To enter, both players stand in Lorencia market as a party of two; the leader signs up with NPC Might and the partner confirms. The gate opens five minutes ahead of the start, and anyone who leaves the map cannot come back. During the preliminaries you may swap partners freely, but the pair is fixed from the moment you qualify for the main round.
How points work
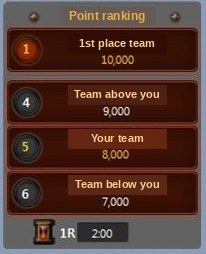
A round scores (monsters killed × that round's hunting value) + (bonus points × team members still alive). Every round has its own monster with its own value, and a golden monster that is worth a great deal more.
| Round | Monster | Score | Golden monster | Golden score |
|---|---|---|---|---|
| 1 | Gollock | 300 | Golden Tantalos (rounds 1–5) | 10,000 |
| 2 | Balram | 600 | ↑ | ↑ |
| 3 | Bloody Orc | 900 | ↑ | ↑ |
| 4 | Condra | 1,200 | ↑ | ↑ |
| 5 (boss) | Werewolf (Hero) | 3,000 | ↑ | ↑ |
| 6 | Bloody Death Rider | 1,500 | Golden Erohim (rounds 6–10) | 30,000 |
| 7 | Bloody Witch Queen | 1,800 | ↑ | ↑ |
| 8 | Scout (Hero) | 2,100 | ↑ | ↑ |
| 9 | Necron | 2,400 | ↑ | ↑ |
| 10 (boss) | Sapi Queen | 10,000 | ↑ | ↑ |
| 11 | Kentauros Warrior | 2,700 | Golden Hell Maine (rounds 11–15) | 90,000 |
| 12 | Death Centurion | 3,000 | ↑ | ↑ |
| 13 | Shriker | 3,300 | ↑ | ↑ |
| 14 | Genocider Warrior | 5,000 | ↑ | ↑ |
| 15 (boss) | Dark Elf | 200,000 | ↑ | ↑ |
Championship prizes: Wings of Conqueror and the Ring of Dark Transformation
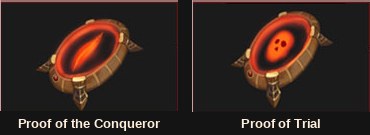
The token is exchanged for the actual prize at the Chaos Goblin in Noria (180, 103) through an ordinary chaos combination that never fails. Both recipes are identical: the token, a 10-bundle each of Jewel of Bless, Jewel of Soul and Jewel of Life, and one Jewel of Chaos.
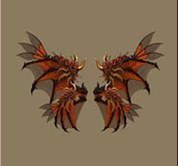
The Season 8 wings expired after 28 days; the Season 9 Wings of Conqueror do not. They leave the goblin at +0 with one or two random wing options, carry a unique Attack Power 100 line that rises by 5 per item level, and can take Jewel of Life options on top. Upgrading works like any third-tier wings — jewels up to +9, chaos combinations from +10 to +15.
| Item level | +0 | +3 | +6 | +9 | +12 | +15 |
|---|---|---|---|---|---|---|
| Attack power | 100 | 115 | 130 | 145 | 160 | 175 |
| Defense | 60 | 76 | 88 | 100 | 118 | 145 |
| Damage increase | 39% | 45% | 51% | 57% | 63% | 69% |
| Damage absorb | 39% | 45% | 51% | 57% | 63% | 69% |
On creation the wings roll one or two of: 5% chance of full HP recovery, 5% chance to reflect the attacker's damage, 5% chance of ignore-defense damage. A Jewel of Life can add automatic HP recovery 1–4%, additional attack power +4/+8/+12/+16, or additional wizardry / curse power +4/+8/+12/+16.
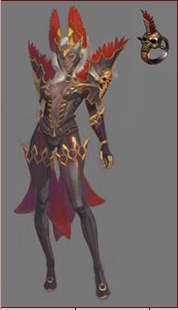
Where the older transformation rings expired, the Ring of Dark Transformation simply wears down. Drop a Jewel of Bless on it and it regains 50 durability, with no chance of failure. As with the other rings, pairing it with a pet unlocks a set bonus.
| Pet / ring | Pet effect | Ring effect | Set effect |
|---|---|---|---|
| Skeleton | Attack/wizardry/curse +20%, attack speed +10, EXP 30% | Attack/wizardry/curse +40 | EXP +50% |
| Panda | EXP 50%, defense +50 | Zen +50%, attack/wizardry/curse +30 | EXP +50% |
| Robot Knight | — | Zen +50%, attack/wizardry/curse +30 | EXP +50% |
| Demon | Attack/wizardry/curse +40%, attack speed +10 | — | — |
| Guardian Spirit | Absorbs 30% damage, max HP +50 | — | — |
| Ring of Dark Transformation | — | Attack/wizardry/curse +70, attack speed +10, defense +50, max HP +50 | EXP +50% |
Regular matches pay out as well: the Gift of the Knights Order in Chaos Castle and the Devil's Box from the round 5, 10 and 15 monsters in the Plaza. The preliminary boxes hold jewels; from the main round on they can also contain set items and level 400 socket weapons such as Asura, and the final's high-grade box gives the best odds.
Uruk Mountain
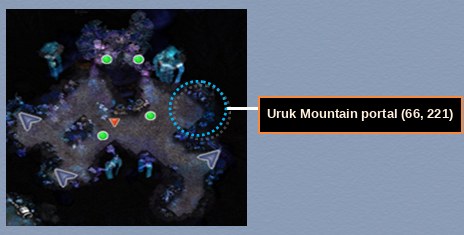
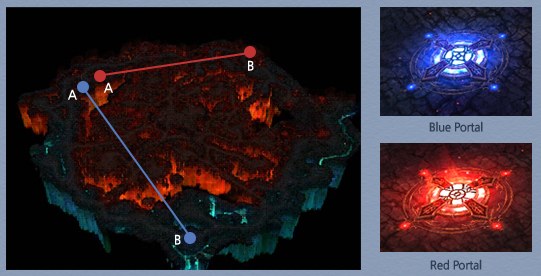
Uruk Mountain became Acheron's fourth region and its hardest. Neither Arca War nor Acheron Guardian takes place there, and a death or a logout returns you to the Acheron safe zone.
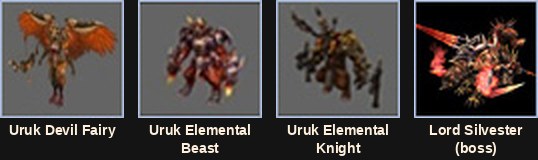
| Monster | Level | HP | Attack | Defense | Def. rate | Elem. attack | Elem. defense |
|---|---|---|---|---|---|---|---|
| Uruk Devil Fairy | 115 | 68,000 | 730–760 | 630 | 300 | 700–730 | 420 |
| Uruk Elemental Beast | 117 | 75,000 | 770–800 | 150 | 320 | 740–770 | 440 |
| Uruk Elemental Knight | 117 | 80,000 | 810–840 | 680 | 310 | 780–810 | 460 |
| Lord Silvester (boss) | 180 | 8,000,000 | 5,000–6,000 | 1,400 | 4,000 | 1,700–2,300 | 700 |
Lord Silvester
Silvester comes back every 24 hours with a freshly rolled element. His basic attacks can stun. Wind Whirlwind hurts and shoves everyone around him, Curse of the Wind strips 20% of your HP and knocks you back, and at 70%, 50% and 20% health Call of the Wind brings in three adds — while any of them lives, the boss takes no damage. Give him a moment's rest and he heals 20,000 HP a second. The drop list covers pentagrams, socket items, spheres and tetra crystals.
Tetra: the 4th sphere tier
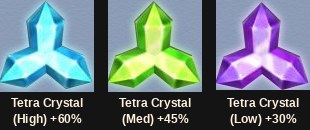
Tetra spheres, the fourth tier, drop from monsters of level 132 or higher. Combining a seed with a sphere still happens at the Seed Master and still wipes out every ingredient on a failure — which is exactly why the new Tetra Crystals exist.
| Material | Qty | Note |
|---|---|---|
| Sphere (Tetra) grade 4 | 1 | Required |
| Seed Sphere (Tri) grade 3 | 1 | Required — its element decides the result's element |
| Bundle of Jewel of Chaos (10) | 1 | Required |
| Bundle of Jewel of Creation (10) | 1 | Required |
| Zen | 1,000,000 | Required |
| Tetra Crystal | 1 | Optional — only one may be registered |
Bonus socket options
A full set of matching spheres still produces a bonus option, but a set made entirely of Tetra spheres can roll a far stronger exclusive one.
| Gear | Elements | Option (tiers 1–4, 30%) | Option (all Tetra, 10%) |
|---|---|---|---|
| Weapons, bows, scepters | Fire / Lightning / Ice | Attack power +11 | Attack power +22 |
| Weapons, bows, scepters | Lightning / Ice / Fire | Skill attack power +11 | Skill attack power +22 |
| Staff | Fire / Lightning / Ice | Attack & wizardry power +5 | Attack & wizardry power +10 |
| Staff | Lightning / Ice / Fire | Skill attack power +11 | Skill attack power +22 |
| Armour and shields | Water / Earth / Wind | Defense +24 | Defense +27 |
| Armour and shields | Earth / Wind / Water | Max HP +29 | Max HP +31 |
Socketing or extracting a sphere on an item that already has its bonus option can wipe that option out, so complete the set first and experiment afterwards.
Sphere destruction was replaced by extraction. The Seed Researcher takes a mounted seed sphere back out of an item as a seed of the same element — the sphere is gone, the seed remains. It costs 1 Jewel of Guardian, 5 Jewels of Chaos and 5 Jewels of Harmony; if it fails you lose the materials and the sphere stays put. Item tooltips gained a [Tier: 4] line to show the tier.
Stat specialization
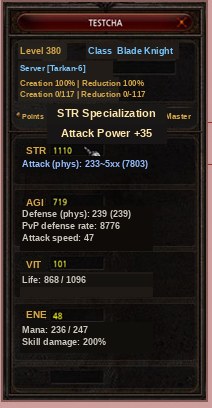
In Part 2 each class was given a base stat that feeds a bonus ability. The bonus is worked out from your total stat — points, fruits, master tree, set items and buffs all count — and is added on as attack power + specialization + weapon attack = maximum attack.
| Class | Ability | Base stat | Tier 1 | Tier 2 | Tier 3 |
|---|---|---|---|---|---|
| Dark Knight | Attack power / Defense | STR / AGI | 1–1500: 0–10% | 1501–2000: 10–30% | 2001–3000: 30–45% |
| Dark Wizard | Wizardry, attack & PvP success rate | ENE / AGI | 1–1500: 0–10% | 1501–2000: 10–30% | 2001–3000: 30–45% |
| Elf | Attack power, defense & PvP defense rate | AGI | 1–1800: 0–10% | 1801–2100: 10–30% | 2101–3000: 30–45% |
| Summoner | Wizardry / curse power | ENE | 1–1500: 0–10% | 1501–2000: 10–30% | 2001–3000: 30–45% |
| Magic Gladiator | Attack power | STR | 1–1500: 0–10% | 1501–2000: 10–30% | 2001–3000: 30–45% |
| Magic Gladiator | Wizardry | ENE | 1–1800: 0–10% | 1801–2500: 10–30% | 2501–3000: 30–45% |
| Dark Lord | Attack power / Defense | STR / AGI | 1–1500: 0–10% | 1501–2000: 10–30% | 2001–3000: 30–45% |
| Rage Fighter | Attack power | STR | 1–1500: 0–10% | 1501–2000: 10–30% | 2001–3000: 30–45% |
New skill formulas
Skill damage was re-expressed as a flat number plus a stat divided by a constant, so extra stat points keep mattering however high you go. A few examples:
| Class | Skill | Formula |
|---|---|---|
| Dark Knight | Twisting Slash | STR / 40 |
| Dark Knight | Rageful Blow | 70 + STR / 150 |
| Dark Knight | Blood Storm | 170 + STR / 200 |
| Dark Wizard | Evil Spirit | 45 + ENE / 150 |
| Dark Wizard | Hellfire | 120 + ENE / 200 |
| Dark Wizard | Earth Prison | 150 + ENE / 200 |
| Elf | Triple Shot | AGI / 100 |
| Elf | Ice Arrow | 105 + AGI / 150 |
| Elf | Poison Arrow | 130 + AGI / 100 |
| Summoner | Lightning Shock | 95 + ENE / 200 |
| Magic Gladiator | Gigantic Storm | 110 + ENE / 250 |
| Dark Lord | Electric Spark | 250 + STR / 100 |
| Dark Lord | Chaotic Diseier | 190 + STR / 150 |
| Rage Fighter | Killing Blow / Beast Uppercut / Phoenix Shot | VIT / 200 |
The Rage Fighter is the odd one out: its specialization keys off strength, yet every one of its skill formulas uses vitality.
The Fist Master tree
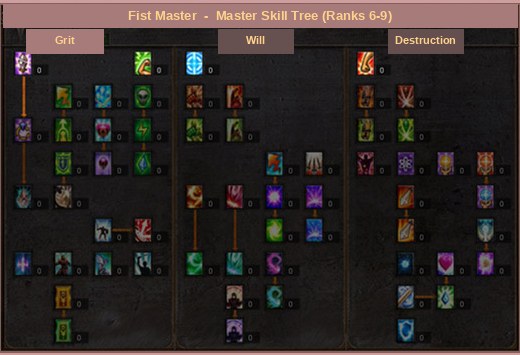
The Rage Fighter's third-class tree received 24 new skills, spread over ranks 6–9 and three branches.
| Rank | Grit | Will | Destruction |
|---|---|---|---|
| 6 | Set defense increase; Revenge (reflects damage) | Max AG increase; Dragon Roar Mastery (fire damage over time) | Max attack power; Critical damage rate |
| 7 | Energy, vitality, agility and strength stat increases | Chain Drive Mastery (ice damage over time); Dark Side Mastery (+1 tile range for 10 points); Dragon Slasher enhancement | Complete mana recovery; complete HP recovery (both on being hit); excellent damage rate; double damage rate |
| 8 | Cape of Overrule defense enhancement | Blood Howling; Dragon Slasher Mastery (2 second stun chance) | Complete SD recovery (on attacking) |
| 9 | Cape of Overrule attack enhancement | Blood Howling enhancement | Ignore enemy defense rate |
The stand-out is Blood Howling: once buffed, every attack skill has a 10% chance to bleed the target for 200 damage every half second for 10 seconds. Its rank 9 enhancement raises both the damage and the trigger chance.
Muun mounts and the Stone of Magic Power
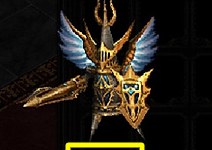
Muuns now come in two kinds. A normal muun trails behind you; a mount muun calls a mount you can ride, switched with the button in the bottom-left corner or Ctrl + Z. Riding is blocked in towns, safe zones, Chaos Castle and Illusion Temple. Evolving a mount muun changes the appearance of both the muun and the mount.
The muun window (Y) gained a sub slot. Whatever sits there keeps its function but is not shown on screen, and both slots can hold mount muuns — though never two copies of the same one. Next to the familiar stat-type function there is now a skill type: the muun fires a skill on its own timer, unlocks higher skill tiers as it levels, and carries a single fixed stat bonus that does not grow.
Recycling muuns into evolution stones
A Muun Energy Converter is sold by the town shop NPCs (Silvia in Elbeland, Fairy Lala in Noria, Isabel in Devias, Amy in Lorencia, Leina in Karutan). Drag unwanted muuns or evolution stones onto it and they are consumed for energy. When the converter reaches 120 energy it turns into a Stone of Magic Power, which Exchange Agent Monica in Elbeland (24, 229) swaps for the evolution stone of any muun currently in the game. Keep a 1×1 muun slot and a 4×4 block of normal inventory free for the exchange.
| Muun grade | Lv1 | Lv2 | Lv3 | Lv4 | Lv5 | Evolved |
|---|---|---|---|---|---|---|
| ★ | 3 | 6 | — | — | — | 8 |
| ★★ | 6 | 12 | 18 | — | — | 24 |
| ★★★ | 9 | 18 | 27 | 36 | — | 48 |
| ★★★★ | 12 | 24 | 36 | 48 | 60 | 80 |
| Stone of Evolution | 2 | 2 | 2 | 2 | 2 | 2 |
The Gremory Case
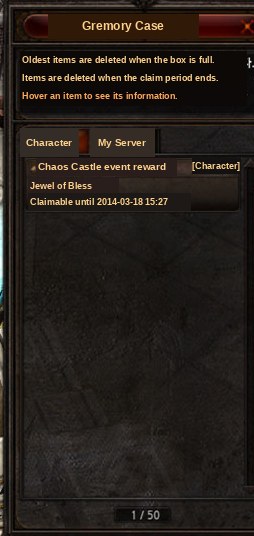
From Part 2 onwards, event-map and operator rewards no longer drop into the inventory. They wait in the Gremory Case, opened with K or from the bag menu. The Character tab is private to the character that won the item; the My Server tab is shared by all characters on that server but only one of them can take each item. Each tab holds 50 items, the oldest is deleted when a 51st arrives, and every item has an expiry date. A claim with no free inventory space simply does not go through.
Chaos Castle, Blood Castle, Illusion Temple, Doppelganger and everything on Battle Core deliver rewards this way. For Battle Core you collect on your home server: open the Battle Core pop-up, pick Reward collection, choose the event, and the items appear in the case.
Widescreen
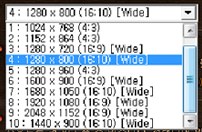
The launcher's Option settings finally list widescreen modes: 1024×768, 1152×864 and 1280×960 for 4:3 screens, and 1280×720, 1280×800, 1440×900, 1600×900, 1680×1050, 1920×1080 and 2048×1152 for 16:9 and 16:10, with a windowed option. Which ones you can pick depends on your monitor and graphics card.
Interface changes
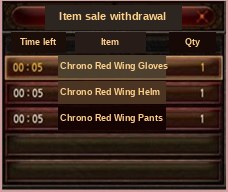
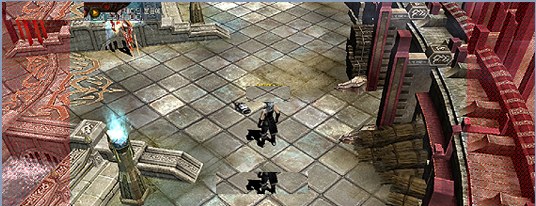
Shops got an item sale withdrawal button. Anything that raised the expensive-item warning when sold can be bought back within 24 hours at the sale price plus 10%. Only the five most recent sales are kept, and time-limited items never appear on the list.
Smaller changes rounded out the season. Quest windows moved to the left of the character, show the NPC's whole text at once, respond to number keys, and switch their last button from "Confirm" to "Complete" when a quest is ready to turn in. The game tip at the top of the screen now rolls rather than scrolling sideways. The PC-bang marker became a plain buff icon, the event and Battle Core icons were folded into a single expandable banner, and the pet HP bar moved to the right side where it can be dragged and collapsed with the minus mark — the party HP bar got the same treatment. The exit countdown has its own colour and freezes the character while the client shuts down, and items can at last be dropped on ground you cannot walk on.
- Battle Core: a cross-server arena with its own Chaos Castle.
- Monthly Plaza of Trials and Chaos Castle championships.
- Uruk Mountain, Acheron's fourth region, and the boss Lord Silvester.
- Tetra seed spheres and Tetra Crystals; sphere extraction replaces destruction.
- Stat specialization for every class and Fist Master ranks 6–9.
- Gremory Case, muun mounts and widescreen resolutions.