Most of these guides are archaeology. This one is not. The currency your event rewards are paid in, the window you apply for events from, the gear tier that ends ordinary armour, the fifth pentagram slot and the skill bar your helper reads back were all built in 2015, and all of it is still live on a Season 22 server. So this page is not sorted into Part 1, 2 and 3, but by how often you touch the thing.
Season 10 sorted by how much of it you still touch
Nothing here was removed. The split is between systems you use without thinking and ones climbed over so often that Season 10's version is now the floor, not the ceiling.
| What Season 10 built | Where you meet it in Season 22 | Still the current version? |
|---|---|---|
| Ruud | Every event payout, and the shop you spend it in | Yes, used for far more than it was built for |
| Gremory Case (K) | The mailbox delayed rewards arrive in | Yes |
| Event Map Plaza | Where you apply for every event | Yes, still the desk |
| Mastery Boxes | What finishing an event pays you | Yes, with more grades since |
| Blood Angel mastery sets | Level 400, after your third class change | No — the first rung of a longer ladder |
| Errtel of Radiance, fifth slot | Your pentagram | Yes, and still locked by default |
| Skill imprinting (U) | Hotkeys 1–0, and what the MU Helper may cast | Yes |
| Grow Lancer / Mirage Lancer | The character select screen | Yes, with later class changes on top of her |
| Master skill tree layout | Every class, every point you spend | Window yes, numbers no |
| Damage-share experience | Every monster you help kill | Yes — it is why leeching fails |
| Bulk combination | Chaos Goblin, Osbourne, Elpis | Yes, longer recipe list |
| Nars and Core Magriffy | A gate in the Acheron safe zone | No — a stop, not the endgame |
| Evomon | Only if your server switches it on | Optional |
| Drop-table pinning | Which map you farm for which item | Principle yes, lists no |
The furniture you use every day: the Plaza, the boxes, the Case
You used to apply for an event in the right town at the right NPC. One place took that over, and you still use it: reach the Event Map Plaza from the move command window (M) for 20,000 zen, or click the notification icon when an event opens. The old town NPCs no longer accept applications, which is the commonest reason a returning player thinks an event was deleted.
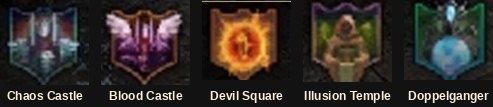
Eight desks share the Plaza, and entry requirements were flattened into shared level bands, so the four main events read identically below.
| Desk NPC | What it opens | Entry bands | How often it runs |
|---|---|---|---|
| Spirit of the Archangel | Blood Castle | 50–179 / 180–269 / 270–349 / 350–399 / 400–500 / 501–650 / 651+ | 22 times a day |
| Charon | Devil Square | The same seven bands | 22 times a day |
| Mirage | Illusion Temple | Five bands, the lowest starting at 180 | 21:00 |
| Lugard | Doppelganger | The same seven bands | 20:30 |
| Adjutant Zelint | Vulcanus | — | — |
| Priest James | The Ruud shop | — | Always open |
| Chaos Goblin | Combinations | — | Always open |
| Safety Guardian | Warehouse | — | Always open |
Those are the official 2015 times; private servers rewrite timetables, and ours runs events and mini-bosses all day. The bands matter more: the same event at level 50 and at 400 is two different fights.
Mastery Boxes, and why you sometimes finish an event with nothing
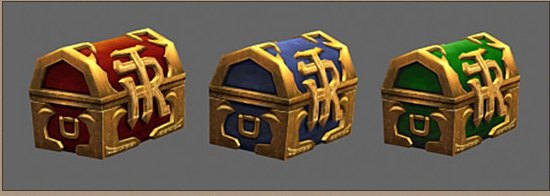
Boxes are not handed out at the door. They are paid into the Gremory Case when the event ends, only to characters at master level or above, and graded on your own contribution. Too little, and you get nothing even on a successful run.
| Event | What the server counts as your contribution |
|---|---|
| Chaos Castle | Monsters and players you killed |
| Blood Castle | Gates and statues you destroyed |
| Illusion Temple | Statues you captured |
| Vulcanus | Boss kills |
One exception, and it is why energy elves get invited: an elf with 1,500 or more energy is credited with the party's average instead of her own.
Ruud: the currency that outgrew its own patch
Ruud was introduced to buy sealed Blood Angel pieces and is now the game's general event currency. Earning it works as Season 10 set up: it comes out of Mastery Boxes, which come out of Chaos Castle, Blood Castle, Devil Square, Illusion Temple, Doppelganger and Vulcanus. There is no other tap.
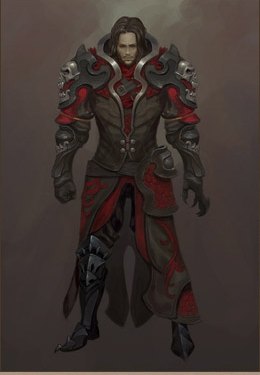
It sits at the bottom of your inventory (I) like a second zen counter and behaves nothing like it: it is welded to the character that earned it.
| Can you… | Zen | Ruud |
|---|---|---|
| Trade it to another player | Yes | No |
| Put it through a personal store | Yes | No |
| Move it between your own characters via the vault | Yes | No |
| Drop it on the ground | Yes | No |
| Spend it at an ordinary NPC | Yes | No — Priest James only |
| Get it back by selling what you bought | n/a | No, the item resells for zen only |
Pick your main before you grind events: Ruud earned on an alt is stuck there.
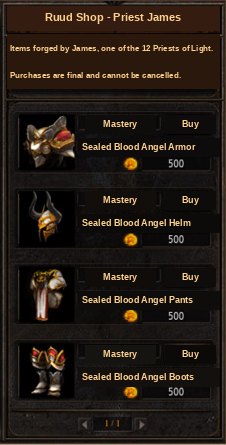
Everything on his shelf is sealed, and sealed pieces cannot be worn. He shows one set, for the class talking to him.
Blood Angel: the bottom rung of the mastery ladder
This is the part that moved most. Blood Angel was built as endgame armour for level 400 characters past their third class change, and that is still where you meet it — except endgame has climbed several tiers, so it is now the first mastery set you own rather than the last. The mechanic was kept and the numbers raised.
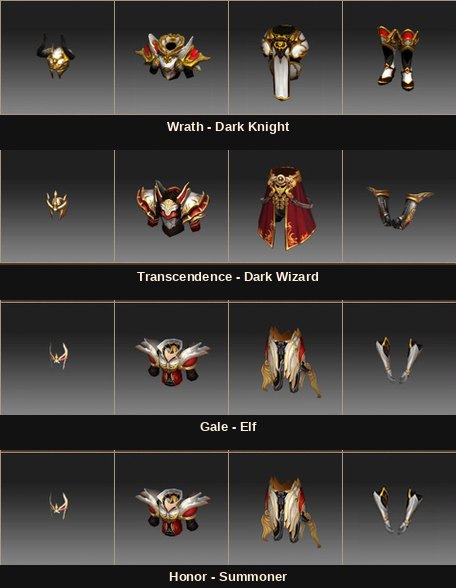
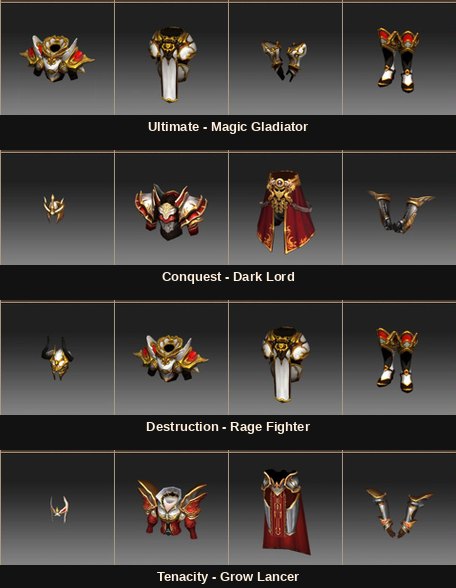
| Class | Set | Four pieces |
|---|---|---|
| Grow Lancer | Blood Angel Set of Tenacity | Helm · armour · pants · gloves |
| Dark Knight | Blood Angel Set of Wrath | Helm · armour · pants · boots |
| Rage Fighter | Blood Angel Set of Destruction | Helm · armour · pants · boots |
| Magic Gladiator | Blood Angel Set of the Ultimate | Armour · pants · gloves · boots (no helm) |
| Dark Wizard | Blood Angel Set of Transcendence | Helm · armour · pants · gloves |
| Elf | Blood Angel Set of Gale | Helm · armour · pants · gloves |
| Summoner | Blood Angel Set of Honor | Helm · armour · pants · gloves |
| Dark Lord | Blood Angel Set of Conquest | Helm · armour · pants · gloves |
Three grades: two farmed, one bought.
| Grade | How you get it | What that means for your route |
|---|---|---|
| Set | Bought sealed from Priest James with Ruud, then unsealed | The reliable path: run events, bank Ruud, buy on purpose |
| Excellent | Drops on Nars and nowhere else | The only reason to go to Nars |
| Normal | Drops in Debenter and Uruk Mountain | Incidental, seen while levelling |
Unsealing, and the ancient sets you were about to throw away

A sealed piece needs a Soul of the Ancient Hero, made at the Chaos Goblin from an ancient set upgraded to +11 or higher, weapons and accessories excluded. That combination passes 80% of the time. Soul plus sealed item then unseals at a flat 100%, and the piece equips and counts toward the set bonuses.
Budget for that first step: four pieces means four Souls at 80% each. On our server the custom jewel system is where the upgrading happens.
What the four pieces buy you
Bonuses stack, and three pieces to four is where the set stops being armour and becomes a build.
| Pieces worn | What switches on |
|---|---|
| 2 | Skill attack power +25, and +50 to your class's main stat option — energy for the Dark Wizard and the Summoner |
| 3 | Double damage rate +10% and attack power +50, reading as wizardry for those same two classes |
| 4 | Critical damage rate +15%, excellent damage rate +15%, ignore enemy defense 5%, all stats +10, base defense +20, critical damage +30, excellent damage +30 |
Every mastery piece also carries one exclusive stat option worth 15–30 to one stat or 7–15 across all of them, and excellent mastery armour rolls from its own pool.
| Option on excellent mastery armour | Value | New in Season 10? |
|---|---|---|
| Zen from monsters | +43% | New |
| Max HP | +165 | New |
| Max mana | +165 | New |
| Damage decrease | 45 | New |
| Defense success rate | +10% | Existing |
| Damage reflect | 5% | Existing |
The Grow Lancer, if you want to play her
Part 1 added the third female class, and the only one with two separate damage pools. The second class change makes her a Grow Lancer, the third a Mirage Lancer.
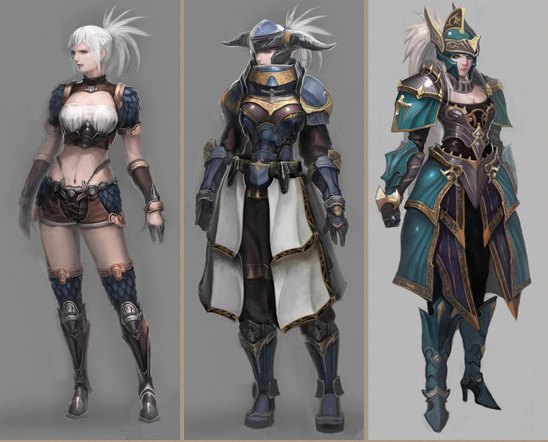
| Attribute | Grow Lancer | In play |
|---|---|---|
| Account requirement | A character of level 200 or higher already on the account | Never your first character |
| Starting town | Lorencia | Standard opening route |
| Base stats | HP 110 · MP 40 · STR 30 · AGI 30 · VIT 25 · ENE 24 | An even strength/agility split, which is the point |
| Equipment slots | Five armour pieces plus lance and shield | The shield slot is always in use |
| Punishment attack power | Scales with strength | Raw hitting power |
| Wrath attack power | Scales with agility | Attack speed and elemental damage |
| Defence from agility | 0–10% up to 1,500 AGI, 10–30% up to 2,000, 30–45% up to 3,000 | Agility defends her as well as arming her |
| Set party | Dark Wizard + Elf + Grow Lancer | Counts for the set-party experience bonus |
Both pools feed her skill damage, so neither a pure strength nor a pure agility build wastes anything.
Her skills, in the order you unlock them
The gate is the unusual part: her skills come from scrolls with stat requirements, not level requirements, so you can be past the level and still locked out for spreading your points. Ordered below by when you get each one, gate in place of level.
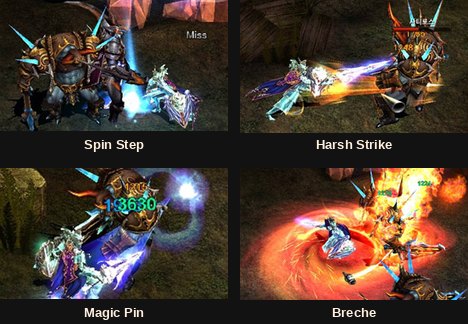
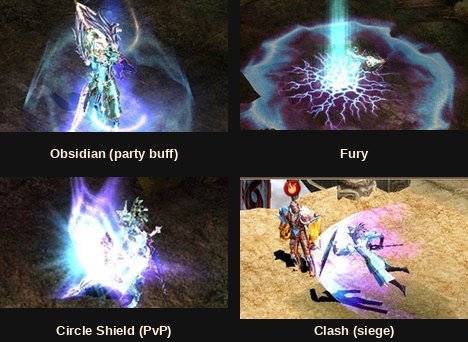
| Skill | Gate | Range | Damage | Mana / AG | Role |
|---|---|---|---|---|---|
| Fury | Level 66 | Self | — | 100 / 50 | Trades defence for attack power; your first power button |
| Harsh Strike | 150 strength | 3 | 100 | 12 / 0 | Slash into thrust, paid out of Punishment |
| Obsidian | Level 74 | Party | — | 50 / 50 | Converts your strength into the party's skill attack power |
| Magic Pin | 300 strength and 300 agility | 2 | 80 | 30 / 20 | Three thrusts in sequence, paid out of Wrath |
| Spin Step | 150 agility | 2 | 100 | 12 / 0 | Hits the target and everything beside it; your farming key |
| Shining Peak | 200 energy, level 220 | 3 | 70 | 60 / 25 | Projectile drawing on both pools at once |
| Circle Shield | Quest from NPC Marlon at 220 | Self | — | 100 / 50 | PvP only: a chance to strip the enemy's AG |
| Breche | Level 300 | 3 | 400 | 25 / 45 | Area strike on up to four monsters; the damage is not a typo |
| Clash | Castle Siege only | 6 | 50 | 50 / 50 | Charge that shoves defenders off a position |
Magic Pin's 300/300 double gate is the most expensive unlock in the kit, and Circle Shield is the only one behind a quest, so if it never appears you missed Marlon.
Her gear ladder
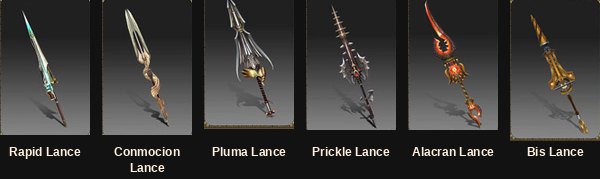
Six lances in two speed classes, paired at near-identical drop levels. The choice at every rung is Wrath damage from the faster lance against Punishment from the slower.
| Bracket | Faster lance (speed 40) | Drops from | Slower lance (speed 35) | Drops from |
|---|---|---|---|---|
| Early | Rapid Lance | 15, excellent at 40 | Prickle Lance | 22, excellent at 47 |
| Middle | Conmocion Lance | 65, excellent at 90 | Alacran Lance | 67, excellent at 92 |
| Late | Pluma Lance | 85, excellent at 110 | Bis Lance | 87, excellent at 112 |
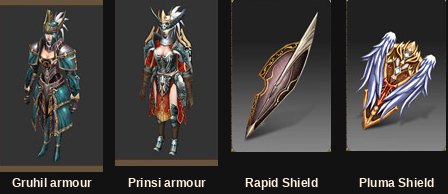
Three armour lines cover the curve, with two shields alongside; on high exp you pass all three in an evening.
| Line | Starts dropping at level |
|---|---|
| Robust | 10 |
| Gruhil | 40 |
| Prinsi | 60 |
| Rapid and Pluma shields | Alongside the lines above |
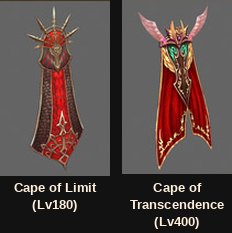
The capes are her signature slot: she pays life for damage as a standing cost of attacking.
| Cape of Limit | Cape of Transcendence | |
|---|---|---|
| Required level | 180 | 400 |
| Defense | 15 + (level × 2) | 45 + (level × 4) |
| Damage increase | 20 + (level × 2) | 39 + (level × 2) |
| Damage absorb | 10 + (level × 2) | 39 + (level × 2) |
| HP cost per landed attack | 1 | 3 |
| Random options rolled | Three, from HP or mana +50 + (level × 5), or a 3% chance to ignore defense | Drawn from a stronger pool: 5% ignore defense, 5% damage reflect, 5% full HP recovery, 5% full mana recovery |
| Crafted from | A first-tier wing, Crest of Lexmilon, Jewel of Chaos, and an excellent item +4 with four options | Condor's Feather, Condor's Flame, Jewel of Chaos, 10× Bless, 10× Soul, Jewel of Creation, and an excellent item +9 with four options |
The master skill window, and the numbers that have moved since
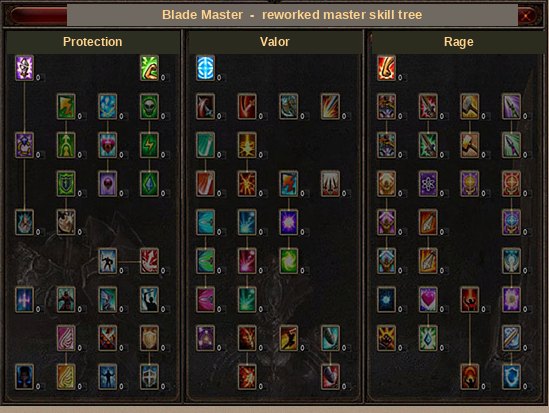
Part 1 rebuilt the master trees for all seven existing classes at once. The layout you still use, ranks 7 to 9, and the rule that mana and AG costs climb with a skill's grade all date from here. The values do not.
Two baseline changes set the pattern: stat nodes went from 12 to 14 points per investment, cap 90 to 108, and durability reduction from 12% to 18%, cap 90% to 135%. Damage nodes were lifted in the same pass — Blood Storm's cooldown halved from 10 seconds to 5, to 3 strengthened, its strengthener going 5 to 11; Hellfire and Ice strengtheners 6 to 14; the Dimension Master's Drain Life mastery 12 to 102 against a cap of 766.
The nodes that changed how classes defend
The durable half is defensive, and it introduced feedback you still read in combat: Parry, Absorb and Block popping over your character are Season 10 nodes firing. Shared nodes and class additions are listed together, since one pool of points buys both.
| Node | Who gets it | Rank | What it does |
|---|---|---|---|
| Life Absorption | Shared | 7 | Half your successful hits drain HP off the target |
| Weapon Block | Shared | 8 | With a sword, mace, spear or axe equipped, a chance to parry physical hits. Magic goes through. Reads Parry. |
| Shield Block | Shared | 8 | With a shield equipped, a chance to eat damage using the shield's own defense rate. Reads Absorb. |
| Strong Will | Shared | 9 | Harder to stun, harder to knock back |
| Steel Armor | Shared | 9 | Base defense equal to the points invested, and it cannot be ignored |
| Guardian Shield | Shared | 9 | With a shield equipped, a chance to block the hit outright. Reads Block. |
| Shield Absorption | Shared | 9 | Half your successful hits drain SD off the target |
| Charge | Blade Master | — | Closes up to 5 tiles and lands a heavy hit. 5 second cooldown. |
| Iron Defense | Blade Master | — | Up to +800 defense and HP for 10 seconds, plus status immunity. 30 second cooldown. |
| Illusion | Grand Master | — | A phantom fights your target for 45 seconds and has a 30% chance to soak damage aimed at you. 2 minute cooldown. |
| Shadow Step | High Elf | — | Dash 5 tiles in any direction. 3 second cooldown. |
| Evasion | High Elf | — | A short spike in defense success rate and PvP defense rate. 1 minute cooldown. |
| Paralyze | Dimension Master | — | Slows everything around you. 30 second cooldown; the rank 9 version adds bleeding. |
Mirage Lancer's three branches
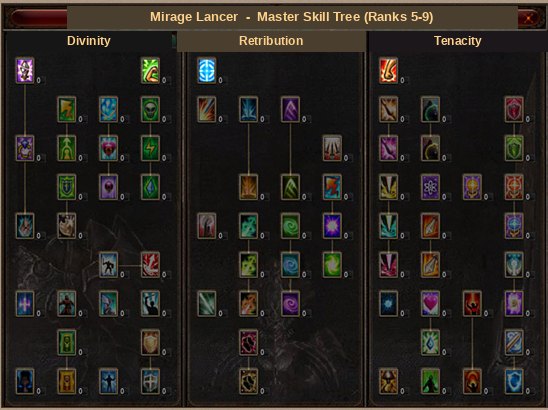
Her tree splits three ways, and the branch you commit to decides what she is for. Tenacity hides the best single node in it: Fury mastery removes Fury's defence penalty, turning a trade-off into a free buff.
| Branch | Build it for | What sits in it |
|---|---|---|
| Retribution | Skill damage | Enhancements to Obsidian, Magic Pin, Breche and Shining Peak; Magic Pin's range pushed to 3 and Breche's area to 4; plus the new Armor Breaker skill, a temporary ignore-defense spike, and its cooldown reduction |
| Tenacity | Sustained output | Fury proficiency and mastery, which removes Fury's defence penalty; attack power and critical, excellent and double damage rates; full mana, HP and SD recovery; Life and Shield Absorb; rank 9 boosts to both Punishment and Wrath |
| Divinity | Staying alive | Set defense, Revenge, all four stat nodes, Cape of Transcendence defense and attack enhancement, Shield Block, Strong Will, Steel Armor, Guardian Shield |
The elemental layer you will actually touch
Part 3 was the quiet one, and it shapes how a level 400+ character gears today.
The fifth slot and the Errtel of Radiance
The Errtel of Radiance is the fifth errtel and goes in the fifth pentagram slot, which ships locked. Open it with a Radiance Slot Expansion Scroll — four Radiance Slot Fragments combined, or pulled whole from an Elemental Capsule — then right-click the pentagram in your inventory and click the slot. There is no NPC to hand it to.
Rank decides what the slot gives you, and the progression is not smooth: rank 1 is numbers, rank 2 survivability, rank 3 crowd control and the reason to open it.
| Rank | Character | Options it can roll |
|---|---|---|
| 1 | Flat stats | Elemental attack power II and III, elemental defense II and III, elemental attack success rate II, elemental defense success rate II |
| 2 | Defensive | Bastion — below 20% SD, a chance at a buff cutting incoming elemental damage by 90%; Shield Absorb — elemental damage absorbed as SD; Life Drain — absorbed as HP instead |
| 3 | Control | Bind — the target cannot move; Paralysis — movement and recovery slowed; Blindness — the target's attack success rate collapses; Bleeding — damage ticking over time; Punishment — critical elemental hits tear a percentage off the target's HP |
A rank-up switches on one option of the new rank at random, and you can only rank up once every activated option sits at +7.
Skill imprinting, and why your helper ignores half your bar
Register a skill and, when its element matches your equipped pentagram's, it gains extra skill attack power, scaled by the pentagram's upgrade level and the errtels in it. Imprinted skills are marked in the icon corner.
Ten slots: five basic skills on hotkeys 1 to 5 and five special skills — siege skills and the Dark Lord's Dark Spirit commands — on 6 to 0. Special skills get no elemental bonus. The part that catches everybody: the MU Helper only casts skills you have imprinted, so changing an imprint silently reconfigures your AFK farming, which on high exp is most of your levelling.
Combination and dismantling
Elemental crafting moved to NPC Adniel — Elbeland (37, 215) and Acheron (38, 216) — in a window that previews the outcome, keeps materials registered between attempts, and drops the result into the Gremory Case rather than failing on a full inventory. Every recipe got simpler at the same time.
| Recipe | What it costs now | What that replaced |
|---|---|---|
| Mithril from fragments | 5 fragments convert straight to Mithril | 5 fragments → bundle → Mithril |
| Errtel creation | Mithril + Jewel of Bless | Mithril + Elixir + Jewel of Bless, with Elixir removed from the game entirely |
| Errtel level up | Errtel + Elemental Runes | Errtel + Jewel Combination Frame + Jewel of Bless |
| Errtel rank up | Errtel + Bundle of Bless + Spirit Powder + a level 7 set item with 4 or more options | Errtel + Bless + Soul + Spirit Powder + a level 7 set item |
Elemental Runes come from the town NPCs Amy, Fairy Lara, Silvia and Isabel, and from Elemental Capsules. The count climbs with level and rank, from one rune at rank 1 level 1 to 11 at rank 3 level 10.
Dismantling is the half nobody uses enough. Set items and errtels break down from the inventory for 1 Elemental Powder each; 50 powder makes an Elemental Capsule, which needs 4×4 free space and can hold Errtels of Radiance, Radiance slot fragments, Elemental Runes and mid-tier pentagrams. Levelling junk becomes the exact materials this system runs on.
Two more rules hold. Pulling an errtel out of a pentagram requiring level 299 or below always works; from level 300+ you need Spirit's Protection for a guaranteed 100%. And pentagram level requirements were cut — the Lorencia Knights' Iron Wall Shield, Hero's Elixir and Gladiator's Dagger from 300 to 150, their magic-imbued versions to 180, Etramu's Scroll from 200 to 150.
Nars and Core Magriffy: a destination demoted to a stop
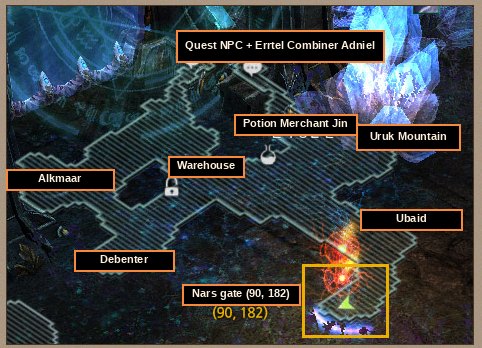
Nars was the sixth Acheron region and, in 2015, the hardest ground in the game. On a Season 22 server it has one reason to exist for you: excellent Blood Angel gear drops here and nowhere else. Arca War and the Acheron Guardian do not run here. Two field gate pairs cut the walking; the boss sits behind a third.
| Gate | Links | With |
|---|---|---|
| Blue field gate | (42, 80) | (215, 34) |
| Red field gate | (41, 98) | (109, 230) |
| Core Magriffy's Nest | (179, 148) | The boss arena |
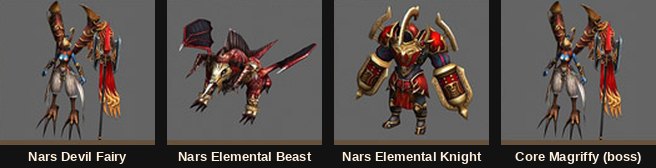
Read the elemental columns first: these were the strongest elemental monsters in the game, and the three residents are close enough that no spawn is worth preferring over another.
| Monster | Lv | HP | Elem. attack | Elem. defense | Attack | Defense | Def. rate |
|---|---|---|---|---|---|---|---|
| Nars Devil Fairy | 116 | 80,000 | 860–890 | 520 | 820–855 | 770 | 410 |
| Nars Elemental Beast | 118 | 90,000 | 900–930 | 540 | 880–910 | 800 | 420 |
| Nars Elemental Knight | 120 | 92,000 | 940–980 | 560 | 920–950 | 830 | 430 |
| Core Magriffy | 190 | 9,750,000 | — | — | — | — | — |
The boss has roughly a hundred times the HP of anything else here. He respawns every 24 hours with a random element — check it before engaging — and has four tricks.
| Ability | What happens | What to do about it |
|---|---|---|
| Poison | Rides along on his ordinary attacks | Chip damage all fight |
| Tornado | Whirlwinds spin up in four directions | Do not line up with him |
| Roar | Damage plus knockback | Costs uptime, not health |
| Clone | Splits into two identical bodies. Hit the wrong one and Berserk fires, adding a permanent +100 attack power that stacks every time it triggers | The actual fight: guess wrong repeatedly and he out-scales you |
He regenerates every second if you stop hitting him, so a party that cannot sustain damage through the Clone phase never finishes him. He drops 4 items, including pentagrams and three mount muuns.
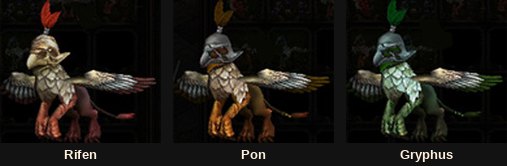
| Mount muun | Grade | Base ability, active 13:00–24:00 |
|---|---|---|
| Gryphus | ★★★ | Attack, wizardry and curse power up |
| Rifen | ★★★ | Elemental attack power up |
| Pon | ★★★ | Elemental defense up |
All three run at 15× their base ability for their first 30 days, so use one the day you get it.
Evomon: the one part that may not exist on your server
Evomon is the third case: a self-contained event servers switch on or off, so check your event list before planning around it.
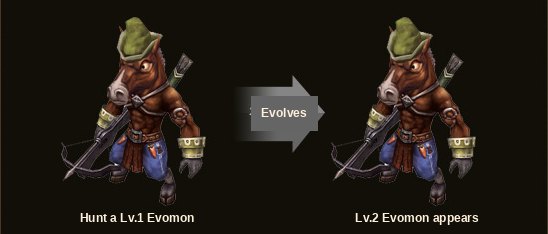
Field monsters drop Summon Scroll Fragments; twenty-five combine on their own in the event inventory into an Evomon Summon Scroll. Throw it on the ground and a level 1 Evomon spawns, owned by you. Kill it and the chain evolves a step or breaks. Push one past level 30 and every new scroll starts 4 levels above the last, to a ceiling of level 69.
Breaking the restrictions wastes a scroll. No throwing in a safe zone, or inside Chaos Castle, Blood Castle, Devil Square, Illusion Temple, Vulcanus, Doppelganger, Icarus or Kalima. One Evomon per player or party on the field. And there is a time limit: let it expire and the scroll pays nothing.
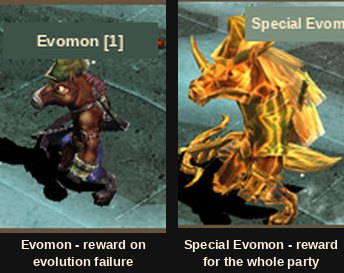
The two types pay in opposite ways, which is easy to get backwards. A normal Evomon pays when the chain finally fails; a golden Special Evomon pays the whole party on a successful hunt. Rewards go to the Gremory Case, and your ranking entry is the highest level you managed plus one, shown top-left.
The rules underneath your levelling
Experience follows damage
Hunting experience rose across every band — a level 100 character on a Yeti from 275 to 439, a level 300 character on Alquamos from 1,132 to 1,912, a level 500 character on Erohim from 4,811 to 5,736. The rule that came with those figures matters more: your share of a kill is your share of the damage. Deal 60,000 of a 100,000 HP monster and you take 60% of the solo experience while your partner takes 40%.
Party experience is calculated from the highest-level member's solo value and split by level ratio, with a flat bonus for size and a better one for a set party.
| Party of | 2 | 3 | 4 | 5 |
|---|---|---|---|---|
| Normal party bonus | 30% | 60% | 90% | 120% |
| Set party bonus | — | 70% | 105% | 140% |
Which is why a five-person set party is the standard shape, and a passenger is worth less than an empty slot.
Bulk combination, which saves you an hour
Several recipes run in batches, with materials and cost scaled to quantity and the success rate rolled per item rather than once for the stack.
| NPC | Batch sizes |
|---|---|
| Chaos Goblin | SD potions ×32, potions of bless and soul ×25, fruits ×16, gold and silver boxes ×16, Devil Square invitations ×8, invisibility cloaks ×6, dinorants ×2 |
| Elpis | Jewel of Harmony ×32 |
| Osbourne | Refining stones ×8 |
Where things drop
Part 3 pinned the item table to specific hunting grounds. The lists have been revised since, but the principle is permanent. Season 10's assignments were potions and town portal scrolls to Lorencia, Elbeland, Noria, Devias and Dungeon; spell scrolls and orbs to matching level ranges; excellent pendants and rings to Atlans, Lost Tower 6–7 and Tarkan; one sphere tier each to Karutan, Aida 2, Vulcanus and Kanturu Ruins; level 380 gear to Kanturu Ruins 3 and Kanturu Relics, skill weapons restricted to the Dark Iron Knight; gemstones to the Tower of Refinement alone.
Two side effects still matter. Monsters began dropping the excellent version of whatever they visibly carry, so what a monster holds tells you what it can give you. And the field bosses Ice Queen, Gorgon, Balrog, Death King, Hydra and Zaikan got their own excellent drop tables on a 24 hour respawn with a single spawn each. Elemental items stopped dropping from Ice Queen, Gorgon, Balrog, Hydra, Phoenix of Darkness and Hell Maine, moving to Atlans, Ubaid, Alkmaar, Debenter, Uruk Mountain and Nars. Blood Castle and Devil Square monsters were capped at equipment tiers 1 to 4.
Interface changes you use without noticing
Class-change quests became trackable in the My Quest window (T), with a live journal that turns green on completion. A Play Guide opens from the HELP icon or F1. Buff-type cash shop items extend up to 50 days when you use the same product again instead of overwriting the timer. At Uruk Mountain, approaching Lord Silvester seals six entrances behind you; leave the area empty for 60 seconds and the gates reopen with the boss at full HP.
What later seasons buried
- Blood Angel is no longer the top tier. It is the first mastery set you own at 400.
- Nars is not the endgame map. Its monsters sit at 116 to 120: go for drops and the boss, not experience.
- The master skill values are historical. The window and ranks 7–9 are current; the numbers have been raised since.
- The event schedule is gone. Twenty-two Blood Castle runs and a 21:00 Illusion Temple are 2015's official timetable.
- Elixir no longer exists, so any guide still listing it predates this patch.
Not buried: Ruud, the Gremory Case, the Event Map Plaza, Mastery Boxes, the fifth pentagram slot, skill imprinting, damage-share experience and the Grow Lancer herself.
What to do about Season 10
- Pick your main before you farm events. Ruud never leaves the character that earned it.
- Learn the Plaza first. M, 20,000 zen, or the notification icon.
- Contribute, do not attend. Boxes are graded on what you did, and too little means nothing.
- Stockpile ancient sets before you spend Ruud. Four pieces need four Souls at 80% each, from +11 sets.
- Open the fifth pentagram slot and aim at rank 3, where the control options are.
- Re-check your imprints whenever you change your bar, because the MU Helper casts only what is imprinted.
- Dismantle set junk instead of selling it: fifty powder is a capsule.
- Do not level on Nars. Take the drops, try the boss, leave.
Our server runs Season 22 on the latest server files, opens on 30 October 2026, with high exp, stats capped at 32,700, events and mini-bosses all day and a custom jewel system. All of the plumbing above is live on it. Make an account, then read Season 11 for what happened to the mastery ladder next, or browse the full guide index.
- Still live: Ruud, the Gremory Case, the Event Map Plaza and Mastery Boxes.
- Ruud is character-bound — no trade, no store, no vault, no dropping, and only Priest James takes it.
- Blood Angel is the first mastery set at level 400, not the last: four pieces, four Souls at 80% each.
- The fifth pentagram slot ships locked; a Radiance Slot Expansion Scroll opens it.
- The MU Helper only casts skills you have imprinted with U.
- Experience follows damage share, so a passenger in your party earns nothing.
- Nars is a stop, not a destination: drops and Core Magriffy, not levels.