La mayoría de estas guías son arqueología. Esta no. La moneda con la que se te pagan las recompensas de los eventos, la ventana desde la que te postulas a los eventos, el nivel de equipo que termina con la armadura común, la quinta ranura del pentagram y la barra de habilidades que tu helper lee se construyeron todos en 2015, y todo eso sigue vivo en un servidor Season 22. Así que esta página no está ordenada en Parte 1, 2 y 3, sino según la frecuencia con la que tocas cada cosa.
Season 10 ordenada según cuánto de ella sigues tocando
Nada de esto fue eliminado. La división está entre los sistemas que usas sin pensarlo y los que has superado tantas veces que la versión de Season 10 ahora es el piso y no el techo.
| Lo que construyó Season 10 | Dónde te lo encuentras en Season 22 | ¿Sigue siendo la versión actual? |
|---|---|---|
| Ruud | Cada pago de evento, y la tienda donde lo gastas | Sí, usado para mucho más de aquello para lo que se creó |
| Gremory Case (K) | El buzón donde llegan las recompensas diferidas | Sí |
| Event Map Plaza | Donde te postulas a cada evento | Sí, sigue siendo el mostrador |
| Mastery Boxes | Lo que te paga terminar un evento | Sí, con más grados desde entonces |
| Blood Angel mastery sets | Nivel 400, después de tu tercer cambio de clase | No — el primer escalón de una escalera más larga |
| Errtel of Radiance, quinta ranura | Tu pentagram | Sí, y sigue bloqueada por defecto |
| Imprinting de habilidades (U) | Teclas 1–0, y lo que el MU Helper puede lanzar | Sí |
| Grow Lancer / Mirage Lancer | La pantalla de selección de personaje | Sí, con cambios de clase posteriores encima de ella |
| Diseño del árbol de master skills | Cada clase, cada punto que gastas | La ventana sí, los números no |
| Experiencia por reparto de daño | Cada monstruo que ayudas a matar | Sí — es por eso que el leeching no funciona |
| Combinación en lote | Chaos Goblin, Osbourne, Elpis | Sí, con una lista de recetas más larga |
| Nars y Core Magriffy | Una puerta en la zona segura de Acheron | No — una parada, no el endgame |
| Evomon | Solo si tu servidor lo activa | Opcional |
| Fijación de las tablas de drop | Qué mapa farmeas para qué ítem | El principio sí, las listas no |
El mobiliario que usas todos los días: la Plaza, las cajas y la Case
Antes te postulabas a un evento en el pueblo correcto con el NPC correcto. Un solo lugar se hizo cargo de eso, y lo sigues usando: llega al Event Map Plaza desde la ventana del comando de movimiento (M) por 20,000 zen, o haz clic en el icono de notificación cuando se abre un evento. Los viejos NPC de los pueblos ya no aceptan postulaciones, que es la razón más común por la que un jugador que regresa cree que un evento fue eliminado.
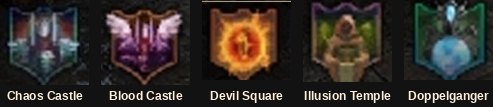
Ocho mostradores comparten la Plaza, y los requisitos de entrada se unificaron en bandas de nivel compartidas, así que los cuatro eventos principales se leen igual abajo.
| NPC del mostrador | Qué abre | Bandas de entrada | Cada cuánto se corre |
|---|---|---|---|
| Spirit of the Archangel | Blood Castle | 50–179 / 180–269 / 270–349 / 350–399 / 400–500 / 501–650 / 651+ | 22 veces al día |
| Charon | Devil Square | Las mismas siete bandas | 22 veces al día |
| Mirage | Illusion Temple | Cinco bandas, la más baja empezando en 180 | 21:00 |
| Lugard | Doppelganger | Las mismas siete bandas | 20:30 |
| Adjutant Zelint | Vulcanus | — | — |
| Priest James | La tienda de Ruud | — | Siempre abierta |
| Chaos Goblin | Combinaciones | — | Siempre abierta |
| Safety Guardian | Bóveda | — | Siempre abierta |
Esos son los horarios oficiales de 2015; los servidores privados reescriben los horarios, y el nuestro corre eventos y mini-bosses todo el día. Las bandas importan más: el mismo evento a nivel 50 y a nivel 400 son dos peleas distintas.
Las Mastery Boxes, y por qué a veces terminas un evento sin nada
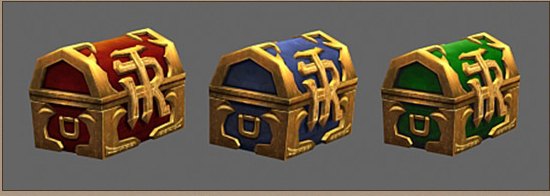
Las cajas no se reparten en la puerta. Se pagan a la Gremory Case cuando el evento termina, solo a los personajes de master level o superior, y se gradúan según tu propia contribución. Si aportas demasiado poco, no recibes nada ni siquiera en una corrida exitosa.
| Evento | Qué cuenta el servidor como tu contribución |
|---|---|
| Chaos Castle | Monstruos y jugadores que mataste |
| Blood Castle | Puertas y estatuas que destruiste |
| Illusion Temple | Estatuas que capturaste |
| Vulcanus | Bosses eliminados |
Una excepción, y es por eso que invitan a las elfas de energía: a una Elf con 1,500 o más de energía se le acredita el promedio del party en lugar de lo suyo.
Ruud: la moneda que superó a su propio parche
Ruud se introdujo para comprar piezas Blood Angel selladas y hoy es la moneda general de eventos del juego. Ganarlo funciona como lo estableció Season 10: sale de las Mastery Boxes, que salen de Chaos Castle, Blood Castle, Devil Square, Illusion Temple, Doppelganger y Vulcanus. No hay otra fuente.
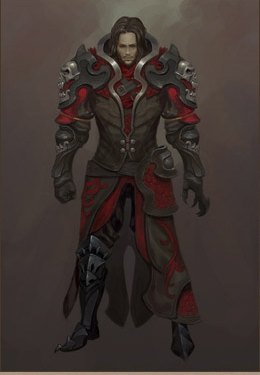
Se ubica al final de tu inventario (I) como un segundo contador de zen y no se comporta para nada como él: está soldado al personaje que lo ganó.
| ¿Puedes… | Zen | Ruud |
|---|---|---|
| Intercambiarlo con otro jugador | Sí | No |
| Pasarlo por una tienda personal | Sí | No |
| Moverlo entre tus propios personajes por la bóveda | Sí | No |
| Tirarlo al suelo | Sí | No |
| Gastarlo con un NPC común | Sí | No — solo con Priest James |
| Recuperarlo vendiendo lo que compraste | n/a | No, el ítem se revende solo por zen |
Elige tu main antes de farmear eventos: el Ruud ganado en un alt se queda atrapado ahí.
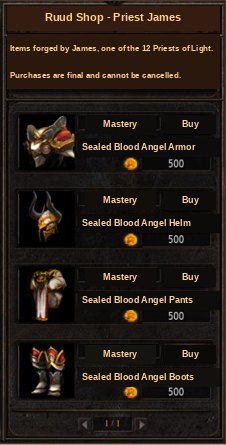
Todo lo que hay en su estantería está sellado, y las piezas selladas no se pueden equipar. Muestra un solo set, el de la clase que habla con él.
Blood Angel: el escalón más bajo de la escalera mastery
Esta es la parte que más se movió. Blood Angel se construyó como armadura de endgame para personajes de nivel 400 pasado su tercer cambio de clase, y ahí sigues encontrándola — excepto que el endgame subió varios niveles, así que ahora es el primer set mastery que tienes y no el último. La mecánica se mantuvo y los números subieron.
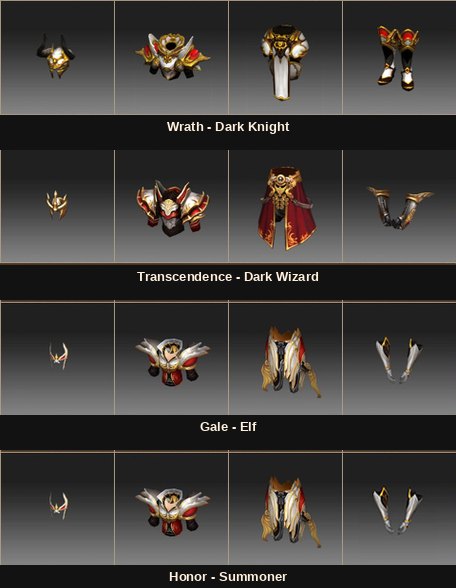
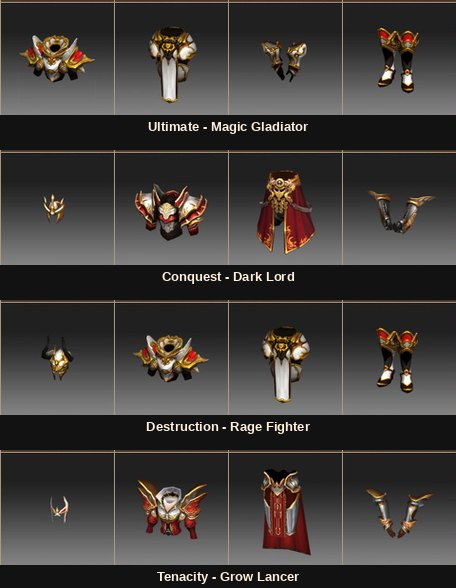
| Clase | Set | Cuatro piezas |
|---|---|---|
| Grow Lancer | Blood Angel Set of Tenacity | Casco · armadura · pantalones · guantes |
| Dark Knight | Blood Angel Set of Wrath | Casco · armadura · pantalones · botas |
| Rage Fighter | Blood Angel Set of Destruction | Casco · armadura · pantalones · botas |
| Magic Gladiator | Blood Angel Set of the Ultimate | Armadura · pantalones · guantes · botas (sin casco) |
| Dark Wizard | Blood Angel Set of Transcendence | Casco · armadura · pantalones · guantes |
| Elf | Blood Angel Set of Gale | Casco · armadura · pantalones · guantes |
| Summoner | Blood Angel Set of Honor | Casco · armadura · pantalones · guantes |
| Dark Lord | Blood Angel Set of Conquest | Casco · armadura · pantalones · guantes |
Tres grados: dos se farmean, uno se compra.
| Grado | Cómo lo consigues | Qué significa eso para tu ruta |
|---|---|---|
| Set | Comprado sellado a Priest James con Ruud, y luego desellado | La vía confiable: corre eventos, junta Ruud, compra a propósito |
| Excellent | Dropea en Nars y en ningún otro lado | La única razón para ir a Nars |
| Normal | Dropea en Debenter y Uruk Mountain | Incidental, lo ves mientras subes de nivel |
Desellar, y los sets ancient que estabas por tirar

Una pieza sellada necesita un Soul of the Ancient Hero, hecho en el Chaos Goblin a partir de un set ancient mejorado a +11 o más, excluyendo armas y accesorios. Esa combinación sale bien el 80% de las veces. El Soul más el ítem sellado desellan después a un 100% fijo, y la pieza se equipa y cuenta para los bonos de set.
Presupuesta ese primer paso: cuatro piezas significan cuatro Souls al 80% cada uno. En nuestro servidor el sistema de joyas personalizado es donde ocurre la mejora.
Qué te dan las cuatro piezas
Los bonos se acumulan, y pasar de tres piezas a cuatro es donde el set deja de ser armadura y se convierte en una build.
| Piezas equipadas | Qué se activa |
|---|---|
| 2 | Poder de ataque de habilidad +25, y +50 a la opción de estadística principal de tu clase — energía para el Dark Wizard y el Summoner |
| 3 | Tasa de daño doble +10% y poder de ataque +50, que se lee como wizardry para esas dos mismas clases |
| 4 | Tasa de daño crítico +15%, tasa de daño excellent +15%, ignorar defensa enemiga 5%, todas las estadísticas +10, defensa base +20, daño crítico +30, daño excellent +30 |
Cada pieza mastery también lleva una opción de estadística exclusiva que vale 15–30 en una estadística o 7–15 repartido entre todas, y la armadura mastery excellent rolea desde su propio pool.
| Opción en armadura mastery excellent | Valor | ¿Nueva en Season 10? |
|---|---|---|
| Zen de los monstruos | +43% | Nueva |
| HP máximo | +165 | Nueva |
| Maná máximo | +165 | Nueva |
| Reducción de daño | 45 | Nueva |
| Tasa de éxito de defensa | +10% | Existente |
| Reflejo de daño | 5% | Existente |
La Grow Lancer, si quieres jugarla
La Parte 1 agregó la tercera clase femenina, y la única con dos pools de daño separados. El segundo cambio de clase la convierte en Grow Lancer, el tercero en Mirage Lancer.
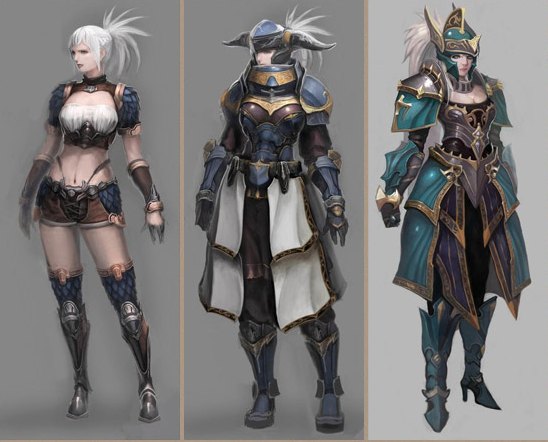
| Atributo | Grow Lancer | En la práctica |
|---|---|---|
| Requisito de cuenta | Un personaje de nivel 200 o superior ya en la cuenta | Nunca tu primer personaje |
| Pueblo inicial | Lorencia | Ruta de inicio estándar |
| Estadísticas base | HP 110 · MP 40 · STR 30 · AGI 30 · VIT 25 · ENE 24 | Un reparto parejo entre fuerza y agilidad, que es justamente el punto |
| Ranuras de equipo | Cinco piezas de armadura más lanza y escudo | La ranura del escudo siempre está en uso |
| Poder de ataque Punishment | Escala con la fuerza | Poder de golpe puro |
| Poder de ataque Wrath | Escala con la agilidad | Velocidad de ataque y daño elemental |
| Defensa por agilidad | 0–10% hasta 1,500 AGI, 10–30% hasta 2,000, 30–45% hasta 3,000 | La agilidad la defiende tanto como la arma |
| Set party | Dark Wizard + Elf + Grow Lancer | Cuenta para el bono de experiencia de set party |
Los dos pools alimentan el daño de sus habilidades, así que ni una build de fuerza pura ni una de agilidad pura desperdician nada.
Sus habilidades, en el orden en que las desbloqueas
La traba es la parte inusual: sus habilidades vienen de scrolls con requisitos de estadísticas y no de nivel, así que puedes estar pasado del nivel y seguir bloqueada por haber repartido tus puntos. Abajo están ordenadas por cuándo obtienes cada una, con la traba en lugar del nivel.
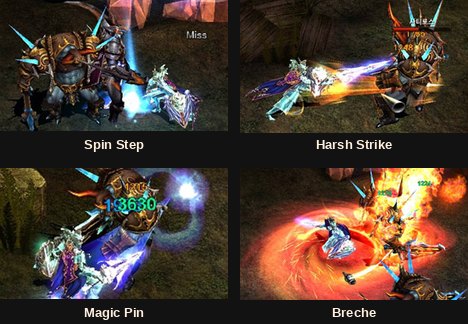
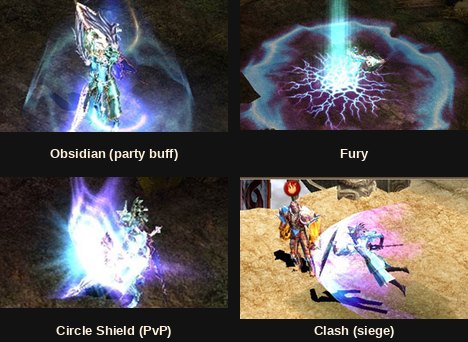
| Habilidad | Traba | Rango | Daño | Maná / AG | Rol |
|---|---|---|---|---|---|
| Fury | Nivel 66 | Propio | — | 100 / 50 | Cambia defensa por poder de ataque; tu primer botón de poder |
| Harsh Strike | 150 de fuerza | 3 | 100 | 12 / 0 | Tajo que pasa a estocada, pagado desde Punishment |
| Obsidian | Nivel 74 | Party | — | 50 / 50 | Convierte tu fuerza en poder de ataque de habilidad para el party |
| Magic Pin | 300 de fuerza y 300 de agilidad | 2 | 80 | 30 / 20 | Tres estocadas en secuencia, pagadas desde Wrath |
| Spin Step | 150 de agilidad | 2 | 100 | 12 / 0 | Golpea al objetivo y a todo lo que esté a su lado; tu tecla de farmeo |
| Shining Peak | 200 de energía, nivel 220 | 3 | 70 | 60 / 25 | Proyectil que se nutre de los dos pools a la vez |
| Circle Shield | Misión del NPC Marlon a nivel 220 | Propio | — | 100 / 50 | Solo PvP: una probabilidad de quitarle el AG al enemigo |
| Breche | Nivel 300 | 3 | 400 | 25 / 45 | Golpe de área sobre hasta cuatro monstruos; el daño no es un error de tipeo |
| Clash | Solo en Castle Siege | 6 | 50 | 50 / 50 | Carga que empuja a los defensores fuera de una posición |
La doble traba de 300/300 de Magic Pin es el desbloqueo más caro del kit, y Circle Shield es el único detrás de una misión, así que si nunca aparece es porque te perdiste a Marlon.
Su escalera de equipo
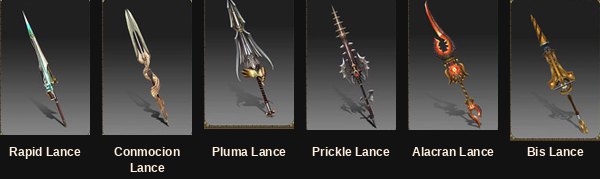
Seis lanzas en dos clases de velocidad, emparejadas a niveles de drop casi idénticos. La elección en cada escalón es daño Wrath de la lanza más rápida contra Punishment de la más lenta.
| Tramo | Lanza más rápida (velocidad 40) | Dropea de | Lanza más lenta (velocidad 35) | Dropea de |
|---|---|---|---|---|
| Temprano | Rapid Lance | 15, excellent a 40 | Prickle Lance | 22, excellent a 47 |
| Medio | Conmocion Lance | 65, excellent a 90 | Alacran Lance | 67, excellent a 92 |
| Tardío | Pluma Lance | 85, excellent a 110 | Bis Lance | 87, excellent a 112 |
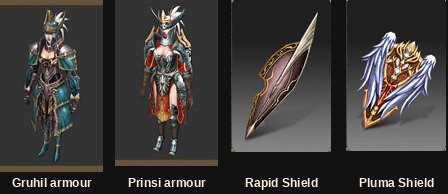
Tres líneas de armadura cubren la curva, con dos escudos al lado; en exp alta las pasas las tres en una tarde.
| Línea | Empieza a dropear al nivel |
|---|---|
| Robust | 10 |
| Gruhil | 40 |
| Prinsi | 60 |
| Escudos Rapid y Pluma | Junto a las líneas de arriba |
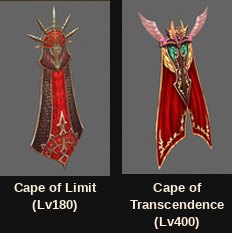
Las capas son su ranura característica: paga vida por daño como costo permanente de atacar.
| Cape of Limit | Cape of Transcendence | |
|---|---|---|
| Nivel requerido | 180 | 400 |
| Defensa | 15 + (nivel × 2) | 45 + (nivel × 4) |
| Aumento de daño | 20 + (nivel × 2) | 39 + (nivel × 2) |
| Absorción de daño | 10 + (nivel × 2) | 39 + (nivel × 2) |
| Costo de HP por ataque conectado | 1 | 3 |
| Opciones aleatorias roleadas | Tres, de HP o maná +50 + (nivel × 5), o un 3% de probabilidad de ignorar defensa | Sacadas de un pool más fuerte: 5% ignorar defensa, 5% reflejo de daño, 5% recuperación total de HP, 5% recuperación total de maná |
| Se fabrica con | Unas alas de primer nivel, Crest of Lexmilon, Jewel of Chaos, y un ítem excellent +4 con cuatro opciones | Condor's Feather, Condor's Flame, Jewel of Chaos, 10× Bless, 10× Soul, Jewel of Creation, y un ítem excellent +9 con cuatro opciones |
La ventana de master skills, y los números que se movieron desde entonces
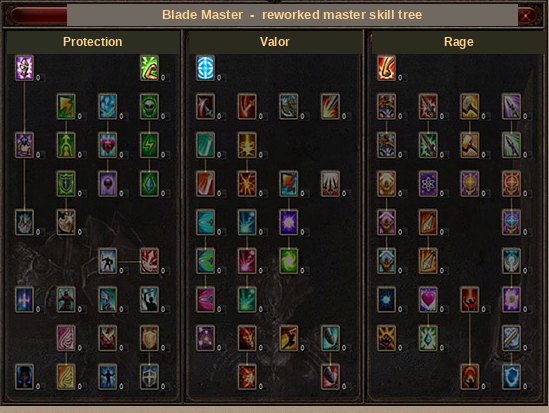
La Parte 1 reconstruyó los árboles de master de las siete clases existentes de una sola vez. El diseño que sigues usando, los rangos 7 a 9, y la regla de que los costos de maná y AG suben con el grado de una habilidad vienen todos de aquí. Los valores no.
Dos cambios de base marcaron la pauta: los nodos de estadísticas pasaron de 12 a 14 puntos por inversión, con el tope de 90 a 108, y la reducción de durabilidad de 12% a 18%, con el tope de 90% a 135%. Los nodos de daño se levantaron en la misma pasada — el cooldown de Blood Storm se redujo a la mitad, de 10 segundos a 5, y a 3 reforzado, con su reforzador subiendo de 5 a 11; los reforzadores de Hellfire y de Ice de 6 a 14; la maestría de Drain Life del Dimension Master de 12 a 102 contra un tope de 766.
Los nodos que cambiaron cómo se defienden las clases
La mitad durable es la defensiva, e introdujo la respuesta visual que todavía lees en combate: Parry, Absorb y Block apareciendo sobre tu personaje son nodos de Season 10 activándose. Los nodos compartidos y los agregados por clase están listados juntos, ya que un mismo pool de puntos compra ambos.
| Nodo | Quién lo recibe | Rango | Qué hace |
|---|---|---|---|
| Life Absorption | Compartido | 7 | La mitad de tus golpes exitosos drenan HP del objetivo |
| Weapon Block | Compartido | 8 | Con una espada, maza, lanza o hacha equipada, una probabilidad de parar golpes físicos. La magia pasa igual. Se lee Parry. |
| Shield Block | Compartido | 8 | Con un escudo equipado, una probabilidad de comerte el daño usando la propia tasa de defensa del escudo. Se lee Absorb. |
| Strong Will | Compartido | 9 | Más difícil de aturdir, más difícil de empujar |
| Steel Armor | Compartido | 9 | Defensa base igual a los puntos invertidos, y no se puede ignorar |
| Guardian Shield | Compartido | 9 | Con un escudo equipado, una probabilidad de bloquear el golpe por completo. Se lee Block. |
| Shield Absorption | Compartido | 9 | La mitad de tus golpes exitosos drenan SD del objetivo |
| Charge | Blade Master | — | Cierra hasta 5 casillas y conecta un golpe fuerte. Cooldown de 5 segundos. |
| Iron Defense | Blade Master | — | Hasta +800 de defensa y HP por 10 segundos, más inmunidad a estados. Cooldown de 30 segundos. |
| Illusion | Grand Master | — | Un fantasma pelea contra tu objetivo por 45 segundos y tiene un 30% de probabilidad de absorber el daño dirigido a ti. Cooldown de 2 minutos. |
| Shadow Step | High Elf | — | Avanza 5 casillas en cualquier dirección. Cooldown de 3 segundos. |
| Evasion | High Elf | — | Un pico corto en la tasa de éxito de defensa y en la tasa de defensa PvP. Cooldown de 1 minuto. |
| Paralyze | Dimension Master | — | Ralentiza todo a tu alrededor. Cooldown de 30 segundos; la versión de rango 9 agrega sangrado. |
Las tres ramas de la Mirage Lancer
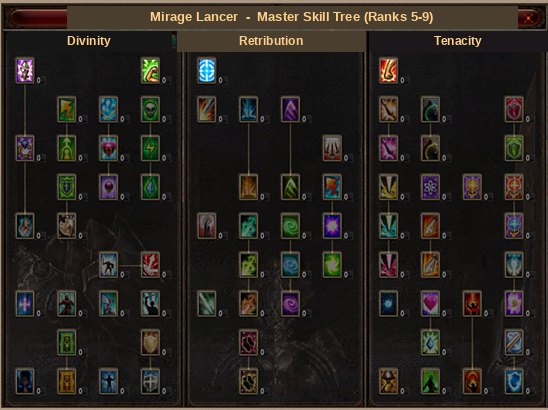
Su árbol se divide en tres, y la rama a la que te comprometes decide para qué sirve ella. Tenacity esconde el mejor nodo individual del árbol: la maestría de Fury elimina la penalización de defensa de Fury, convirtiendo un intercambio en un buff gratis.
| Rama | Constrúyela para | Qué hay dentro |
|---|---|---|
| Retribution | Daño de habilidad | Mejoras a Obsidian, Magic Pin, Breche y Shining Peak; el rango de Magic Pin llevado a 3 y el área de Breche a 4; más la nueva habilidad Armor Breaker, un pico temporal de ignorar defensa, y su reducción de cooldown |
| Tenacity | Rendimiento sostenido | Competencia y maestría de Fury, que elimina la penalización de defensa de Fury; poder de ataque y tasas de daño crítico, excellent y doble; recuperación total de maná, HP y SD; Life y Shield Absorb; mejoras de rango 9 tanto a Punishment como a Wrath |
| Divinity | Mantenerte con vida | Defensa de set, Revenge, los cuatro nodos de estadísticas, la defensa y la mejora de ataque de la Cape of Transcendence, Shield Block, Strong Will, Steel Armor, Guardian Shield |
La capa elemental que de verdad vas a tocar
La Parte 3 fue la silenciosa, y define cómo se equipa hoy un personaje de nivel 400+.
La quinta ranura y el Errtel of Radiance
El Errtel of Radiance es el quinto errtel y va en la quinta ranura del pentagram, que viene bloqueada. Ábrela con un Radiance Slot Expansion Scroll — cuatro Radiance Slot Fragments combinados, o sacado entero de una Elemental Capsule — y después haz clic derecho en el pentagram de tu inventario y haz clic en la ranura. No hay ningún NPC al que entregárselo.
El rango decide qué te da la ranura, y la progresión no es pareja: el rango 1 son números, el rango 2 supervivencia, el rango 3 control de masas y la razón para abrirla.
| Rango | Carácter | Opciones que puede rolear |
|---|---|---|
| 1 | Estadísticas planas | Poder de ataque elemental II y III, defensa elemental II y III, tasa de éxito de ataque elemental II, tasa de éxito de defensa elemental II |
| 2 | Defensivo | Bastion — por debajo del 20% de SD, una probabilidad de un buff que corta el daño elemental entrante en un 90%; Shield Absorb — daño elemental absorbido como SD; Life Drain — absorbido como HP en su lugar |
| 3 | Control | Bind — el objetivo no puede moverse; Paralysis — movimiento y recuperación ralentizados; Blindness — la tasa de éxito de ataque del objetivo se desploma; Bleeding — daño que gotea con el tiempo; Punishment — los golpes elementales críticos le arrancan un porcentaje del HP al objetivo |
Subir de rango activa al azar una opción del rango nuevo, y solo puedes subir de rango cuando cada opción activada está en +7.
Imprinting de habilidades, y por qué tu helper ignora media barra
Registra una habilidad y, cuando su elemento coincide con el de tu pentagram equipado, gana poder de ataque de habilidad extra, escalado por el nivel de mejora del pentagram y por los errtels que lleva. Las habilidades imprintadas están marcadas en la esquina del icono.
Diez ranuras: cinco habilidades básicas en las teclas 1 a 5 y cinco habilidades especiales — habilidades de siege y los comandos Dark Spirit del Dark Lord — en 6 a 0. Las habilidades especiales no reciben bono elemental. La parte que pilla a todos: el MU Helper solo lanza habilidades que hayas imprintado, así que cambiar un imprint reconfigura en silencio tu farmeo AFK, que en exp alta es casi toda tu subida de nivel.
Combinación y desmantelado
La fabricación elemental se mudó al NPC Adniel — Elbeland (37, 215) y Acheron (38, 216) — a una ventana que previsualiza el resultado, mantiene los materiales registrados entre intentos, y deja el resultado en la Gremory Case en lugar de fallar con el inventario lleno. Cada receta se simplificó al mismo tiempo.
| Receta | Qué cuesta ahora | Qué reemplazó |
|---|---|---|
| Mithril a partir de fragmentos | 5 fragmentos se convierten directo en Mithril | 5 fragmentos → bundle → Mithril |
| Creación de errtel | Mithril + Jewel of Bless | Mithril + Elixir + Jewel of Bless, con el Elixir eliminado del juego por completo |
| Subir de nivel un errtel | Errtel + Elemental Runes | Errtel + Jewel Combination Frame + Jewel of Bless |
| Subir de rango un errtel | Errtel + Bundle of Bless + Spirit Powder + un ítem de set de nivel 7 con 4 opciones o más | Errtel + Bless + Soul + Spirit Powder + un ítem de set de nivel 7 |
Las Elemental Runes vienen de las NPC de los pueblos Amy, Fairy Lara, Silvia e Isabel, y de las Elemental Capsules. La cantidad sube con el nivel y el rango, desde una runa en rango 1 nivel 1 hasta 11 en rango 3 nivel 10.
El desmantelado es la mitad que nadie usa lo suficiente. Los ítems de set y los errtels se descomponen desde el inventario por 1 Elemental Powder cada uno; 50 de powder hacen una Elemental Capsule, que necesita 4×4 de espacio libre y puede contener Errtels of Radiance, Radiance slot fragments, Elemental Runes y pentagrams de nivel medio. La basura que juntas subiendo de nivel se convierte en los materiales exactos con los que funciona este sistema.
Se mantienen dos reglas más. Sacar un errtel de un pentagram que requiere nivel 299 o menos siempre funciona; desde nivel 300+ necesitas Spirit's Protection para un 100% garantizado. Y los requisitos de nivel de los pentagrams se recortaron — el Iron Wall Shield de los Lorencia Knights, el Hero's Elixir y el Gladiator's Dagger de 300 a 150, sus versiones imbuidas de magia a 180, el Etramu's Scroll de 200 a 150.
Nars y Core Magriffy: un destino degradado a parada
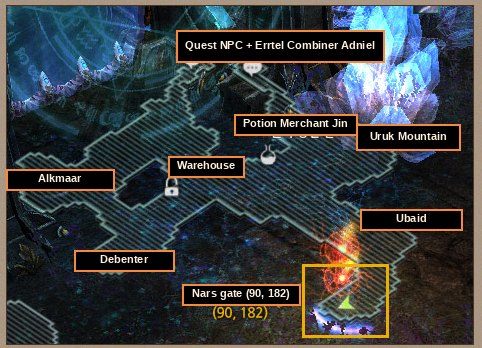
Nars fue la sexta región de Acheron y, en 2015, el terreno más duro del juego. En un servidor Season 22 tiene una sola razón de existir para ti: el equipo Blood Angel excellent dropea aquí y en ningún otro lado. La Arca War y el Acheron Guardian no se corren aquí. Dos pares de puertas de campo acortan la caminata; el boss está detrás de una tercera.
| Puerta | Conecta | Con |
|---|---|---|
| Puerta de campo azul | (42, 80) | (215, 34) |
| Puerta de campo roja | (41, 98) | (109, 230) |
| Core Magriffy's Nest | (179, 148) | La arena del boss |
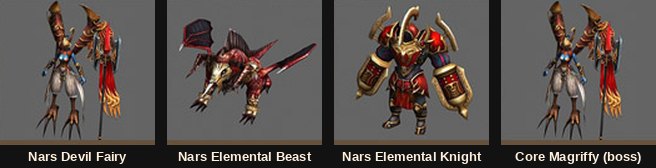
Lee primero las columnas elementales: estos eran los monstruos elementales más fuertes del juego, y los tres residentes están lo bastante parejos como para que ningún spawn valga más que otro.
| Monstruo | Nv | HP | Ataque elem. | Defensa elem. | Ataque | Defensa | Tasa def. |
|---|---|---|---|---|---|---|---|
| Nars Devil Fairy | 116 | 80,000 | 860–890 | 520 | 820–855 | 770 | 410 |
| Nars Elemental Beast | 118 | 90,000 | 900–930 | 540 | 880–910 | 800 | 420 |
| Nars Elemental Knight | 120 | 92,000 | 940–980 | 560 | 920–950 | 830 | 430 |
| Core Magriffy | 190 | 9,750,000 | — | — | — | — | — |
El boss tiene aproximadamente cien veces el HP de cualquier otra cosa de aquí. Reaparece cada 24 horas con un elemento aleatorio — revísalo antes de atacarlo — y tiene cuatro trucos.
| Habilidad | Qué pasa | Qué hacer al respecto |
|---|---|---|
| Poison | Va montado en sus ataques comunes | Daño constante durante toda la pelea |
| Tornado | Se levantan torbellinos en cuatro direcciones | No te alinees con él |
| Roar | Daño más empuje | Te cuesta tiempo de ataque, no vida |
| Clone | Se divide en dos cuerpos idénticos. Golpea al equivocado y se dispara Berserk, que agrega un +100 de poder de ataque permanente y se acumula cada vez que se activa | La pelea de verdad: adivina mal varias veces y te sobrepasa |
Se regenera cada segundo si dejas de golpearlo, así que un party que no puede sostener el daño durante la fase Clone nunca lo termina. Dropea 4 ítems, incluyendo pentagrams y tres muuns montables.
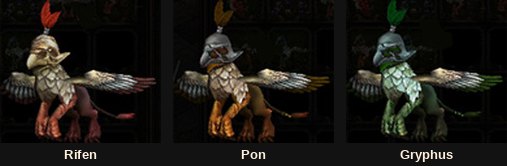
| Muun montable | Grado | Habilidad base, activa de 13:00 a 24:00 |
|---|---|---|
| Gryphus | ★★★ | Sube el poder de ataque, de wizardry y de curse |
| Rifen | ★★★ | Sube el poder de ataque elemental |
| Pon | ★★★ | Sube la defensa elemental |
Los tres funcionan a 15× su habilidad base durante sus primeros 30 días, así que usa uno el mismo día que lo consigas.
Evomon: la única parte que puede no existir en tu servidor
Evomon es el tercer caso: un evento autocontenido que los servidores activan o desactivan, así que revisa tu lista de eventos antes de planear algo a su alrededor.
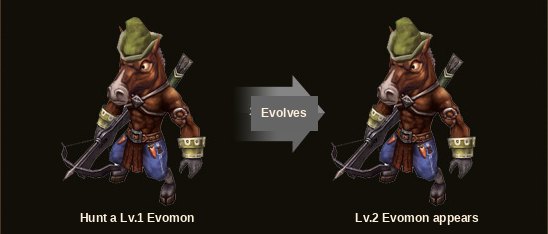
Los monstruos de campo dropean Summon Scroll Fragments; veinticinco se combinan solos en el inventario de eventos para formar un Evomon Summon Scroll. Tíralo al suelo y aparece un Evomon de nivel 1, de tu propiedad. Mátalo y la cadena evoluciona un paso o se rompe. Lleva una más allá del nivel 30 y cada scroll nuevo empieza 4 niveles por encima del anterior, hasta un techo de nivel 69.
Romper las restricciones desperdicia un scroll. No se puede tirar en una zona segura, ni dentro de Chaos Castle, Blood Castle, Devil Square, Illusion Temple, Vulcanus, Doppelganger, Icarus o Kalima. Un Evomon por jugador o party en el campo. Y hay un límite de tiempo: déjalo expirar y el scroll no paga nada.
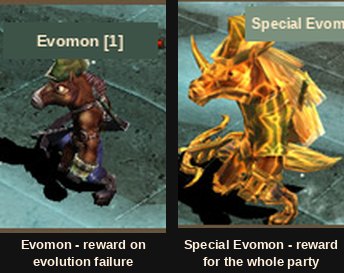
Los dos tipos pagan de formas opuestas, lo que es fácil de confundir. Un Evomon normal paga cuando la cadena finalmente falla; un Special Evomon dorado le paga a todo el party en una cacería exitosa. Las recompensas van a la Gremory Case, y tu entrada en el ranking es el nivel más alto que lograste más uno, mostrado arriba a la izquierda.
Las reglas que están debajo de tu subida de nivel
La experiencia sigue al daño
La experiencia de caza subió en todas las bandas — un personaje de nivel 100 sobre un Yeti de 275 a 439, un personaje de nivel 300 sobre Alquamos de 1,132 a 1,912, un personaje de nivel 500 sobre Erohim de 4,811 a 5,736. La regla que llegó con esas cifras importa más: tu parte de una muerte es tu parte del daño. Haz 60,000 de daño a un monstruo de 100,000 de HP y te llevas el 60% de la experiencia en solitario mientras tu compañero se lleva el 40%.
La experiencia de party se calcula a partir del valor en solitario del miembro de nivel más alto y se reparte por proporción de nivel, con un bono fijo por tamaño y uno mejor para un set party.
| Party de | 2 | 3 | 4 | 5 |
|---|---|---|---|---|
| Bono de party normal | 30% | 60% | 90% | 120% |
| Bono de set party | — | 70% | 105% | 140% |
Que es por lo que un set party de cinco personas es la forma estándar, y un pasajero vale menos que una ranura vacía.
Combinación en lote, que te ahorra una hora
Varias recetas se corren por lotes, con los materiales y el costo escalados a la cantidad y la tasa de éxito roleada por ítem en lugar de una sola vez para todo el lote.
| NPC | Tamaños de lote |
|---|---|
| Chaos Goblin | Pociones de SD ×32, pociones de bless y de soul ×25, frutas ×16, cajas de oro y de plata ×16, invitaciones a Devil Square ×8, capas de invisibilidad ×6, dinorants ×2 |
| Elpis | Jewel of Harmony ×32 |
| Osbourne | Piedras de refinamiento ×8 |
Dónde dropean las cosas
La Parte 3 fijó la tabla de ítems a zonas de caza específicas. Las listas se han revisado desde entonces, pero el principio es permanente. Las asignaciones de Season 10 fueron pociones y pergaminos de portal al pueblo a Lorencia, Elbeland, Noria, Devias y Dungeon; pergaminos de hechizo y orbes a los rangos de nivel correspondientes; pendants y rings excellent a Atlans, Lost Tower 6–7 y Tarkan; un nivel de esferas a cada uno de Karutan, Aida 2, Vulcanus y Kanturu Ruins; equipo de nivel 380 a Kanturu Ruins 3 y Kanturu Relics, con las armas de habilidad restringidas al Dark Iron Knight; gemstones solo a la Tower of Refinement.
Dos efectos secundarios siguen importando. Los monstruos empezaron a dropear la versión excellent de lo que llevan a la vista, así que lo que un monstruo sostiene te dice lo que puede darte. Y los bosses de campo Ice Queen, Gorgon, Balrog, Death King, Hydra y Zaikan recibieron sus propias tablas de drop excellent con un respawn de 24 horas y un solo spawn cada uno. Los ítems elementales dejaron de dropear de Ice Queen, Gorgon, Balrog, Hydra, Phoenix of Darkness y Hell Maine, y se movieron a Atlans, Ubaid, Alkmaar, Debenter, Uruk Mountain y Nars. Los monstruos de Blood Castle y Devil Square quedaron limitados a los niveles de equipo 1 a 4.
Cambios de interfaz que usas sin notarlo
Las misiones de cambio de clase se volvieron rastreables en la ventana My Quest (T), con un diario en vivo que se pone verde al completarlas. Una Play Guide se abre desde el icono HELP o con F1. Los ítems de la cash shop de tipo buff se extienden hasta 50 días cuando usas el mismo producto otra vez en lugar de sobrescribir el temporizador. En Uruk Mountain, acercarte a Lord Silvester sella seis entradas detrás de ti; deja el área vacía durante 60 segundos y las puertas se reabren con el boss a HP completo.
Lo que enterraron las seasons posteriores
- Blood Angel ya no es el nivel más alto. Es el primer set mastery que tienes a los 400.
- Nars no es el mapa de endgame. Sus monstruos están entre 116 y 120: ve por los drops y por el boss, no por la experiencia.
- Los valores de las master skills son históricos. La ventana y los rangos 7–9 son actuales; los números se subieron desde entonces.
- El horario de eventos ya no existe. Veintidós corridas de Blood Castle y un Illusion Temple a las 21:00 son el horario oficial de 2015.
- El Elixir ya no existe, así que cualquier guía que todavía lo liste es anterior a este parche.
No enterrados: el Ruud, la Gremory Case, el Event Map Plaza, las Mastery Boxes, la quinta ranura del pentagram, el imprinting de habilidades, la experiencia por reparto de daño y la propia Grow Lancer.
Qué hacer con Season 10
- Elige tu main antes de farmear eventos. El Ruud nunca abandona al personaje que lo ganó.
- Aprende la Plaza primero. M, 20,000 zen, o el icono de notificación.
- Contribuye, no solo asistas. Las cajas se gradúan según lo que hiciste, y aportar poco significa nada.
- Junta sets ancient antes de gastar Ruud. Cuatro piezas necesitan cuatro Souls al 80% cada uno, hechos de sets +11.
- Abre la quinta ranura del pentagram y apunta al rango 3, donde están las opciones de control.
- Vuelve a revisar tus imprints cada vez que cambies tu barra, porque el MU Helper lanza solo lo que está imprintado.
- Desmantela la basura de sets en lugar de venderla: cincuenta de powder son una capsule.
- No subas de nivel en Nars. Toma los drops, intenta el boss, vete.
Nuestro servidor corre Season 22 sobre los archivos de servidor más recientes, abre a comienzos de octubre de 2026, con exp alta, estadísticas con tope de 32,700, eventos y mini-bosses todo el día y un sistema de joyas personalizado. Toda la plomería de arriba está viva en él. Crea una cuenta, y luego lee Season 11 para ver qué le pasó después a la escalera mastery, o explora el índice completo de guías.
- Todavía vivos: el Ruud, la Gremory Case, el Event Map Plaza y las Mastery Boxes.
- El Ruud está ligado al personaje — sin intercambio, sin tienda, sin bóveda, sin tirarlo, y solo Priest James lo acepta.
- Blood Angel es el primer set mastery a nivel 400, no el último: cuatro piezas, cuatro Souls al 80% cada uno.
- La quinta ranura del pentagram viene bloqueada; un Radiance Slot Expansion Scroll la abre.
- El MU Helper solo lanza las habilidades que hayas imprintado con U.
- La experiencia sigue el reparto de daño, así que un pasajero en tu party no gana nada.
- Nars es una parada, no un destino: drops y Core Magriffy, no niveles.