Most of Season 11 is a patch note. One part of it is a system you open in your first week on a Season 22 server and keep opening for as long as that character lives. This guide sorts the 2015 - 2016 release into what still runs your build, what caps it, what you clear and leave, and what has been outranked.
Why a 2015 patch is still load-bearing
Season 11 did four unrelated things at once. It added Feria, a map with a boss on a long timer. It gave almost every class a new skill. It finished two half-built weapon tiers. And it rebuilt the socket and seed sphere system, which is the only one of the four that changed how every character since gets geared.
That is why the season still matters. Maps get outlevelled and weapon tiers get replaced, but a crafting system that works gets built on, and the ceilings Season 11 put on stacked options are still the ones your gear planning runs into.
Sockets: the Season 11 system you use every day
Before this season, socket work was split across two NPCs and a chaos machine, spheres stopped at level 4, and pulling a sphere out destroyed most of its value. Season 11 collapsed it into one place and made it non-destructive.
One NPC, one window, six tabs
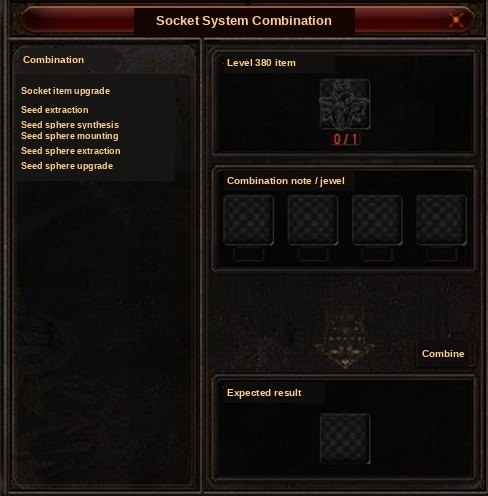
The Seed Researcher was deleted and the Chaos Goblin lost its 400-socket work. In their place stands the Seed Master in Elbeland at (46, 243), whose window holds six jobs: socket item upgrade, seed extraction, sphere synthesis, mounting, extraction and the new sphere upgrade. Those six tabs are the whole curriculum.
Level 10 spheres, and a failure that costs you nothing
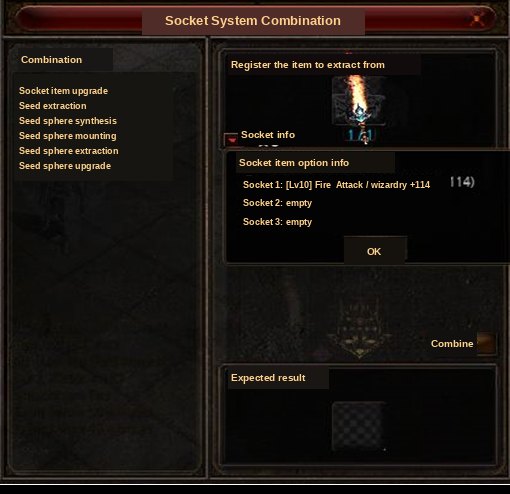
Spheres used to stop at level 4. Season 11 pushed the ceiling to level 10 and added the tab that gets you there: register the sphere, feed it a second sphere of the same level plus Sphere Upgrade Runes, with the rune cost climbing each level. The important half is the failure case. The sphere you are raising keeps its level and options; only the sacrificial sphere and the runes burn.
Extraction changed in the same spirit. You used to get a plain seed back; you now get the sphere itself, level and options intact, so a good sphere is a permanent asset you move between items rather than something welded into the first slot.
What each element actually buys you
Six elements, twenty-four options, Earth first because it was new here and is still the only sphere that raises base stats. Levels 1, 4, 7 and 10 show the shape of the curve, which is not linear.
| Element | Buys you | Option | Lv1 | Lv4 | Lv7 | Lv10 |
|---|---|---|---|---|---|---|
| Earth | Base stats | Strength | 6 | 11 | 18 | 24 |
| Earth | Base stats | Vitality | 30 | 36 | 44 | 57 |
| Earth | Base stats | Energy | 10 | 15 | 23 | 36 |
| Earth | Base stats | Agility | 1 | 4 | 9 | 18 |
| Fire | Offence | Attack or wizardry power | 20 | 30 | 45 | 63 |
| Fire | Offence | Attack or wizardry power per 20 levels | 1.1 | 1.4 | 1.7 | 2.0 |
| Fire | Offence | Attack speed | 7 | 10 | 13 | 16 |
| Fire | Offence | AG cost cut | 40% | 43% | 46% | 49% |
| Lightning | Burst | Excellent damage | 15 | 30 | 51 | 81 |
| Lightning | Burst | Excellent damage rate | 10% | 13% | 16% | 19% |
| Lightning | Burst | Critical damage | 30 | 40 | 66 | 102 |
| Lightning | Burst | Critical damage rate | 8% | 11% | 14% | 17% |
| Ice | Sustain | Skill attack power | 37 | 50 | 71 | 100 |
| Ice | Sustain | Attack success rate | 25 | 35 | 56 | 83 |
| Ice | Sustain | Mana per monster killed | 400 | 550 | 703 | 859 |
| Ice | Sustain | HP per monster killed | 250 | 340 | 436 | 541 |
| Water | Defence | Shield defense | 100% | 300% | 450% | 600% |
| Water | Defence | Defense | 30 | 39 | 47 | 60 |
| Water | Defence | Defense success rate | 10% | 13% | 16% | 19% |
| Water | Defence | Damage reflect | 5% | 8% | 11% | 14% |
| Water | Defence | Damage decrease | 4% | 7% | 10% | 13% |
| Wind | Pools | Max HP | 100 | 145 | 205 | 295 |
| Wind | Pools | Max mana | 150 | 195 | 255 | 345 |
| Wind | Pools | Max AG | 70 | 110 | 162 | 226 |
Three of those lines were rewritten rather than added, which is why older socket guides mislead: attack power per level became per 20 levels, max HP and mana went from a percentage to flat, and recovery on kill is now exact.
Mounting order, and the bonus nobody sets up on purpose
Mounting spheres in a set elemental sequence has always produced an extra option on top of the spheres themselves. Season 11 tied the size of that extra to sphere level: low spheres roll only the ordinary bonus, level 4 opens a rare tier, level 8 a better one.
| Levels of the spheres you mounted | What can roll |
|---|---|
| Anything from 1 to 10 | 30% chance of the normal bonus option |
| 4 to 7 | 30% normal, plus 10% for rare bonus option (1) |
| 8 to 10 | 30% normal, plus 10% for rare bonus option (2) |
The sequences, with the three payout tiers folded into one column. Armour first, because those two orders are the ones people get wrong.
| Goes on | Mount in this order | Bonus option | Normal → rare 1 → rare 2 |
|---|---|---|---|
| All armour | Earth → Wind → Water | Max HP | 29 → 31 → 33 |
| All armour | Water → Earth → Wind | Defense | 24 → 27 → 30 |
| All weapons | Lightning → Ice → Fire | Skill attack power | 11 → 22 → 33 |
| Sword, mace, bow, crossbow, claw, lance | Fire → Lightning → Ice | Attack power | 11 → 22 → 33 |
| Staff, stick | Fire → Lightning → Ice | Attack and wizardry power | 5 → 10 → 15 |
The two armour orders use the same three elements in a different sequence for a different result, and the weapon orders overlap too. Mount in the wrong sequence and you get the spheres but no bonus, so pick the bonus first.
Three shop items keep the system fed, all of them bought rather than farmed.
| Buy this | From | For |
|---|---|---|
| Sphere | The potion merchant in any town | Synthesising a seed sphere |
| Sphere Upgrade Rune Capsule | Priest James, Ruud shop, Elbeland (32, 239) | Raising a sphere toward level 10 |
| Socket Upgrade Note | Priest James, Ruud shop, Elbeland (32, 239) | Turning a 380 socket item into its 400 version |
Because the new combinations replaced the old ones, Sphere and Tetra items stopped dropping, along with the Sonic Combination Note and the Ice Walker’s Mane. Anything left on an old account is shop fodder, and repair bills came down in the same patch.
The four ceilings that still cap your build
This is the shortest section here and the most worth remembering. Season 11 put a hard roof on the four options players had been stacking without limit. Anything above the roof does not trigger at all, not even partly.
| Option | Ceiling | Why you hit it |
|---|---|---|
| Excellent damage rate | 70% | Lightning spheres, excellent gear and set bonuses all feed the same number |
| Critical damage rate | 80% | Easy to overshoot once Lightning spheres sit in several slots |
| Damage decrease | 60% | Water spheres plus defensive gear reach this faster than people expect |
| Shield defense increase | 1800% | A single level 10 Water sphere already hands over 600% of it |
Count these before you spend. A third Lightning sphere that pushes excellent damage rate past 70% is a dead slot that could have carried another element. This is the part of Season 11 that changes what you do on a Season 22 server.
Feria: where it lands in your progression
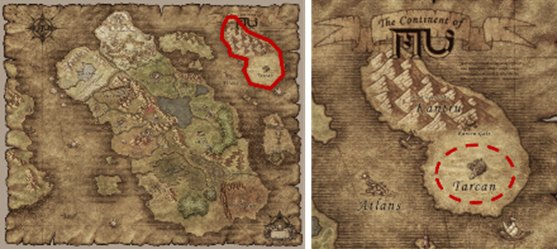
Feria was an artistic kingdom that dropped into a dimensional rift during the Great Earthquake of Tarkan, and its knights never stopped patrolling. Entry wants character level 400, from the map move window or on foot from the Tarkan safe zone at (176, 38).
Level 400 decides what this map is to you. On a high-exp server you pass it early and keep going, so Feria is not somewhere you settle or gear up. The boss and its 12-to-24-hour timer are the only reason to put the map in your rotation.
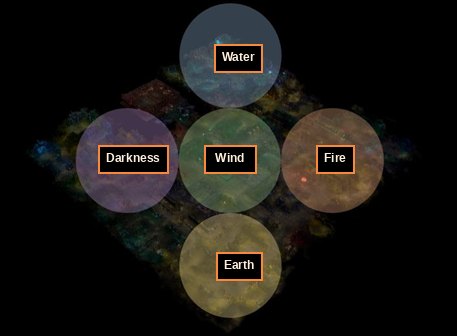
The map is elemental by district, which is the one thing here still worth something: you can walk from one element to the next and watch what your pentagram does. Two gate pairs shortcut the walking, the red gate joining (198, 173) to (107, 67) and the blue gate (201, 155) to (199, 137).
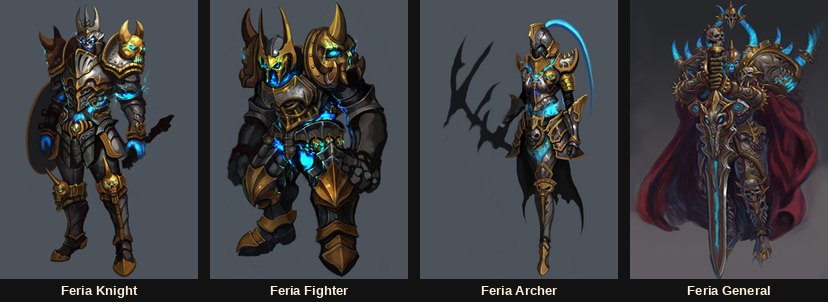
Everything in Feria in one table, field and boss together.
| Monster | Found how | HP | Attack | Defense | Elemental attack / defense |
|---|---|---|---|---|---|
| Feria Archer | Field, all five elements | 98,000 | 1,500–1,600 | 1,180 | 990–1,130 / 1,500 |
| Feria Knight | Field, all five elements | 105,000 | 1,400–1,450 | 1,225 | 950–1,050 / 1,500 |
| Feria Fighter | Field, all five elements | 120,000 | 1,250–1,300 | 1,355 | 910–1,090 / 1,500 |
| Feria General | Summoned by the boss | 5,000,000 | — | — | — |
| Feria Lord | Crystal orb, boss zone | 25,000,000 | — | — | — |
Read the gap: the toughest thing walking around has 120,000 HP, the Lord more than two hundred times that.
The Feria Lord, and the mistake that stalls the fight
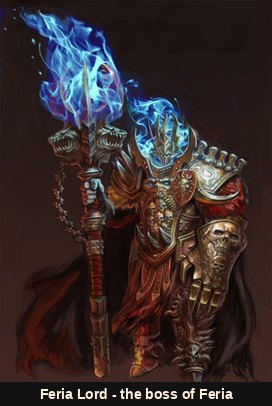
The entrance sits at Feria (112, 60). Smashing the crystal orb inside calls the Lord and seals the room: nobody else gets in and you do not get out. It ends when he dies or the room empties, he drops 3 items, and the next orb appears 12 to 24 hours later. Roughly one attempt a day, so learn the script first.

| Skill | When | What happens | Your job |
|---|---|---|---|
| Mine Explosion | Scales with his HP stage | Plants 1 to 5 mines; a sigil shows on the floor and goes off three seconds later | Watch the floor, not the health bar; three seconds is plenty |
| Swing | At random | Marks one character, and everyone standing near that character eats the damage too | Do not stack the party on one tile |
| Roar | At an HP threshold | Empties the AG and the mana of everybody near him | Expect to lose both; do not plan a burst right after |
| Lord Summon | Straight after Roar | Summons the Feria General, teleports him to his throne, makes him invulnerable and heals him. The heal scales with how many characters Roar caught | Kill the General; nothing else stops the heal |
The two mechanics interact, and that is the mistake: a party bunched up for Swing is a party where Roar catches everyone, which makes the heal as big as it gets.
Pentagrams: the rank-up rule that stuck
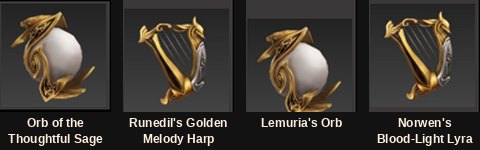
Four pentagrams arrived. The three level 300 ones share identical raw numbers, so the choice is entirely the option they carry at rank 3: pick by the last column, not by the stats.
| Pentagram | Lv | Elemental attack / defense | Trades | Pick it for |
|---|---|---|---|---|
| Runedil's Golden Melody Harp | 300 | 181–245 / 249 | 1 | Offence: pentagram attack and defense +5%, attack +10%, elemental attack +30 at rank 3 |
| Lemuria's Orb | 300 | 181–245 / 249 | 1 | Defence: pentagram attack and defense +5%, defense +10%, elemental defense +30 at rank 3 |
| Norwen's Blood-Light Lyra | 300 | 181–245 / 249 | 1 | Crits: elemental critical damage rate climbing 5%, 10%, 25% as errtel rank rises |
| Orb of the Thoughtful Sage | 180 | 96–129 / 231 | 5 | Early use: elemental defense +35 from an Anger or Blessing errtel at rank 1, and five trades |
The rule worth carrying forward is the rank-up. Two errtels of the same type at rank 1 level 7 combine into a rank 2 errtel at a flat 100%, and the same at rank 2 level 7 gives rank 3, with no failure chance. The left-hand errtel keeps its options; the right-hand one is consumed. The Elemental Conversion Talisman, bought with zen from the potion shop during events, then switches the element of a pentagram or errtel at 100%, keeping level, rank and options. It will not touch a pentagram with an errtel still mounted, or the Errtel of Radiance.
Two smaller changes still help a new character. Pentagram options were rebalanced to switch on far earlier, several dropping from rank 2 level 3 to rank 1 level 0 and others from rank 3 level 5 to rank 3 level 0. And a starter kit appeared: a Beginner’s Pentagram with four beginner errtels, Anger, Blessing, Integrity and Divinity, worth +1 elemental attack, +1 elemental defense, +1% elemental attack rate and +1% elemental defense rate, plus +5% pentagram attack and defense with all four equipped.
The skills are still on your bar
Season 11 gave a new skill to almost every second and third class character, and those skills did not go anywhere. What changed is when you get them: on a high-exp server you have the level long before the gear to make them hit. The books and orbs come from the Ruud shop NPC, Priest James.
Two rules apply to all thirteen. Each one has a main element, so skill imprinting and your pentagram matter to it, and each one has a 5% chance per hit of firing an extra hit for free.
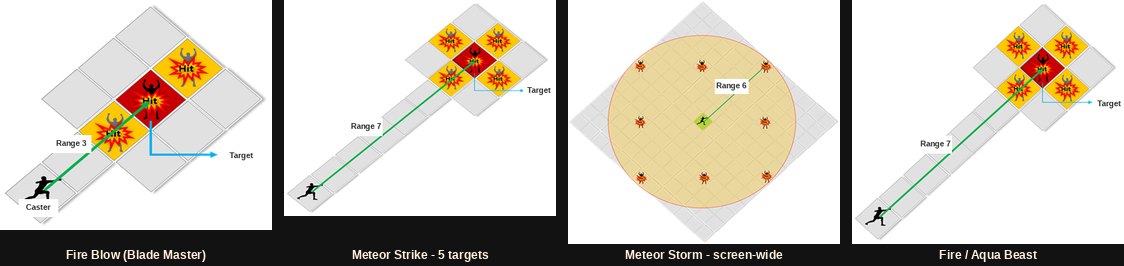
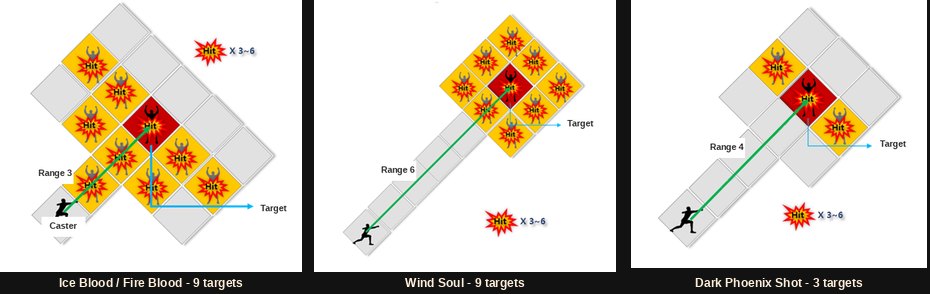
All thirteen in one table, grouped by class.
| Class | Skill | Element | Power | Mana / AG | Shape |
|---|---|---|---|---|---|
| Blade Master | Fire Blow | Fire | 200 | 50 / 50 | A blow landing 3 to 4 hits |
| Grand Master | Meteor Storm | Earth | 200 | 150 / 150 | Screen-wide; 2 to 3 hits on as many as 8 targets inside 6 tiles |
| Grand Master | Meteor Strike | Earth | 200 | 70 / 70 | Meteors funnel onto the target, catching 5 entities |
| Grand Master | Soul Seeker | Darkness | 200 | 70 / 70 | Spirits converge on one target for 3 to 4 hits |
| High Elf | Focus Shot | Wind | 150 | 15 / 15 | A multi-shot poured into one target, and the cheapest skill here |
| Dimension Master | Fire Beast | Fire | 200 | 50 / 50 | A phantom beast charges through, catching 5 entities |
| Dimension Master | Aqua Beast | Water | 200 | 50 / 50 | The same charge in Water, for elemental matchups |
| Duel Master | Dark Blast | Darkness | 120 | 92 / 17 | 3 to 4 hits |
| Duel Master | Meteor Strike | Earth | 120 | 92 / 17 | Catches 5 entities |
| Duel Master | Ice Blood | Water | 80 | 19 / 25 | Target plus the 8 around it, with a chance to slow |
| Duel Master | Fire Blood | Fire | 80 | 19 / 25 | Target plus the 8 around it, with a burn over time |
| Lord Emperor | Wind Soul | Wind | 85 | 60 / 17 | Rebuilds Chaotic Diseier as a wind skill; 9 targets, 3 hits plus 1 |
| Fist Master | Dark Phoenix Shot | Darkness | 650 | 30 / 10 | 3 entities, with a chance to cut their defense success rate |
Two weapon tiers that time has passed
Both weapon projects here were catch-up work, finishing lines left incomplete, and both have since been outranked. The tables below are history, worth a skim for one thing: this is where weapons started arriving pre-rolled as Excellent items.
Blood Angel weapons
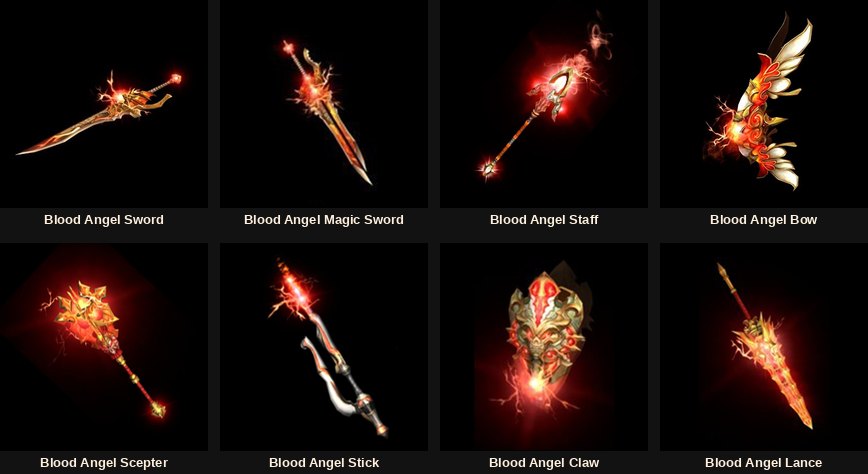
These came from Priest James in Elbeland (32, 239) as Excellent items with the options already rolled. Excellent damage rate +10% is guaranteed, one or two more come from the pool, and Luck is a coin flip. A three-option roll is predictable: excellent damage +10%, attack speed +7 and attack power +1.5 per 20 levels. Sorted below by attack power, with requirements merged and the weapon skill moved into the table.
| Weapon | Class | Attack power | Req. STR / AGI | Weapon skill |
|---|---|---|---|---|
| Blood Angel Bow | High Elf | 343–363 | 182 / 1,095 | Multi-Shot |
| Blood Angel Sword | Blade Master | 299–310 | 886 / 287 | Twisting Slash |
| Blood Angel Magic Sword | Duel Master | 292–303 (67%) | 650 / 398, plus 139 energy | Power Slash |
| Blood Angel Scepter | Lord Emperor | 224–236 (63%) | 618 / 140 | Force Wave |
| Blood Angel Claw | Fist Master | 176–186 | 518 / 177 | Beast Uppercut |
| Blood Angel Lance | Mirage Lancer | 161–172 | 387 / 282 | Thrust |
| Blood Angel Staff | Grand Master / Duel Master | 110–116 (92%) | 266 / 93 | — |
| Blood Angel Stick | Dimension Master | 99–105 (90%) | 324 / 98 | — |
Blessed Archangel's Absolute Weapons
The Absolute Weapons already in the game became upgradeable into Blessed versions with better stats, the full excellent option set and a buff nobody else had. Entry is steep: +15 with 16 option levels first, plus an Archangel’s Hammer. Both steps run at the Chaos Goblin in Noria at 100%, so this is a materials problem, not a luck problem.
| Step | What goes in | What comes out |
|---|---|---|
| 1. Make the hammer | 10× Celestial Steel, a bundle of 10 Bless, a bundle of 10 Soul, Jewel of Chaos, Jewel of Creation, Jewel of Guardian | Archangel's Hammer |
| 2. Upgrade the weapon | The +15 / 16-option Absolute Weapon, the Archangel's Hammer, 30× Bless, 30× Soul, 30× Life, Jewel of Chaos | Blessed Absolute Weapon, reset to +0 with no option levels and no Luck |
Note the reset in step 2: you spend a fully built +15 weapon and get back a blank one. Celestial Steel drops from field bosses, and there is a second route people miss: anyone carrying an Absolute Weapon, and their party on the same map, can pull it from ordinary kills.
| Weapon | Classes | Attack power | Speed | Req. STR / AGI | Weapon skill |
|---|---|---|---|---|---|
| Absolute Crossbow | Elf | 345–380 | 45 | 260 / 440 | Multi-Shot |
| Absolute Scepter | Dark Lord | 331–341 | 45 | 470 / 116 | Force Wave |
| Absolute Sword | Dark Knight, Magic Gladiator, Dark Lord | 265–275 | 45 | 380 / 200 | Twisting Slash |
| Absolute Staff | Dark Wizard, Magic Gladiator | 153–165 (94%) | 30 | 200 / 44 | — |
| Absolute Stick | Summoner | 153–165 (92%) | 30 | 200 / 98 | — |
Every Blessed version carries the same six excellent options, none of them random: excellent damage rate +10%, attack or magic power +2 per 20 levels, attack or magic power +57, attack speed +7, and life and mana recovery of one eighth of the relevant stat per kill. On top sits Archangel’s Will, a buff giving you and nearby party members +200 PvP attack damage and +50 skill attack power.
The two newest classes finally got socket gear
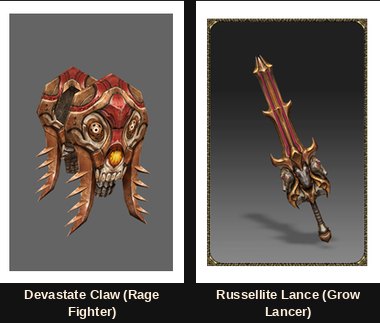
Rage Fighter and Grow Lancer had been left out of the level 400 socket tier. Season 11 added their missing pieces and the conversion with them: the socket item upgrade turns a 380 piece straight into its 400 counterpart, keeping Luck, the weapon skill and the socket count. Every item here takes up to three sockets.
| Class | Slot | Level 380 → level 400 |
|---|---|---|
| Grow Lancer | Weapon | Rectus Lance → Russellite Lance |
| Grow Lancer | Shield | Grace Shield → Constant Shield |
| Grow Lancer | Armour | Grace helm, armour, pants, gloves, boots → Constant |
| Rage Fighter | Weapon | Panthera Claw → Devastate Claw |
| Rage Fighter | Armour | Tigris helm, armour, pants, boots → Crimson Skull |


Two smaller wins came with them. Dropped socket items print their socket count in the drop tooltip, so the MU Helper’s selected-item pickup can filter on it, and hovering one shows the level of the spheres inside. Raklion was rearranged too: spawns moved, 400 socket armour stopped dropping there, and Selupan picked up Blast Break, Horn of Steel, Magma Sphere, Devil Cross Crossbow, Spite Staff and Ambition Shield.
Interface switches to find on day one
The last Season 11 additions are client features, which is why they outlived the gear around them.
C, and then Shift + C
The character window was rebuilt so specialisation values print under each stat instead of hiding in a tooltip, and so stats split by colour. Permanent stats are yellow: levels, fruits, master tree nodes. Variable stats are light blue: equipment and buffs. Requirements must be met with permanent stats alone, so a weapon you can equip while buffed is not a weapon you can equip.
Shift + C opens the extended sheet, where the numbers you build around live: critical, excellent and double damage rates, ignore-defense and reflect rates, skill attack power, damage increase, decrease and absorb, automatic and on-kill recovery for HP, mana, AG and SD, full-recovery chances, mana and AG cost reduction, PvP SD ratio and SD ignore rate, stun rate and resistance, Steel Armor defense, master tree block rates, and zen acquisition rate. Open it after every gear change.
The Element tab is the most useful screen in the season: your pentagram, the elemental attack and defense its errtels add up to, your skill imprint bonus, and your attack and defense affinity against every opposing element, sorted with the elements that beat yours on top and split into PvE and PvP. A Fire pentagram against Darkness applies 110% attack affinity.
The hunting record
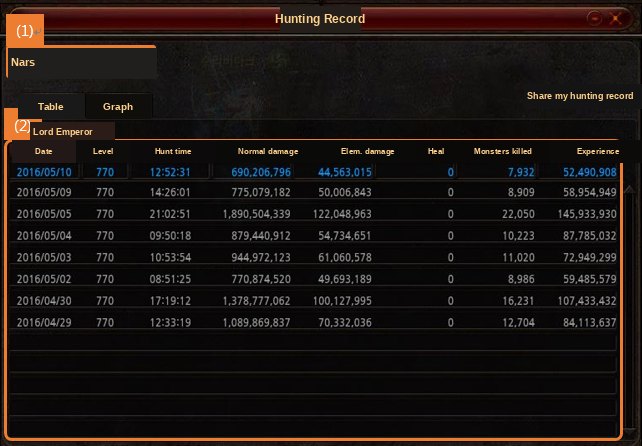
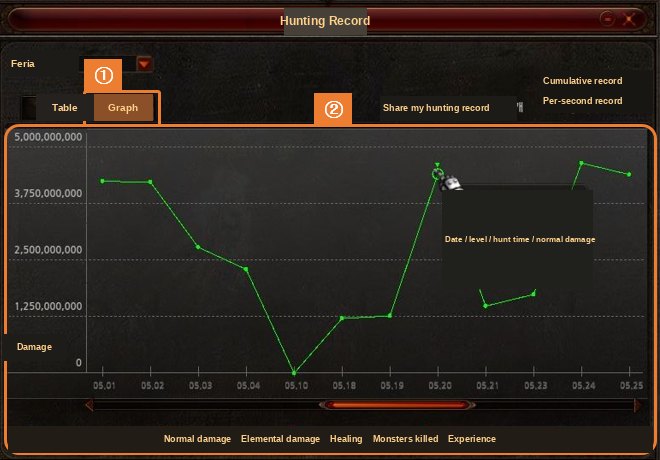
The hunting record exists because the MU Helper hunts while you are not watching. One row per day per hunting ground: time spent, normal and elemental damage, healing, kills, experience. It holds 60 days, then drops the oldest row. Open it from the top-left icon or the End key; today’s row is live, every column sorts, and minimising it gives a per-second readout. Tick share my hunting record and others can read yours.
Mine Finder, and the mouse wheel
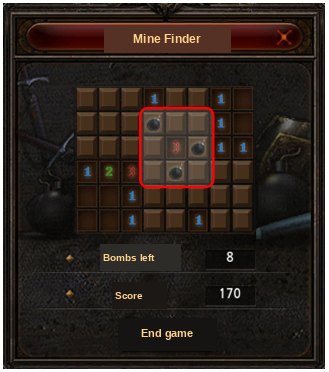
Mine Finder runs on Card Pieces that drop as you hunt, and 24 pieces make a Card Bundle that starts a game; tick “event item” in the Helper and it collects them. Click a square to reveal how many of its eight neighbours hide a bomb, first click always safe, right-click to flag. Score comes from the numbers you uncover, minus penalties for bad flags and bombs. The reward lands as a graded box in the Gremory Case (K) and waits 1 day.
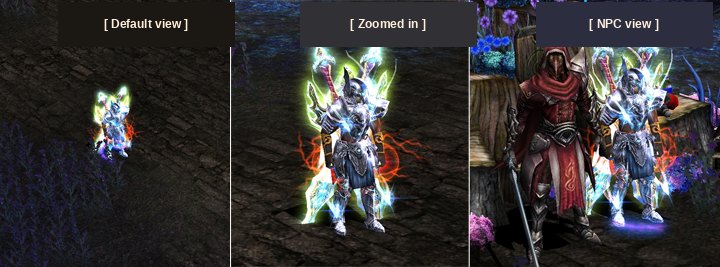
Camera zoom is the smallest addition in the season and the one you use most, because it is the only way to look closely at your own gear. It is off in a few places, Imperial Guardian and Battle Soccer among them, and resets every time you change map.
Superseded, and by what
- Blood Angel weapons are a historical tier. The guaranteed-Excellent idea is what carried forward.
- Blessed Absolute Weapons are a PvP curiosity. Archangel's Will reads well; the base weapons are an old band.
- Feria as a hunting ground is skippable. Its level 400 gate sits far below where you fight.
- Level 380 socket items are only a step toward the 400 versions, not gear to wear.
- Sphere, Tetra, Sonic Combination Note and Ice Walker's Mane stopped dropping when the new combinations replaced the old.
- Old sphere wording is wrong. Per-level became per-20-levels, HP and mana went flat, on-kill recovery became exact.
Not superseded: the Seed Master’s single window, level 10 spheres, the Earth sphere, the four ceilings, 100% errtel rank-ups, the Element tab, the hunting record and camera zoom. A long list for a ten-year-old patch, and why Season 11 is worth more than a skim.
What to do about Season 11
- Find the Seed Master at Elbeland (46, 243) early and work all six tabs on cheap gear.
- Raise one sphere toward level 10 rather than several to level 4.
- Write the four ceilings down and check them in Shift + C before you mount anything.
- Decide the mounting order before the first sphere goes in.
- Rank errtels in pairs at level 7. It is free and it is 100%.
- Go to Feria for the Lord, not the Archers. Spread out, and kill the General at once.
- Turn the hunting record on from day one.
Our server runs Season 22 on the latest server files and opens on 30 October 2026, with high exp, stats capped at 32,700, events and mini-bosses all day, and a custom jewel system. The socket work on this page applies from your first socket item onward. Create an account and go and meet the Seed Master.
- Still core: one socket window at the Seed Master, Elbeland (46, 243).
- Spheres run to level 10, and a failed upgrade costs only the sub material and runes.
- Four ceilings: excellent damage rate 70%, critical damage rate 80%, damage decrease 60%, shield defense 1800%.
- Errtel rank-ups are 100% from two matching errtels at level 7.
- Feria wants level 400, worth one trip for the Feria Lord, whose orb returns every 12 to 24 hours.
- Safe to skip: Blood Angel and Blessed Absolute Weapons, both long since outranked.
- Switch on first: Shift + C, the Element tab, and the hunting record under End.