Bạn đang chơi nội dung của Season 15 nhiều hơn gần như mọi season khác, mà không hề được ai nói cho biết. Cửa sổ bạn dùng để bán đồ, cửa sổ bạn dùng để nâng cấp trang bị, cái nút hình vương miện tự đi săn khi bạn rời máy, lớp debuff mà mọi class bây giờ đều mang theo, và một trong những class trên màn hình tạo nhân vật: tất cả đều được dựng lên trong hai năm 2019 và 2020 và chưa bao giờ bị thay thế. Còn các khu săn, giới hạn cấp độ và các bậc mastery của nó thì lại là chuyện khác. Hướng dẫn này chia bản cập nhật hai phần đó thành ba nhóm: phần bạn chạm tới mỗi lần vào game, phần bạn chỉ đi qua một lần, và phần đã hết thời cùng với những con số mà nó được vẽ ra cho.
Hai phần cập nhật đã mang tới những gì, và vì sao phần lớn trong đó vẫn còn trụ lại
Season 15 ra mắt theo hai nửa, cộng lại là bản cập nhật nặng nhất kể từ Grow Lancer: một class mới với lần chuyển class thứ 4 riêng, bậc vũ khí mastery thứ năm và bậc giáp mastery thứ sáu, hai khu săn về sau còn mọc thêm khu elite, một Guardian thứ hai, bông tai mastery thứ ba, bốn dây chuyền mang cùng lúc cả tùy chọn Excellent và socket, một cửa hàng cá nhân được xây lại, một hệ thống tự động đi săn, một Dark Knight bị tách làm hai, và hai lần nâng giới hạn cấp độ.
Trước khi đi vào chi tiết, có một điều đáng để ý. Bản đồ và vật phẩm rồi sẽ bị các bậc sau vượt qua; còn giao diện và luật chơi thì được thừa hưởng lại. Season 15 đã dồn phần lớn ngân sách vào loại thứ hai, và đó là lý do một bản patch note năm 2019 lại mô tả client năm 2026 của bạn chính xác đến thế, trong khi các khoảng cấp độ của nó thì chẳng mô tả nơi nào bạn còn đứng tới nữa. Season 16 và mọi season sau đó đều xây tiếp trên phần đường ống được lắp đặt ở đây.
Bốn cửa sổ bạn mở mỗi lần vào game
Không có cái nào trong số này là nội dung tùy chọn mà bạn có thể quyết định bỏ qua. Chúng là nội thất của client, và ba trong bốn cái là phiên bản duy nhất của chính chúng mà bạn từng thấy.
Cửa hàng cá nhân là một bản xây lại của Season 15
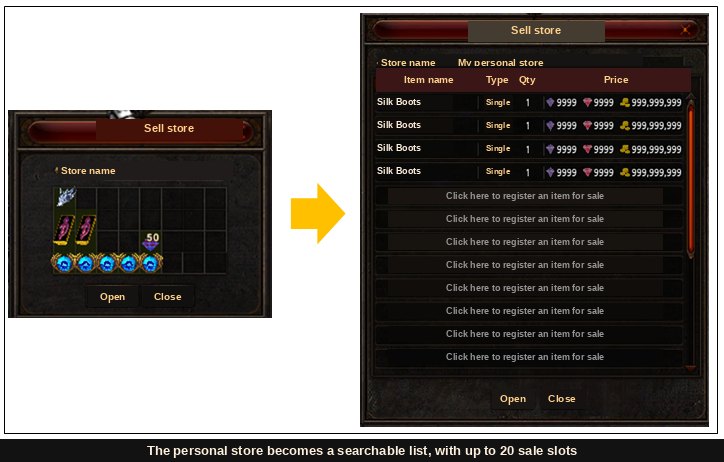
Trước season này, bán đồ nghĩa là đậu một nhân vật dưới một lưới các ô hành trang rồi chờ người mua tự đi tới. Season 15 thay cái lưới bằng một danh sách và tách việc xem hàng ra khỏi việc di chuyển: người mua tìm và mua xuyên mọi channel và mọi khu săn mà không cần đi đâu cả.
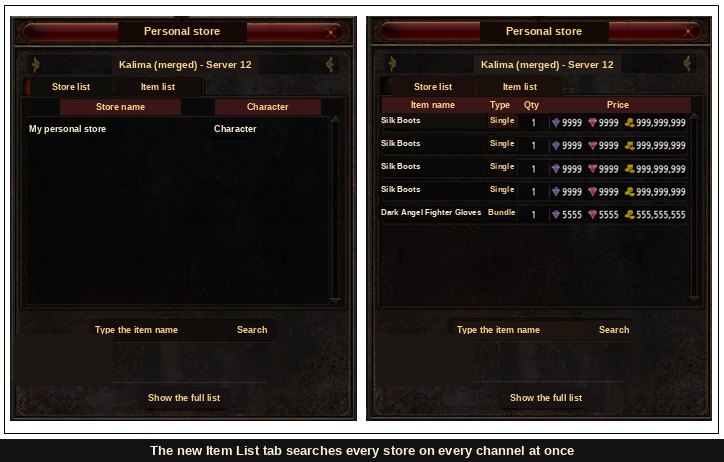
Những luật dưới đây vẫn là luật điều khiển một giao dịch, nằm lẫn trong patch note dưới dạng chữ nhỏ.
| Luật | Nghĩa là gì khi bạn bán |
|---|---|
| Cửa hàng là danh sách, không phải lưới ô | Tối đa 20 dòng, mỗi dòng đặt giá riêng |
| Nơi bạn được phép mở cửa hàng | Chỉ trong khu an toàn: Loren Market, Lorencia, Elbeland, Noria, Devias |
| Rời khỏi chỗ được phép | Cửa hàng tự đóng ngay khi người bán bước sang nơi không được phép |
| Đăng bán một vật phẩm | Một cửa sổ đặt giá mở ra và vật phẩm rời khỏi hành trang trong suốt thời gian được niêm yết |
| Sửa một dòng đã niêm yết | Đóng cửa hàng, bấm vào dòng đó, rồi đổi giá hoặc rút vật phẩm về |
| Bán theo lô | Từ hai đến năm vật phẩm đăng chung thành một lô, nên năm bộ Blood Angel đổi 100 Jewel of Bless là một giao dịch chứ không phải năm |
| Tiền về đâu | Thẻ Gremory Case — Personal Store, giới hạn 150 vật phẩm, phải nhận trong 7 ngày, mỗi giao dịch trễ khoảng một phút |
| Khi đầy giới hạn đó | Cả bán lẫn mua đều dừng lại cho tới khi bạn dọn trống thẻ đó |
| Tìm kiếm | Từ khóa từ hai ký tự trở lên, còn gợi ý tự động vẫn nhận cả một ký tự |
| Những tìm kiếm biết phân biệt | Đồ Elf hệ agility và hệ energy, đồ Magic Gladiator hệ wizard và hệ knight, và seed sphere theo từng bậc |
| Hai thứ nay bị cấm | Đặt giá một jewel bằng chính jewel đó, và dùng Jewel of Chaos làm tiền tệ nói chung |
Hai trong số các luật đó làm nhiều người mất tiền. Hạn nhận 7 ngày nghĩa là người bán nào ngừng đăng nhập sẽ mất luôn tiền hàng, và giới hạn 150 vật phẩm chặn cả việc mua chứ không chỉ việc bán khi nó đầy. Khi bản xây lại lên máy chủ, mọi cửa hàng đang tồn tại đều bị đóng và dồn vào Gremory Case, và đó cũng là lúc Jewel of Chaos thôi làm tiền.
Equipment Enhancement: cửa sổ đã thay thế việc đoán mò
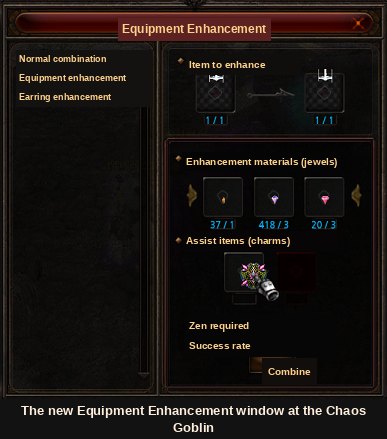
Việc nâng cấp vật phẩm trước đây nằm trong Normal Combination, nơi bạn tự đưa jewel vào và chỉ biết mình chọn sai sau khi đã làm. Season 15 cho nó một nút [Equipment Enhancement] riêng ở Chaos Goblin, bao trọn +1 tới +15 trong cùng một chỗ và tự nạp nguyên liệu.
Thứ cho vào được gần như là tất cả: vật phẩm thường, vật phẩm Excellent, đồ bộ, đồ socket, đồ 380, đồ pentagram, cánh và áo choàng từ cấp 1 tới cấp 4 kể cả loại bị khóa theo nhân vật, cánh quái, Cape of Conqueror, trang bị mastery, cùng Earring of Rage và Earring of Ancestors.
| Khoảng | Jewel mà cửa sổ tự dùng | Thứ bạn vẫn phải tự thêm |
|---|---|---|
| +1 tới +6 | Bless hoặc Soul, chọn bằng nút radio | Không có gì |
| +7 tới +9 | Chỉ Soul; Bless bị từ chối | Không có gì |
| +10 tới +15 | Bố cục chuyển sang dạng khác ở mốc +9 | Lucky Charm, Chaos Combination Charm và các bản nguyên tố của chúng. Một Lucky Charm và một Chaos Combination Charm có thể cùng nằm trong cửa sổ |
Helper Plus, và những party sống sót qua lúc bạn thoát game
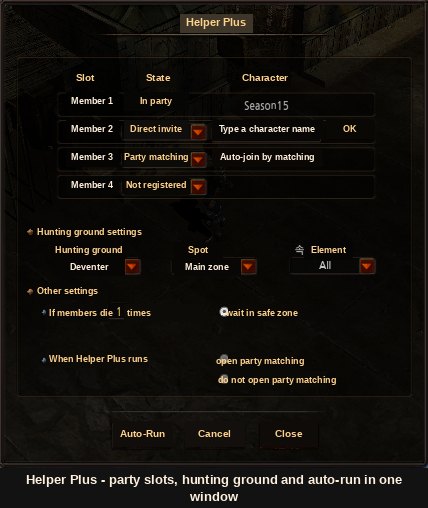
Cái nút hình vương miện bên cạnh nút MU Helper chính là Helper Plus, và nó làm ba việc mà bạn vốn phải tự tay làm trước một phiên AFK: nó tuyển party, nó tìm chỗ săn, và nó bắt đầu săn. Bạn chạy nó khi chơi một mình hoặc khi làm trưởng party. Thành viên party thì không khởi động được.
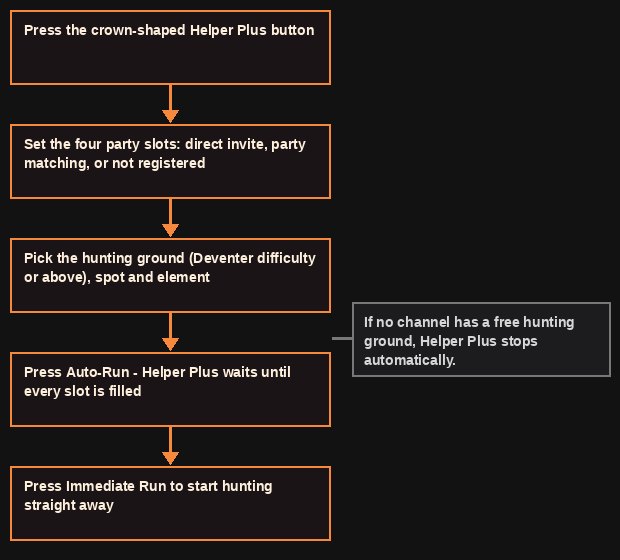
Mỗi ô trong bốn ô party được đặt riêng, và đặt cả bốn ô giống nhau là cách để có một phiên chạy một mình gọn gàng.
| Thiết lập của ô | Ai sẽ vào ô đó |
|---|---|
| Direct registration | Một cái tên bạn tự gõ vào, sẽ được mời tự động khi phiên chạy bắt đầu |
| Party matching | Bất cứ ai, được niêm yết công khai theo thiết lập ghép party bạn đã lưu |
| Not registered | Không ai cả. Bốn ô như vậy nghĩa là chơi một mình |
Phần chọn khu săn bao gồm các khu săn từ độ khó Deventer trở lên, và bạn có thể ghim cả vị trí lẫn nguyên tố của quái. Nó tìm trong channel của bạn trước, rồi tới các channel còn lại, và tự tắt nếu không channel nào còn chỗ trống. Các khu săn do MU Helper chia ra thì không bao giờ trùng nhau giữa những người chơi. Có bốn bản đồ bị loại: Valley of Loren, Loren Market, Event Map Square và Labyrinth of Dimensions.
Để làm được chuyện đó, hệ thống party phải được nới ra, và những thay đổi ấy giúp bạn ngay cả khi bạn không bao giờ bấm cái vương miện.
| Thay đổi về party | Hiệu ứng |
|---|---|
| Party tồn tại lâu dài | Party không còn tan khi mọi người thoát game |
| Thành viên không hoạt động | Bị loại sau 30 ngày không đăng nhập |
| Trưởng party không hoạt động | Party giải tán sau 30 ngày không đăng nhập |
| Thành viên ở các channel khác nhau | Vẫn ở trong party và vẫn vào được nội dung dành cho party; kinh nghiệm và buff MU Helper chỉ chia khi họ đứng cùng một chỗ |
| Giao quyền Helper và tự động di chuyển | Hoạt động xuyên channel, và cả trong Valley of Loren lẫn Crywolf |
| Danh sách bạn bè | Mời trực tiếp một người bạn ở xa, không cần di chuyển |
| Yêu cầu Energy Elf | Một tùy chọn ghép party giữ riêng một ô cho nhân vật có Energy cao hơn Agility, hoặc ít nhất 1,500 |
| Check Info | Cho xem thành phần của một party trước khi bạn xin vào |
Simple UI và một danh sách dài những ân huệ nhỏ
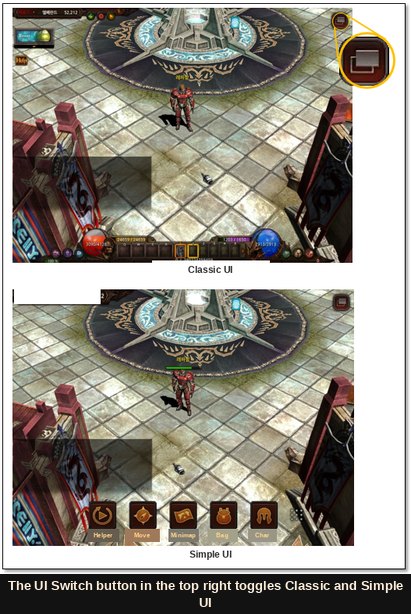
Simple UI lược HUD xuống còn một menu nhanh ngắn do chính bạn tự dựng. Mở menu đầy đủ ra là thanh đó vào chế độ chỉnh sửa: bấm một nút trên menu nhanh, rồi bấm nút trên menu đầy đủ mà bạn muốn thay vào, hoặc bấm hai nút trên menu nhanh để đổi chỗ chúng. Đóng menu đầy đủ là kết thúc chỉnh sửa.
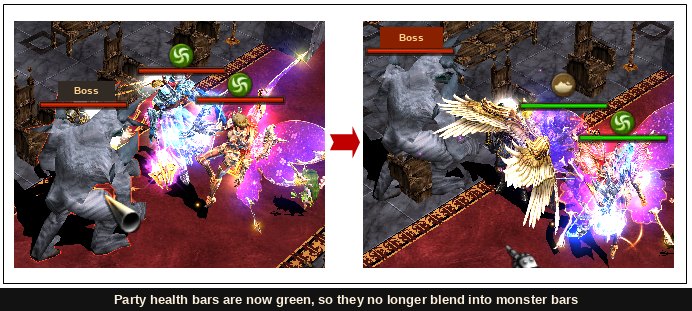
Phần còn lại của lượt chỉnh sửa này là danh sách những thứ bạn chỉ nhận ra khi chúng không còn.
| Thay đổi | Bạn thấy nó ở đâu |
|---|---|
| Thanh máu của party đổi sang màu xanh | Những màn hình đông đúc, nơi trước đây chúng bị đọc thành thanh máu quái |
| Sắp xếp lại các ô nhân vật | Mũi tên bên cạnh mỗi ô, không nhảy qua được một ô trống |
| Vẽ lại các icon | Sửa đồ, tách đồ và tháo rã đồ |
| Chữ chuyển channel miễn phí sáng hơn | Danh sách channel |
| Tinh luyện vật phẩm lucky | Chuyển sang nút Dismantle trong hành trang thay vì bấm chuột phải |
| Bấm chuột phải để mặc | Dùng song song với kéo và thả |
| Jewel of Extension | Xếp chồng tới 10 |
| Đường đi của MU Helper | Không còn kẹt cách điểm xuất phát một ô khi có nhân vật khác đứng ở đó |
| MU Helper tự sửa Guardian cho bạn | Tự động, bằng Jewel of Bless, khi sinh lực Guardian còn 1. Công tắc nằm trong MU Helper [Other settings] |
Slayer, đọc như một lựa chọn class chứ không phải một bản tin
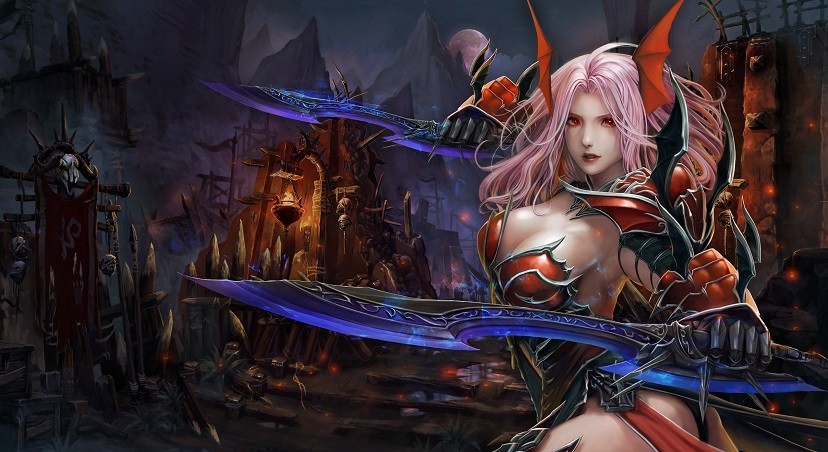
Trong tất cả những thứ ở đây, Slayer là phần dễ thay đổi việc bạn thật sự làm trong game nhất, vì nó vẫn nằm ngay trên màn hình tạo nhân vật mà không cần điều kiện mở khóa nào. Không cần nhân vật cấp cao trong tài khoản, không nhiệm vụ, không vật phẩm. Bạn chọn nó và bắt đầu ở Lorencia.
Về cơ chế, đây là một kiếm sĩ dùng đoản kiếm, phóng lưỡi kiếm ra xa rồi lao vào giữa đám quái với tốc độ cao, nên nó chơi như một sát thủ không bao giờ dính hẳn vào đánh gần. Chỉ số cao nhất của nó khi tạo nhân vật là Agility, và Agility cũng là thứ mà mọi kỹ năng riêng của class này đều đo bạn theo.
| Khi tạo nhân vật | Slayer |
|---|---|
| Bậc thang class | Slayer → Royal Slayer → Master Slayer → Slaughterer |
| Mở khóa | Không có. Có sẵn từ đầu |
| Thị trấn khởi đầu | Lorencia |
| Strength / Agility / Vitality / Energy | 28 / 30 / 15 / 10 |
| Sinh lực / mana | 130 / 10 |
| Party hợp bộ | Slayer, Dark Knight, Summoner |
| Cửa hàng khởi đầu | Wandering Merchant Alex tại (115, 120) ở Lorencia: đoản kiếm cấp thấp, cánh, và cả bốn viên ngọc kỹ năng |
Desmodus, con muun không ai khác có được
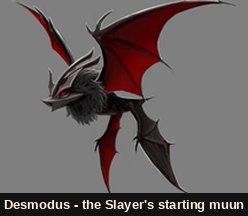
Mỗi Slayer đều được trao một Special Muun Egg, trứng này nở ra Desmodus, một muun bậc 3 độc quyền của class. Khả năng cơ bản của nó cho phép muun dùng kỹ năng tấn công, tuy không dùng được trong PvP, và khả năng theo thời hạn 30 ngày của nó nhân đôi tốc độ của những kỹ năng đó. Các nhiệm vụ chuyển class sẽ nuôi lớn nó giúp bạn.
| Lần chuyển class | Thứ nó trả lại cho bạn |
|---|---|
| Thứ 1 | Một Desmodus cấp 1 |
| Thứ 2 | Một Desmodus cấp 1 |
| Thứ 3 | Một Desmodus cấp 1 |
| Thứ 4 | Một Desmodus Evolution Stone |
Danh sách kỹ năng: năm cái đi vay, sáu cái của riêng nó
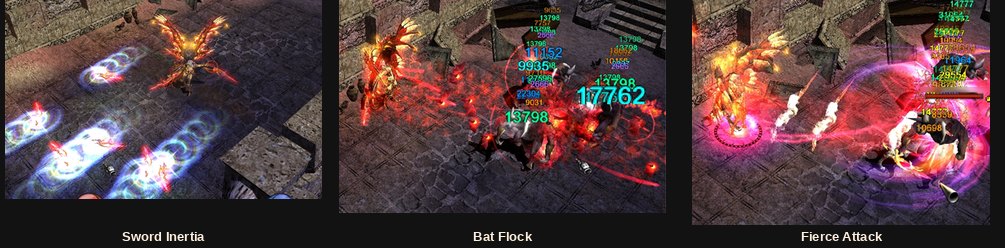
Năm ô kỹ năng lấy thẳng từ Dark Knight: Twisting Slash, Uppercut, Lunge, Cyclone và Rageful Blow. Dưới đây là phần của riêng class, với bốn kỹ năng cơ bản và hai kỹ năng chỉ có ở mastery gộp trong một bảng để thấy trọn vòng phát triển cùng lúc. Hãy mua ngọc kỹ năng từ Alex trước khi rời Lorencia.
| Kỹ năng | Nguyên tố | Yêu cầu | Nó làm gì |
|---|---|---|---|
| Sword Inertia | Darkness | Cấp 30, Str 50, Agi 100 | Bạn lao qua trái rồi qua phải và phóng ra ba đoản kiếm, mỗi lưỡi bay đi rồi quay về như boomerang, mỗi lưỡi gây một lần sát thương |
| Bat Flock | Darkness | Cấp 270, Str 100, Agi 380 | Một đàn dơi lao về phía trước, gây hai lần sát thương, và để lại sát thương theo thời gian phía sau |
| Fierce Attack | Darkness | Str 300, Agi 1,100, cùng Bat Flock và Bat Flock Mastery 10 | Dịch chuyển vào đánh hai nhát cận chiến rồi quay về. Nếu mục tiêu đang chịu sát thương theo thời gian từ Bat Flock, bạn đánh vào điểm yếu để thêm hai nhát nữa |
| Detection | Không | Cấp 300, Agi 800 | Vẽ mọi sinh vật quanh bạn lên bản đồ nhỏ, hồi chiêu 5 giây |
| Detection enhancement | Không | Nhánh mastery, 10/10 | Đẩy chính lần quét đó ra tới 500 ô |
| Demolish | Không | Cấp 400, Agi 1,450, Master Slayer | Tiêu 3% sức mạnh tấn công kỹ năng của chính bạn để cho bản thân và cả party một phần hiệu ứng bỏ qua phòng thủ trong 40 giây, hồi chiêu 60 giây. Hai kỹ năng master giúp giảm thời gian hồi chiêu và tăng giá trị của nó |
Demolish là thứ phải mua chứ không phải học: Priest James ở Elbeland bán nó lấy Ruud, khiến nó thành phần duy nhất trong bộ kỹ năng bị chặn sau một loại tiền tệ thay vì sau một cấp độ. Khi chơi, hãy luôn dùng Bat Flock trước Fierce Attack, vì những nhát đánh thêm chỉ vào được mục tiêu đã bị đàn dơi gây độc trước đó.
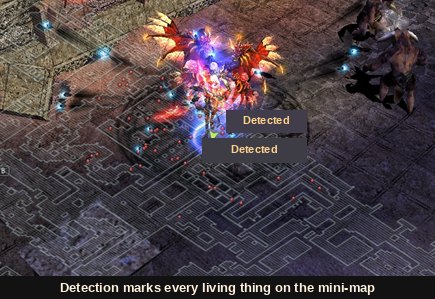
Detection có giá trị trên một máy chủ private đông người hơn là trên máy chủ chính thức. Một vòng quét 500 ô tìm ra mini-boss vừa hồi sinh, chỗ săn trống và đoàn quái của người chơi khác mà không cần đi khắp bản đồ, còn trên máy chủ Season 22 của chúng tôi thì mini-boss chạy suốt ngày, nên thấy một con xuất hiện nghĩa là tới đó trước người khác.
Slaughterer: lần chuyển class thứ 4
Class thứ tư của Slayer là Slaughterer, và chuỗi nhiệm vụ mở ra ở cấp 800 khi bạn đã xong lần chuyển class thứ ba. Cả ba nhiệm vụ đều nhận từ Cent (131, 147) ở Lorencia, và cả ba đều là đánh nhau chứ không phải chạy việc lấy đồ.
| Nhiệm vụ | Trận đánh | Trả bằng |
|---|---|---|
| Cent's Qualification Test | Một trận 1 đấu 1 thẳng với chính Cent | 20 điểm chỉ số |
| New Battle (1) | Trụ hết thời gian trước Deep Dungeon Larva, Skeleton Warrior và Cyclops | 30 điểm chỉ số |
| New Battle (2) | Lại là Cent, lần này có quái Deep Dungeon đứng cùng, trong một giới hạn thời gian | 50 điểm chỉ số và một Grey Scroll of Oblivion |
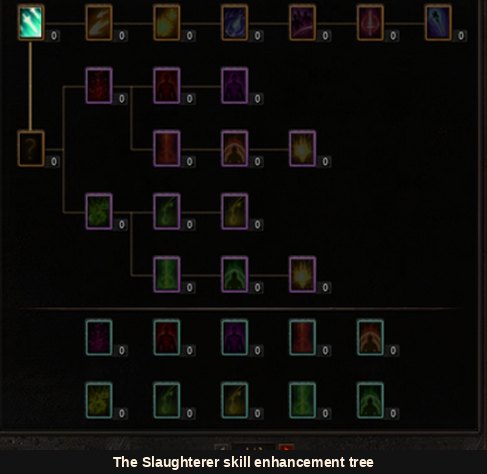
Mỗi kỹ năng trong ba kỹ năng đặc trưng có một nhánh riêng, và mọi nhánh đều mang bảy nút giống nhau với cùng mức giá. Bảng dưới xếp theo giá của chúng.
| Điểm | Nút | Trên Sword Inertia | Trên Bat Flock và Fierce Attack |
|---|---|---|---|
| 1/20 | Enhancement | Sức mạnh tấn công kỹ năng | Sức mạnh tấn công kỹ năng |
| 1/20 | Additional damage rate | Tỉ lệ gây sát thương thêm | Tỉ lệ gây sát thương thêm |
| 1/20 | Skill damage | Sát thương kỹ năng | Sát thương kỹ năng |
| 1/20 | Weapon attack power | Sức mạnh tấn công của vũ khí đang mặc, theo phần trăm | Sức mạnh tấn công của vũ khí đang mặc, theo phần trăm |
| 15/15 | Nút thứ hai | Số lần sát thương +1 | Tầm tung kỹ năng +1 ô |
| 10/10 | Nút thứ tư | Thêm sát thương lan | Tầm tấn công +1 ô |
| 10/10 | Target increase | +1 mục tiêu | +1 mục tiêu |
Ba nút có giá cố định là nơi một build farm và một build đấu tay đôi tách khỏi nhau: số lần sát thương thêm và sát thương lan của Sword Inertia hơn hẳn một ô tầm xa thêm trên Bat Flock khi đứng giữa đám quái. Các nhánh debuff thì theo bố cục chuẩn của season này, Sword Inertia mang Bleeding và Poison, còn Bat Flock và Fierce Attack đều mang Poison và Frost.
Cánh, giáp Slayer và lưỡi kiếm đi cùng
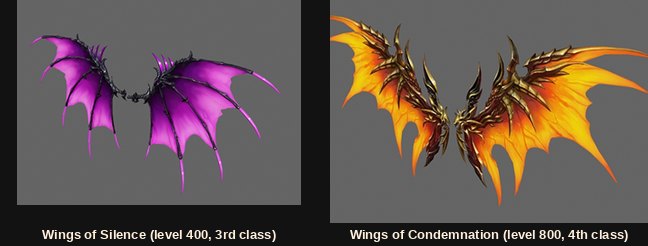
Hai đôi cánh, mỗi lần chuyển class một đôi, với luật quen thuộc rằng đôi cánh thứ tư mới là nơi có những dòng chỉ số thật sự đáng giá.
| Cánh | Yêu cầu | Phòng thủ | Tăng / giảm sát thương | Tùy chọn có thể ra |
|---|---|---|---|---|
| Wings of Silence | Cấp 400, chuyển class lần 3 | 60 | 39% / 39% | Tối đa hai dòng, trong số hồi toàn bộ mana +5%, hồi toàn bộ sinh lực +5%, phản đòn +5% và bỏ qua phòng thủ +5% |
| Wings of Condemnation | Cấp 800, chuyển class lần 4 | 140, cộng tấn công 100 | 55% / 43% | Theo luật cánh cấp 4: một tới bốn trong mười một tùy chọn ngẫu nhiên, cộng không hoặc một tùy chọn nguyên tố trên nền phòng thủ nguyên tố |
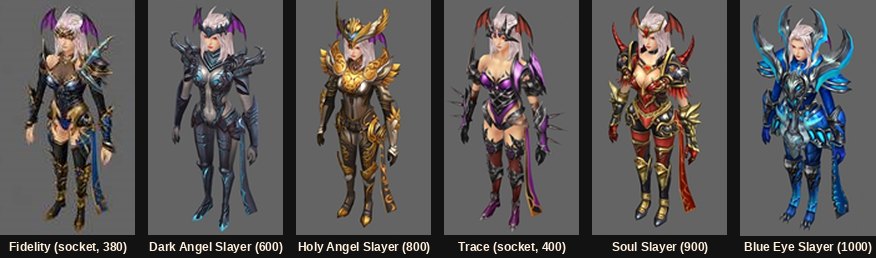
Bậc thang giáp và dòng vũ khí đi song song với nhau, nên chúng thuộc cùng một bảng. Phòng thủ được liệt theo thứ tự mũ, áo, giáp chân, găng tay, giày; mọi đoản kiếm ở cột cuối đều có tốc độ tấn công 45.
| Bậc | Cấp | Phòng thủ, năm món | Đoản kiếm đi cùng |
|---|---|---|---|
| Fidelity (socket) | 380 | 65 / 77 / 70 / 47 / 59 | – |
| Trace (socket) | 400 | 74 / 86 / 79 / 56 / 68 | – |
| Blood Angel Slayer | 400 | 112 / 135 / 127 / 103 / 116 | Blood Angel Short Sword, 296–306 |
| Dark Angel Slayer | 600 | 133 / 146 / 138 / 113 / 126 | Dark Angel Short Sword, 351–361 |
| Holy Angel Slayer | 800 | 187 / 200 / 192 / 167 / 180 | Holy Angel Short Sword, 415–425 |
| Soul Slayer | 900 | 235 / 248 / 241 / 216 / 229 | Soul Short Sword, 477–497 |
| Blue Eye Slayer | 1000 | 284 / 297 / 289 / 265 / 278 | Blue Eye Short Sword, 539–570 |
Đó là các bản thường, và không phải là nơi bạn dừng lại. Bốn bậc có bản nâng cấp bốn món tương ứng, hơn khoảng mười điểm phòng thủ mỗi món, và chính bản nâng cấp mới mang những bonus bộ đáng giá. Cột 4 set là lý do người ta đi săn chúng.
| Bộ nâng cấp | 4 set | 3 set | 2 set |
|---|---|---|---|
| Frigid Blue Eye Slayer | Bỏ qua phòng thủ đối phương 9%, sát thương gấp ba +4%, mastery sinh lực tối đa, +20% cho cả tỉ lệ sát thương critical và excellent | Mastery sức mạnh tấn công, tỉ lệ sát thương gấp đôi 18% | Mastery sức mạnh tấn công kỹ năng, mastery Strength |
| Soul Slayer of Awakening | Bỏ qua phòng thủ đối phương 9%, sát thương gấp ba 2%, toàn bộ chỉ số +25, +20% cho cả tỉ lệ sát thương critical và excellent | Mastery sức mạnh tấn công, tỉ lệ sát thương gấp đôi 18% | Strength +100, sức mạnh tấn công kỹ năng +40 |
| Holy Angel Slayer of Punishment | Bỏ qua phòng thủ đối phương 9%, toàn bộ chỉ số +20, phòng thủ nền +40, +20% cho cả tỉ lệ sát thương critical và excellent | Sức mạnh tấn công +100, tỉ lệ sát thương gấp đôi 18% | Strength +90, sức mạnh tấn công kỹ năng +35 |
| Harsh Dark Angel Slayer | Bỏ qua phòng thủ đối phương 7%, toàn bộ chỉ số +15, phòng thủ nền +30, +18% cho cả tỉ lệ sát thương critical và excellent | Sức mạnh tấn công +75, tỉ lệ sát thương gấp đôi 15% | Strength +70, sức mạnh tấn công kỹ năng +30 |
Hãy để ý thứ gì ngừng tăng. Bỏ qua phòng thủ đối phương chạm trần 9% ở hai bậc dưới đỉnh và tỉ lệ sát thương critical cùng excellent chạm trần 20%, trong khi sát thương gấp ba và các dòng co giãn theo mastery vẫn tiếp tục lớn lên theo cấp nâng cấp của vật phẩm. Đó là lý lẽ cho việc nâng cấp một bộ giáp bậc thấp hơn thay vì mặc một bộ bậc cao hơn nhưng trơn.
Hai khu săn, và vị trí của chúng trên lộ trình của bạn
Scorched Canyon ra mắt ở nửa đầu season và Crimson Icarus ở nửa sau, được thiết kế để leo theo đúng thứ tự đó. Cả hai từng là đỉnh của danh sách bản đồ khi ra mắt, vẽ quanh một giới hạn cấp độ 1,250. Các season sau đã đẩy giới hạn đi xa hơn, nên hãy đọc những cấp độ vào cửa này như vị trí của một bậc thang chứ không phải của cái trần.
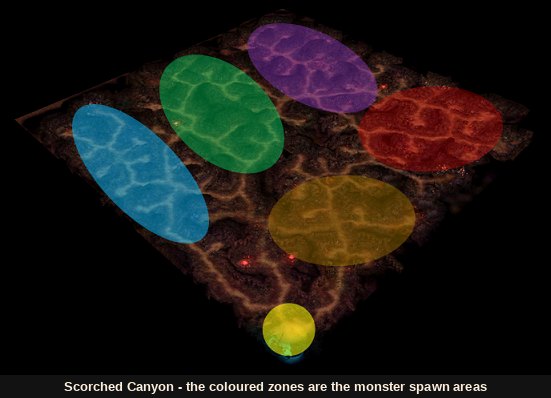
Hẻm núi này mang một trong những câu chuyện hay hơn của game. Những người tị nạn chạy khỏi Feria trong thảm họa Kanturu đã định cư ở đây và bắt đầu chuẩn bị báo thù Kundun. Nhóm muốn đầu hàng thì bị Lemuria bắt đi, hút rỗng thành những người lính không linh hồn, rồi gửi về để phá hủy chính khu nhà tạm đó. Mọi thứ bạn giết ở đây từng sống ở đây.
Crimson Icarus có nguồn gốc lặng lẽ hơn: các học giả của Medea khi vẽ bản đồ Icarus đã tìm ra một tầng trời thứ hai nằm thấp hơn một bậc, đầy mây đỏ và một thứ năng lượng báo hiệu điều chẳng lành.
Đặt cạnh nhau, hai bản đồ khác nhau đúng ở những điểm quyết định việc hôm nay bạn có bước vào được hay không.
| Scorched Canyon | Crimson Icarus | |
|---|---|---|
| Cấp độ vào cửa | 1,050 | 1,070 |
| Cấp độ không còn bị trừ phạt | 1,070 | 1,100 |
| Đường vào | Cửa sổ lệnh di chuyển (M), hoặc đi bộ qua cổng phía bắc ra khỏi khu an toàn Tarkan | Cửa sổ lệnh di chuyển, hoặc đi bộ vào qua Lost Tower tại (1, 238) |
| Phí di chuyển | 50,000 zen | 50,000 zen |
| Yêu cầu thêm | Không có | Phải đang mặc cánh hoặc đang cưỡi mount |
| Vật phẩm rơi | Giáp Silverheart, bản trơn | Giáp Excellent Silverheart và dây chuyền socket Excellent |
| Khi chết hoặc mất kết nối | Đưa bạn về khu an toàn của hẻm núi | – |
| Khu elite | Ba khu, thêm vào muộn hơn trong season | Năm khu, mỗi nguyên tố một khu |
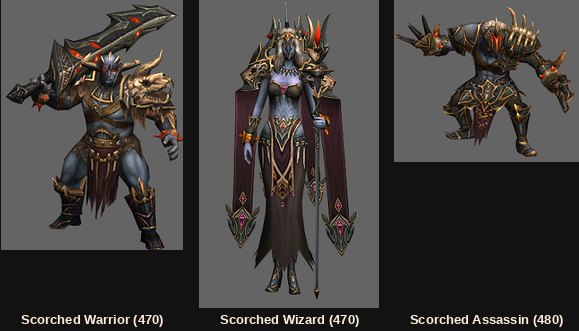
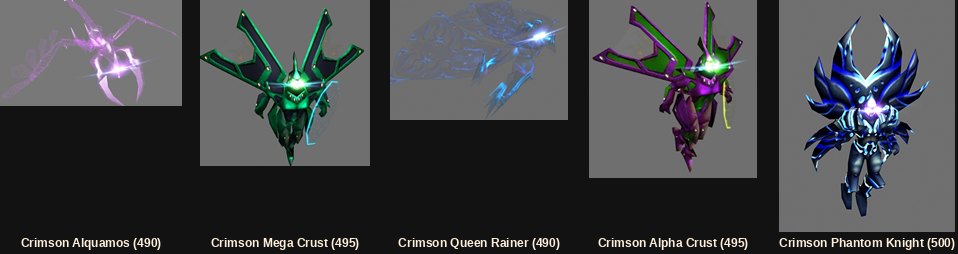
Tám con quái thường trên hai bản đồ, xếp thành một bậc thang từ 470 tới 500 để bạn thấy trọn đường leo trong một cột duy nhất.
| Cấp | Quái | Bản đồ | Cách nó đánh |
|---|---|---|---|
| 470 | Scorched Warrior | Scorched Canyon | Tên khổng lồ thô bạo, đại kiếm, thuần cận chiến |
| 470 | Scorched Wizard | Scorched Canyon | Đứng xa và tung phép diện rộng |
| 480 | Scorched Assassin | Scorched Canyon | Áp sát nhanh, dùng vuốt, cận chiến |
| 490 | Crimson Alquamos | Crimson Icarus | Đánh xa |
| 490 | Crimson Queen Rainer | Crimson Icarus | Đánh xa |
| 495 | Crimson Mega Crust | Crimson Icarus | Đòn diện rộng |
| 495 | Crimson Alpha Crust | Crimson Icarus | Đòn diện rộng |
| 500 | Crimson Phantom Knight | Crimson Icarus | Cận chiến |
Cả ba cư dân của hẻm núi đều mang fire, water, earth, wind và darkness cùng lúc, nên không có cấu hình nguyên tố đơn lẻ nào thắng được bản đồ này. Crimson Icarus thì lại là một khu săn nguyên tố thực sự, quái của nó mang thuộc tính cộng thêm kháng tỉ lệ sát thương excellent, kháng tỉ lệ sát thương critical, hấp thụ sát thương và kháng tỉ lệ debuff. Nếu sát thương của bạn sụp xuống khi chuyển từ hẻm núi lên đây, chính khối kháng đó là nguyên nhân, không phải bậc trang bị của bạn.
Khu elite: lý do thật sự để đi
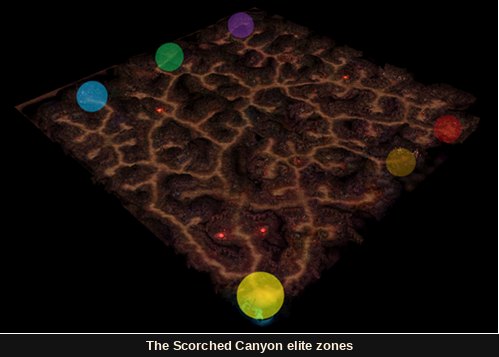
Các khu elite được thêm vào cả hai bản đồ muộn hơn trong season, và chúng là một loại nội dung khác với vùng đất xung quanh. Ba khu của hẻm núi chứa (Elite) Scorched Warrior, (Elite) Scorched Assassin và (Elite) Scorched Wizard, mang các tùy chọn debuff elite và kỹ năng elite. Phần làm nhiều người trở tay không kịp: mọi đòn chúng đánh trúng đều áp debuff với tỉ lệ 100%.
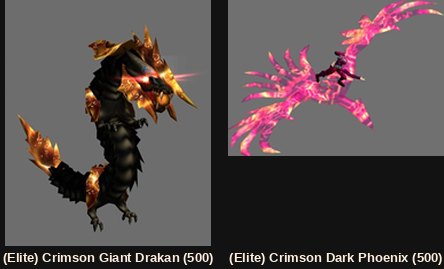
Crimson Icarus chia năm khu của nó theo nguyên tố, mỗi khu chứa cùng hai con elite cấp 500 và áp cặp debuff của nguyên tố mình trong mọi đòn đánh. Những con elite đó miễn nhiễm với đúng các hiệu ứng mà boss miễn nhiễm. Chỉ có tùy chọn kháng elite trên Guardian của bạn mới giảm được debuff nhận vào, và một Guardian chỉ ra một trong năm loại, nên khu bạn định farm sẽ quyết định Guardian của bạn.
| Nguyên tố | Lối vào khu | Nó làm gì với bạn | Dòng Guardian khắc chế nó |
|---|---|---|---|
| Fire | (41, 18) | Bleeding, giảm sức mạnh tấn công | Fire: kháng sát thương bleeding và kháng giảm sức mạnh tấn công |
| Water | (52, 205) | Deadly poison, giảm sức mạnh tấn công | Water: kháng sát thương deadly poison và kháng giảm sức mạnh tấn công |
| Earth | (157, 20) | Bleeding, giảm tốc độ tấn công | Earth: kháng sát thương bleeding và kháng giảm tốc độ tấn công |
| Wind | (148, 206) | Deadly poison, giảm phòng thủ | Wind: kháng sát thương deadly poison và kháng giảm phòng thủ |
| Dark | (188, 98) | Bleeding, giảm phòng thủ | Dark: kháng sát thương bleeding và kháng giảm phòng thủ |
Phần thưởng là bốn vật phẩm rơi không tồn tại ở bất cứ đâu khác. Một số trong đó bị giới hạn theo tuần, và giới hạn làm mới mỗi tuần, nên đây là nội dung bạn ghé theo lịch chứ không phải cày trong một buổi.
| Vật phẩm rơi | Cần bao nhiêu | Nó biến thành gì |
|---|---|---|
| Elite Option Change Fragment | 50 | Một Elite Option Change Stone, dùng để đổi lại tùy chọn elite trên một Guardian. Đây là cách bạn sửa vấn đề sai nguyên tố nói trên |
| Sealed Armour Fragment | 50 | Một món của bộ giáp Scratched Blood Angel. Món đó chế ra giáp Blood Angel mà không cần Soul of Blood Angel, và khi thành công sẽ ra ở +13 |
| Golden Crest | – | Nguyên liệu chế tạo cánh và áo choàng cấp 4 |
| Elite Guardian Enhancement Stone | – | Cách duy nhất để đẩy một Guardian vượt cấp nâng cấp 11 |
Blue Eye và Silverheart: hai bậc mastery mà season này thêm vào
Season 15 chịu trách nhiệm cho hai bậc của thang mastery: vũ khí mastery thứ năm, tên là Blue Eye, và giáp mastery thứ sáu, tên là Ancestral Silverheart. Không cái nào còn là đỉnh nữa, và đó chính là lý do chúng đáng để hiểu. Mọi bậc về sau đều được làm theo cùng một kiểu, từ cùng loại nguyên liệu, tại cùng NPC, với cùng tỉ lệ bảo đảm.
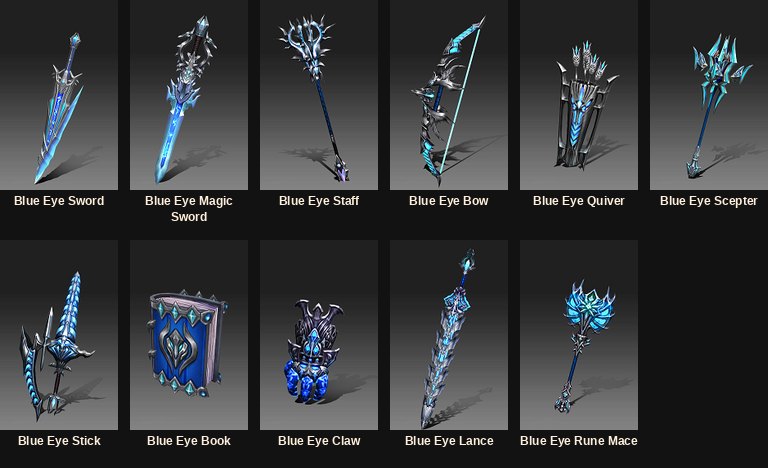
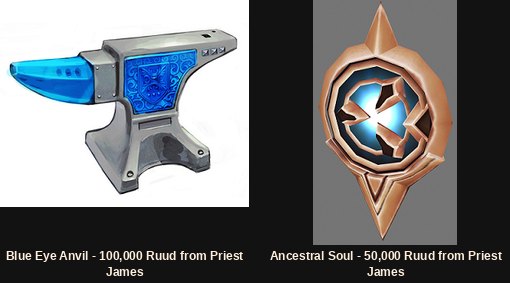
Hai công thức giống nhau về hình dạng: mang một vật phẩm mastery đã ở +11 với 16 tùy chọn, mua chất xúc tác từ Priest James ở Elbeland bằng Ruud, thêm jewel vào, và Chaos Goblin giao hàng với tỉ lệ cố định 100%.
| Thứ bạn muốn | Thứ bạn cho vào | Chất xúc tác | Jewel | Tỉ lệ |
|---|---|---|---|---|
| Vũ khí Blue Eye (mastery thứ 5) | Một vũ khí Soul Excellent ở +11 / 16 tùy chọn | Blue Eye Anvil, 100,000 Ruud | Bless ×30, Soul ×30, Chaos ×1, Creation ×1 | 100% |
| Giáp Ancestral Silverheart (mastery thứ 6) | Một món bộ Frigid Blue Eye ở +11 / 16 tùy chọn | Ancestral Soul, 50,000 Ruud | Bless ×30, Soul ×30, Chaos ×1, Creation ×1 | 100% |
Bản nâng cấp vũ khí giữ lại loại vũ khí, Luck và mọi tùy chọn Excellent; bản nâng cấp giáp giữ lại class được mặc, ô trang bị, Luck và tùy chọn toàn bộ chỉ số. Nên chi phí thật của một bậc mastery là cái +11 và 16 tùy chọn nằm bên dưới, không phải chất xúc tác đặt lên trên.
Mười một vũ khí Blue Eye
Món nào cũng đòi cấp 1,000, và món nào cũng mang cùng khối Excellent: tỉ lệ sát thương excellent +10%, tốc độ tấn công hoặc tốc độ phép +7, hồi sinh lực và mana bằng (chỉ số/8) mỗi lần hạ quái, tấn công hoặc phép thuật +2.2 mỗi 20 cấp, và sức mạnh tấn công +62. Blue Eye Book là ngoại lệ duy nhất, nơi dòng mỗi-20-cấp ghi là sức mạnh lời nguyền.
Bảng được nhóm theo cách dùng vũ khí chứ không theo thứ tự class, và cột cuối trả lời câu hỏi nó có mang theo kỹ năng hay không.
| Vũ khí | Class | Sức mạnh tấn công | Tốc độ | Yêu cầu chỉ số | Kỹ năng nó giữ |
|---|---|---|---|---|---|
| Blue Eye Short Sword | Slaughterer | 539–570 | 45 | Str 336 / Agi 1,067 | – |
| Blue Eye Sword | Blade Master | 552–562 | 40 | Str 1,014 / Agi 322 | Twisting Slash |
| Blue Eye Magic Sword | Duel Master | 551–561, phép thuật 80% | 45 | Str 731 / Agi 448 / Ene 156 | Power Slash |
| Blue Eye Claw | Fist Master | 454–464 | 35 | Str 606 / Agi 197 | Phoenix Shot |
| Blue Eye Lance | Mirage Lancer | 345–357 | 40 | Str 461 / Agi 315 | Lunge |
| Blue Eye Scepter | Lord Emperor | 550–564, pet 88% | 40 | Str 716 / Agi 164 | Force Wave |
| Blue Eye Bow | High Elf | 704–722 | 45 | Str 224 / Agi 1,193 | Triple Shot |
| Blue Eye Quiver | High Elf | 507–531 | 55 | Str 217 / Agi 1,179 | – |
| Blue Eye Staff | Grand Master | 204–218, phép thuật 136% | 30 | Str 322 / Agi 103 | – |
| Blue Eye Stick | Dimension Master | 187–195, phép thuật 138% | 30 | Str 274 / Agi 108 | – |
| Blue Eye Book | Dimension Master | Sức mạnh lời nguyền 135% | 50 | Agi 192 / Ene 984 | – |
| Blue Eye Rune Mace | Majestic Rune Wizard | 178–183, phép thuật 111% | 50 | Str 308 / Agi 108 / Ene 1,102 | – |
Đừng so con số tấn công giữa các class với nhau: một cây staff nhân phép thuật và một cây scepter nhân sát thương của pet, trong khi một cây bow thì không nhân gì cả. Quiver với tốc độ 55 là món nhanh nhất trong danh sách còn Staff và Stick với 30 là chậm nhất, và đó là minh họa rõ nhất cho việc vì sao tốc độ tấn công quan trọng với class này hơn class khác.
Ancestral Silverheart, giáp mastery thứ 6
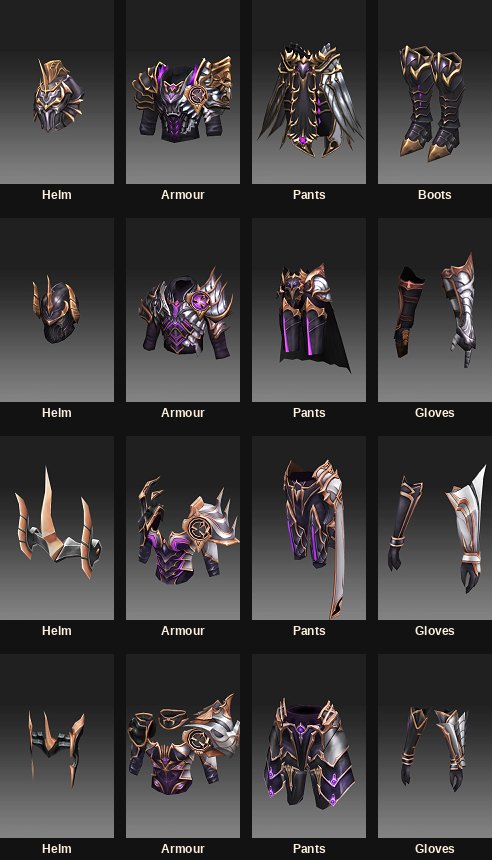
Silverheart được mặc ở cấp 1,100, và bạn hoặc chạy bản nâng cấp bảo đảm nói trên, hoặc đi nhặt nó: nó rơi dạng trơn ở Scorched Canyon, còn bản Excellent rơi ở Crimson Icarus. Đó chính là sợi chỉ nối cả season lại với nhau, hai bản đồ mới nuôi bậc giáp mới.
Bậc này cũng giới thiệu mastery giảm sát thương nhận vào, một tùy chọn trước đó chưa từng có. Như mọi tùy chọn mastery, nó lớn lên theo cấp nâng cấp của vật phẩm, với mức tăng đặt riêng theo từng class và từng loại món, nên cùng một món ở hai cấp cộng khác nhau không phải là cùng một vật phẩm.
| Số món mặc | Bonus bộ |
|---|---|
| 4 set | Mastery sát thương critical, mastery sát thương excellent, mastery toàn bộ chỉ số, mastery phòng thủ nền, mastery sinh lực tối đa, mastery giảm sát thương nhận vào, bỏ qua phòng thủ đối phương +9%, tỉ lệ sát thương critical +20%, tỉ lệ sát thương excellent +20%, sát thương gấp ba +6% |
| 3 set | Tỉ lệ sát thương gấp đôi +18%, mastery sức mạnh tấn công hoặc phép thuật |
| 2 set | Mastery sức mạnh tấn công kỹ năng, mastery chỉ số chính, tức là Strength hoặc Energy tùy class |
Phòng thủ của bản thân các món nằm trong khoảng 310 tới 365 bất kể bạn chơi class nào, và vì các class mặc những tổ hợp mũ, áo, giáp chân, găng tay và giày khác nhau, tổng phòng thủ là phép so sánh công bằng duy nhất:
| Class | Bốn món nó mặc | Phòng thủ, theo thứ tự đó | Tổng |
|---|---|---|---|
| Dragon Knight | Mũ, áo, giáp chân, giày | 341 / 364 / 354 / 340 | 1,399 |
| Magic Knight (strength) | Áo, giáp chân, găng tay, giày | 363 / 339 / 333 / 338 | 1,373 |
| Noble Elf (attack) | Mũ, áo, giáp chân, găng tay | 336 / 342 / 338 / 327 | 1,343 |
| Fist Blazer | Mũ, áo, giáp chân, giày | 317 / 345 / 334 / 323 | 1,319 |
| Rune Wizard | Mũ, áo, giáp chân, găng tay | 326 / 335 / 332 / 322 | 1,315 |
| Empire Lord | Mũ, áo, giáp chân, găng tay | 319 / 339 / 326 / 315 | 1,299 |
| Dimension Summoner | Mũ, áo, giáp chân, găng tay | 323 / 335 / 326 / 314 | 1,298 |
| Soul Wizard | Mũ, áo, giáp chân, găng tay | 321 / 329 / 326 / 315 | 1,291 |
| Shining Lancer | Mũ, áo, giáp chân, găng tay | 311 / 313 / 324 / 321 | 1,269 |
Có một bộ bị thiếu trong bảng đó, và là cố ý. Bản dành cho Elf hệ energy bỏ hết các bonus sát thương để lấy một gói hỗ trợ: tăng phòng thủ +51%, tăng sức mạnh tấn công +51%, +45% phòng thủ khi đang mặc khiên, phòng thủ +270 và sinh lực tối đa +550. Nếu bạn buff cho party, đó là dòng Silverheart duy nhất có ý nghĩa với bạn.
Ba ô phụ kiện, một luật nâng cấp chung
Season 15 chạm tới ô Guardian, các ô bông tai và ô dây chuyền, và hai trong ba chạy trên cùng một cái máy nâng cấp. Hãy học cái máy đó một lần cho xong.
| Cấp cộng của vật phẩm bạn cho vào | Tỉ lệ thành công |
|---|---|
| +15 | 100% |
| +14 | 90% |
| +13 | 80% |
| +12 | 70% |
| +11 | 60% |
Bậc thang đó điều khiển cả Ice Dragon Guardian lẫn Earring of Honour. Cả hai đều nhận Bless ×20, Soul ×20, Chaos ×1 và Creation ×1 cùng một chất xúc tác từ cửa hàng Ruud, và cả hai đều trừng phạt thất bại theo cùng một cách: nguyên liệu bị phá hủy và vật phẩm gốc rơi về +0. Một lần thử 60% không phải là 40% cơ hội mất trắng, mà là 40% cơ hội mất thêm mười một cấp nâng cấp. Ở +15 thì vấn đề đó biến mất.
Ice Dragon, Guardian thứ hai của bạn
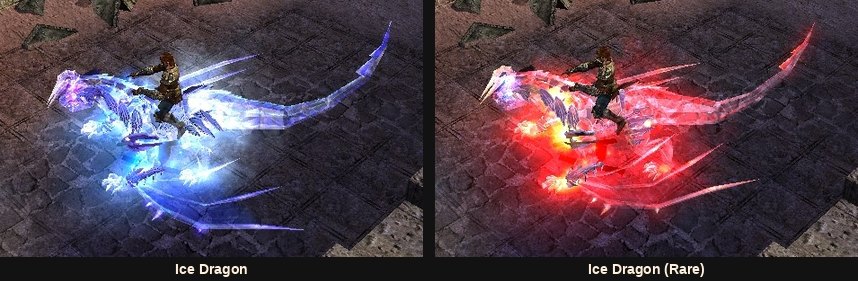
Guardian thứ hai là một Ice Dragon, mặc từ hành trang giống cái đầu tiên và dùng được từ cấp 900. Một Ice Dragon (Rare) ra từ cùng phép ghép đó với tỉ lệ thấp, chỉ khác về màu, nên hãy xem nó như một món đồ trưng bày chứ không phải mục tiêu.
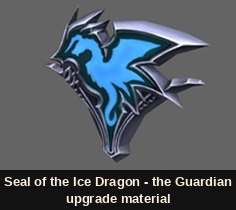
Bạn không đi tìm được một con. Bạn nâng cấp Guardian thứ 1 của mình tại NPC Trainer ở Lorencia (122, 110), với Seal of the Ice Dragon từ cửa hàng Ruud và bộ jewel nói trên, theo đúng bậc thang tỉ lệ thành công nói trên.
Thứ nó ra chỉ số gì còn quan trọng hơn bản thân nó là gì. Cố định: tăng tốc độ di chuyển và tốc độ tấn công +7. Trên nữa là một tới ba tùy chọn thường trong số phòng thủ mỗi 20 cấp, tấn công, phép thuật hoặc sức mạnh lời nguyền mỗi 20 cấp, cả hai đều tính tới cấp 1,100, phòng thủ nguyên tố và sức mạnh tấn công nguyên tố. Rồi đúng một trong năm bộ kháng elite nói trên, tùy chọn quyết định bạn sống nổi ở phần nào của Crimson Icarus.
Có hai hệ quả của một lần thành công mà dễ bị bỏ sót. Các tùy chọn thường sẽ ra lại, ba dòng thì thành ít nhất hai, còn tùy chọn kháng elite thì luôn luôn ra lại, nên một Guardian đã chỉnh cho một nguyên tố sẽ trả về cho bạn một nguyên tố ngẫu nhiên. Một thay đổi nữa: tháo rã một Guardian giờ chỉ trả lại Guardian Enhancement Stone.
Earring of Honour, bông tai mastery thứ 3
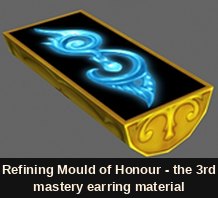
Bông tai mastery thứ ba là Earring of Honour, làm ra bằng cách cho một bông tai mastery thứ 2 qua cái máy đó cùng Refining Mould of Honour từ cửa hàng Ruud. Bên trái ra bên trái và bên phải ra bên phải, nên không có đường tắt nào để có một cặp. Cả hai nửa đều nâng được tới +15 ở Chaos Goblin bằng đá tinh luyện, và một bông tai dư thì tự nó cũng là nguyên liệu làm đá tinh luyện.
Lần nâng cấp sẽ ra lại các tùy chọn, và một bông tai ba tùy chọn ra lò với ít nhất hai. Hai nửa không đối xứng: bên trái là phần phòng ngự, co giãn theo mastery, còn bên phải là tỉ lệ và tốc độ.
| Earring of Honour (phải) | Earring of Honour (trái) | |
|---|---|---|
| Cấp để mặc | 800 | 750 |
| Tùy chọn nền | Tấn công, phép thuật hoặc sức mạnh lời nguyền 172–175, cùng phòng thủ nguyên tố 160 | Tấn công, phép thuật hoặc sức mạnh lời nguyền 132–135, cùng phòng thủ nguyên tố 102 |
| Tùy chọn ngẫu nhiên, 1 tới 3 dòng trong số | Mana tối đa +600, tỉ lệ sát thương excellent +6%, tỉ lệ sát thương critical +6%, hồi AG +10, tốc độ tấn công +7 | Sinh lực tối đa +600, sức mạnh tấn công kỹ năng +21, mastery sức mạnh tấn công hoặc phép thuật +56, mastery sát thương excellent +95, mastery sát thương critical +95 |
| Bonus theo season | Bỏ qua phòng thủ đối phương 3%, toàn bộ chỉ số +6 | Bỏ qua phòng thủ đối phương 3%, toàn bộ chỉ số +6 |
Hãy mặc một cặp cùng loại để lấy bonus theo season: một bên trái và một bên phải của cùng một season mới bật nó lên. Một bên trái của Season 15 đi với bên phải của season khác chỉ cho bạn các tùy chọn nền, lặng lẽ lấy mất của bạn 3% bỏ qua phòng thủ đối phương và toàn bộ chỉ số +6.
Dây chuyền socket, nơi thứ tự lắp ngọc chính là chỉ số
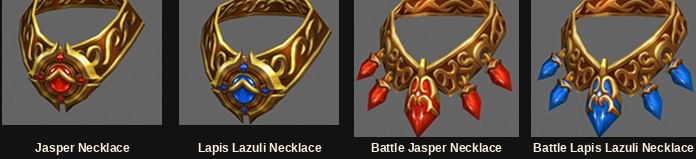
Bốn món này là những dây chuyền đầu tiên mang cùng lúc cả tùy chọn Excellent lẫn socket, tối đa ba socket, và chúng chỉ nhận seed sphere hệ water, wind và earth. Việc lắp và tháo ngọc diễn ra ở Seed Master ở Elbeland (46, 242). Chúng hoàn toàn không cho qua phép ghép đá tinh luyện, nên đừng mua một món rồi tính để sau này nạp vào thứ khác.
Cả bốn đều đòi cấp 850. Khác biệt chỉ đơn giản là tấn công đối lại phép thuật, và bản thường đối lại bản PvP.
| Dây chuyền | Co giãn theo | Tùy chọn PvP |
|---|---|---|
| Battle Jasper Necklace | Tấn công | Kháng tỉ lệ bỏ qua phòng thủ 3% |
| Battle Lapis Lazuli Necklace | Phép thuật | Kháng tỉ lệ bỏ qua SD 3% |
| Jasper Necklace | Tấn công | – |
| Lapis Lazuli Necklace | Phép thuật | – |
Tối đa hai tùy chọn Excellent có thể ra trên chúng, trong số tỉ lệ sát thương excellent 10%, tấn công hoặc phép thuật +1 mỗi 20 cấp, sức mạnh tấn công hoặc phép thuật 2%, tốc độ tấn công và tốc độ phép +7, và sinh lực hoặc mana bằng (chỉ số/8) mỗi lần hạ quái. Các tùy chọn socket thì là danh sách phòng ngự quen thuộc, từ phòng thủ và tỉ lệ phòng thủ thành công, qua phản đòn và giảm sát thương, tới AG tối đa và bốn chỉ số.
Rồi tới phần đáng học thuộc, vì phần lớn người chơi để mất nó. Hai bonus bộ chỉ kích hoạt nếu ngọc được lắp theo đúng thứ tự, và hai thứ tự đó là hai cách sắp khác nhau của cùng ba nguyên tố.
| Bonus bạn muốn | Socket 1 | Socket 2 | Socket 3 |
|---|---|---|---|
| Tăng sinh lực tối đa | Earth | Wind | Water |
| Tăng phòng thủ | Water | Earth | Wind |
Bạn cũng không nhất thiết phải tự chế một món. Chúng rơi ra với tối đa hai tùy chọn Excellent và tối đa ba socket đã mở sẵn, cộng một cơ hội có tùy chọn tự hồi sinh lực 0–3%, ở Deep Dungeon 1–5, Abyss of Atlans 1–3 và Crimson Icarus. Hai trong ba chỗ đó là những bản đồ bạn vốn đã chạy rồi.
Cú tách đôi Dark Knight, và vì sao nó vẫn quyết định build của bạn
Đây là phần của Season 15 có cái bóng dài nhất. Dark Knight không được buff, nó bị tách: một kỹ năng biến bạn thành nhân vật sát thương có tầm với rộng hơn, một kỹ năng khác biến bạn thành tank party mang khiên, và kỹ năng đó bật rồi thì cứ bật. Điều đó khiến nó là một quyết định về build chứ không phải một nhịp trong chuỗi kỹ năng.
| Build | Kỹ năng | Ngưỡng chỉ số | Bật nó lên thì được gì |
|---|---|---|---|
| Rage Knight | Rage of the Sword | Strength 1,060 | Mở rộng tầm sử dụng của các kỹ năng tấn công, và mở rộng thêm cả khoảng sát thương của dòng Blow |
| Rage Knight | Sword Blow | Strength 1,090 | Một đòn Blow hệ water bao một vùng rộng, trong khi Fire Blow dồn tất cả vào một cú nổ |
| Faith Knight | Strong Faith | Energy 1,040 | Cần khiên. Nó chuyển hóa nhân vật: chỉ số biến thành phòng thủ hiệu quả hơn bình thường rất nhiều, và bạn nhận thêm một lượng phòng thủ nền cố định |
| Faith Knight | Solid Protection | Energy 1,052 | Hút một phần sinh lực tối đa của party sang chính mình dựa trên Agility của bạn, gánh một phần sát thương họ nhận vào dựa trên Energy của bạn, và tăng sức mạnh tấn công của họ trong lúc nó chạy |
Các ngưỡng chỉ số quyết định thay bạn. Một Rage Knight trả bằng Strength, một Faith Knight trả bằng Energy, và không nhân vật nào tình cờ đạt được cả hai ngưỡng. Phía Faith là ý tưởng mới thật sự: một class cận chiến mà việc của nó là giữ thanh sinh lực của người khác.
Cây master được mở rộng theo cho khớp: Rage of the Sword Mastery thêm +1 ô tầm tấn công, Strong Faith Enhancement thêm phòng thủ nền, ba nút lo lượng chuyển hóa của Solid Protection, lượng sát thương bạn gánh thay người khác và sức mạnh tấn công nó cấp cho party, còn hai nút lo Destruction Strike. Các tùy chọn nâng cấp kỹ năng vũ khí bị bỏ đi và một số kỹ năng bị dời chỗ, nên một hướng dẫn build từ trước Season 15 sẽ không khớp với client của bạn. Cây này cũng có thêm nhánh cho Destruction Strike (deadly poison, freeze), Sword Blow (deadly poison, bleeding) và Solid Protection.
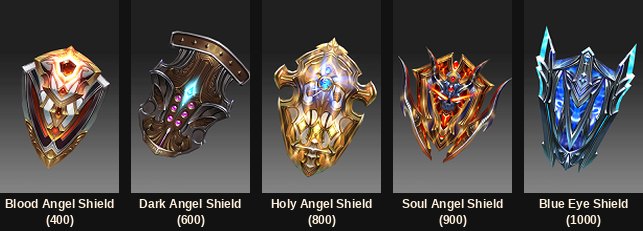
Một Faith Knight cần khiên, nên năm cái khiên mastery ra mắt cùng nó, tất cả đều mang cùng một tùy chọn mới: sát thương gánh thay người khác được giảm đi bằng phòng thủ của khiên × 0.1. Vì vậy phòng thủ của khiên không phải là một chỉ số phòng ngự, nó là hiệu suất của vai trò bạn giữ trong party. Liệt kê từ trên xuống, tức là theo hướng bạn đi mua.
| Khiên | Cấp | Phòng thủ (tỉ lệ) | Phòng thủ nền mỗi 20 cấp | Yêu cầu |
|---|---|---|---|---|
| Blue Eye Shield | 1000 | 81 (118) | +2.2 | Str 239 / Agi 175 / Ene 940 |
| Soul Angel Shield | 900 | 72 (116) | +2.0 | Str 236 / Agi 161 / Ene 965 |
| Holy Angel Shield | 800 | 63 (114) | +1.8 | Str 222 / Agi 155 / Ene 930 |
| Dark Angel Shield | 600 | 54 (112) | +1.6 | Str 214 / Agi 153 / Ene 885 |
| Blood Angel Shield | 400 | 45 (110) | +1.5 | Str 203 / Agi 151 / Ene 860 |
Mỗi cái khiên cũng ra tối đa hai tùy chọn Excellent ngẫu nhiên trong số phản đòn 5%, tỉ lệ phòng thủ thành công +10%, sinh lực tối đa, mana tối đa và giảm sát thương. Ba dòng có số thì co giãn theo bậc, chạy từ 165 / 165 / 45 trên Blood Angel Shield tới 242 / 242 / 66 trên Blue Eye Shield.
Một dòng giáp Faith đi song song với các khiên đó, mỗi món đều đòi Agi 125–135 và Ene 755–769, một lời nhắc rằng đây là build Energy nhưng mặc giáp nặng. Phòng thủ được ghi theo thứ tự mũ, áo, giáp chân, giày.
| Bộ Faith | Cấp | Phòng thủ, bốn món | Bonus bộ nổi bật |
|---|---|---|---|
| Silverheart Knight | — | 361 / 384 / 375 / 360 | Solid Protection tăng tấn công cho party +200, sát thương gấp ba +3% |
| Blue Eye Knight | — | 311 / 335 / 325 / 310 | Solid Protection tăng tấn công cho party +170, sát thương gấp ba +2% |
| Soul Knight | 900 | 263 / 285 / 276 / 262 | Solid Protection tăng tấn công cho party +140, sát thương gấp ba +1% |
| Holy Angel Knight | 800 | 213 / 237 / 226 / 210 | Solid Protection tăng tấn công cho party +110, toàn bộ chỉ số +20 |
| Dark Angel Knight | 600 | 158 / 182 / 171 / 155 | Solid Protection tăng tấn công cho party +80, toàn bộ chỉ số +15 |
| Blood Angel Knight | 400 | 131 / 155 / 144 / 127 | Solid Protection tăng tấn công cho party +50, toàn bộ chỉ số +10 |
Hai dòng trên cùng không ghi cấp để mặc vì patch note không in ra, nên hãy kiểm tra chúng trong client của bạn. Chuỗi tăng tiến cho thấy một Faith Knight được trả bằng gì: sức mạnh tấn công cho party leo từng bậc đều đặn từ +50 lên +200, với toàn bộ chỉ số bị thay bằng sát thương gấp ba ở ba bậc trên cùng. Một thay đổi của bản làm lại giúp tất cả mọi người: kiếm mastery có thể mặc dựa trên Strength hoặc Energy, chỉ cần một trong hai.
Bản làm lại debuff mà bạn thừa hưởng chẳng hề hay biết
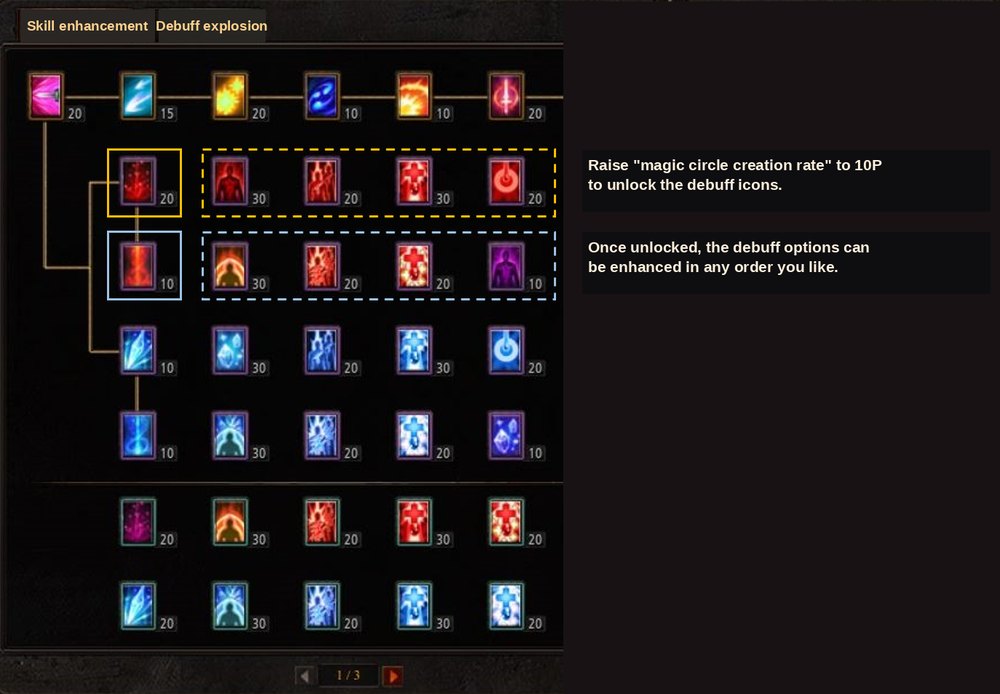
Mọi class trên một máy chủ hiện đại đều áp debuff thông qua một magic circle hình thành trên nhân vật khi bạn liên tục dùng kỹ năng, và cái vòng đó là phát minh của Season 15. Trước nó, nửa debuff của cây kỹ năng hoạt động khác và có hai hiệu ứng nay không còn tồn tại. Một hướng dẫn build mà vẫn khuyên dùng Shock và Stun thì có từ trước bản patch này.
| Thuộc tính | Giá trị |
|---|---|
| Thời gian hiệu lực | 10 giây |
| Hồi chiêu | 20 giây |
| Tỉ lệ debuff thành công cơ bản | 100 |
| Bán kính | 6 ô |
| Mục tiêu | Tối đa 7 |
| Nhịp | Áp debuff của nó mỗi giây một lần, đối lại tỉ lệ phòng debuff của con quái |
| Tùy chọn debuff | Nó mua cho bạn thứ gì |
|---|---|
| Tăng tỉ lệ tạo magic circle | Cơ hội cao hơn để cái vòng hình thành được. Đây là cái cửa: ở 10P thì các icon debuff còn lại mở khóa và sau đó lấy theo thứ tự nào bạn thích cũng được |
| Tăng thời gian magic circle | Một cái vòng kéo dài hơn. Đủ nhiều thì thời gian hiệu lực nuốt luôn thời gian hồi chiêu |
| Tăng tầm debuff | Một cái vòng rộng hơn mức nền 6 ô |
| Tăng số mục tiêu debuff | Nhiều hơn giới hạn 7 mục tiêu |
| Tăng tỉ lệ debuff thành công | Những điểm để tiêu từng chút một, mỗi khi có con quái mới bắt đầu kháng bạn |
| Thêm hiệu ứng debuff bậc trên | Cho cái vòng áp được bậc cao hơn: Poison thành Intoxication, Frost thành Freeze, Bleeding thành Hemorrhage |
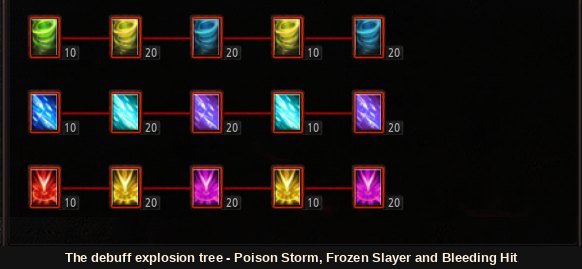
Nhánh kích nổ chính là mục đích của các debuff bậc trên: mỗi trạng thái bậc trên có đúng một kỹ năng chủ động để làm nó nổ.
| Debuff cơ bản | Trạng thái bậc trên | Kỹ năng kích nổ nó |
|---|---|---|
| Poison | Intoxication | Poison Storm |
| Frost | Freeze | Frozen Slayer |
| Bleeding | Hemorrhage | Bleeding Hit |
Có hai tùy chọn mở rộng vụ nổ. Explosion range effect lan sát thương ra mọi thứ trong tầm mà không giảm đi khi thêm mục tiêu. Explosion infection effect truyền debuff sang bất cứ thứ gì trong 3 ô quanh mục tiêu bạn vừa kích nổ và đẩy nó lên một bậc, nên quái sạch thành quái trúng độc và quái trúng độc thành quái nhiễm độc nặng. Nối chuỗi lại, một lần kích nổ dọn đường cho lần sau.
Hai tùy chọn phụ lo phần cánh cấp 4, một dòng tăng phòng thủ và một dòng tăng tấn công, phép thuật hoặc sức mạnh lời nguyền khi đang mặc cánh cấp 4 hoặc áo choàng, và giới hạn điểm tùy chọn phụ cũng tăng từ 30 lên 40 điểm ở cùng giai đoạn đó. Khi Shock và Stun bị bỏ, quái mang tỉ lệ phòng debuff thay cho phần trăm kháng, xem được bằng cách trỏ chuột lên chúng.
Sau đó mỗi class được lấp lại các ô Shock và Stun đã trống bằng cùng một bố cục ba debuff. Dòng của chính bạn là dòng cần đọc.
| Class | Kỹ năng và debuff chúng mang bây giờ |
|---|---|
| Slayer | Sword Inertia: poison, bleeding · Bat Flock: poison, frost · Fierce Attack: poison, frost |
| Dark Knight | Blow: bleeding, frost · Fire Blow: poison, bleeding · Rageful Blow: poison, frost |
| Dark Wizard | Meteor Strike: frost, bleeding · Evil Spirit: frost, poison · Meteor Storm: poison, frost |
| Elf | Triple Shot: bleeding, frost · Multi-Shot: bleeding, poison · Focus Shot: poison, bleeding |
| Magic Gladiator | Fire Blood: bleeding, poison · Ice Blood: frost, bleeding · Blood Attack: poison, bleeding |
| Dark Lord | Chaotic Diseier: bleeding, frost · Wind Soul: frost, bleeding · Fire Burst: poison, bleeding |
| Summoner | Death Side: bleeding, frost · Lightning Shock: bleeding, frost · Aqua Beast: frost, poison · Fire Beast: poison, bleeding |
| Rage Fighter | Spirit Hook: bleeding, frost · Dark Side: frost, poison · Dragon Roar: poison, frost |
| Grow Lancer | Breche: bleeding, poison · Magic Pin: frost, bleeding · Shining Pick: frost, poison |
| Rune Wizard | Magic Arrow: poison, frost · Plasma Ball: frost, poison · Lightning Storm: bleeding, poison |
Giới hạn cấp độ, những phần thưởng đã hết thời, và các khoảng cấp của event
Season 15 nâng trần hai lần, mỗi phần một lần: 1,150 lên 1,200 ở nửa đầu và 1,200 lên 1,250 ở nửa sau. Mỗi lần nâng đều trả ra một muun phần thưởng season cho việc đạt được cái trần cũ, và cả hai nay đã mất hẳn, điều này khiến chúng thành ví dụ rõ nhất ở đây về loại nội dung bạn có thể đọc về nhưng không bao giờ có được.
| Cấp độ đạt được | Muun | Nó cho gì | Nhận bằng cách nào |
|---|---|---|---|
| 1,150 | Elf Queen Runedil | Sức mạnh tấn công kỹ năng +15, nhân lên 20 lần trong 30 ngày | Gremory Case, hạn nhận 30 ngày, có hiệu lực 14 ngày sau khi nhận |
| 1,200 | Magic Gladiator Gaion Karein | Phòng thủ nguyên tố +10, với cùng hệ số nhân 30 ngày | Gremory Case, hạn nhận 30 ngày, có hiệu lực 14 ngày sau khi nhận |
Một hạn nhận ngắn như vậy, trên một phần thưởng cho việc đạt một cái trần mà từ đó đã dời đi hai lần, nghĩa là cả hai con muun giờ chỉ còn tồn tại trong patch note. Hãy nghi ngờ bất cứ hướng dẫn nào liệt chúng ra như thứ còn lấy được.
Lần nâng trần đó có để lại một thứ bạn sẽ gặp. Mọi khoảng cấp độ trong các bản đồ event định kỳ đều được vẽ lại cho một game có trần 1,250, với phần trả Mastery Box gắn vào các bậc mới. Cả hai lần chia lại khoảng cấp nằm trong một bảng, vì đó là cùng một phép làm hai lần.
| Nội dung | Bậc | Khoảng cũ | Khoảng của Season 15 | Mastery Box |
|---|---|---|---|---|
| Chaos Castle, Blood Castle, Devil Square, Doppelganger | 1 | 50–199 | 50–399 | – |
| Vẫn bốn cái đó | 2 | 200–299 | 400–599 | 1 |
| Vẫn bốn cái đó | 3 | 300–399 | 600–699 | 1 |
| Vẫn bốn cái đó | 4 | 400–549 | 700–799 | 1 |
| Vẫn bốn cái đó | 5 | 550–649 | 800–899 | 2 |
| Vẫn bốn cái đó | 6 | 650–769 | 900–999 | 2 |
| Vẫn bốn cái đó | 7 | 770+ | 1,000+ | 2 |
| Illusion Temple | 1 | 180–299 | 180–399 | – |
| Illusion Temple | 2 | 300–399 | 400–599 | 1 |
| Illusion Temple | 3 | 400–599 | 600–799 | 2 |
| Illusion Temple | 4 | 600–769 | 800–999 | 2 |
| Illusion Temple | 5 | 770+ | 1,000+ | 2 |
Khuôn mẫu giống nhau ở cả hai lần: bậc 1 giãn ra để nuốt trọn mọi thứ tới cấp 399, và sàn của bậc cao nhất dời từ 770 lên 1,000. Chỉ số của quái, các nhiệm vụ gắn với những event này và cả cấp độ rơi vé Blood Castle cùng Devil Square đều dời theo các khoảng mới. Những bậc cho hai Mastery Box bắt đầu từ 800, và đó là lúc chạy event trở nên đáng để lên lịch.
Các khoảng đó được vẽ cho trần 1,250 và cái trần đã dời đi từ lâu, nên hãy đọc chúng như hình dạng của hệ thống và kiểm tra danh sách bậc trong client của chính bạn trước khi lên kế hoạch cho một lượt chạy.
Những nội dung Season 15 đã bị vượt qua từ đó
- Blue Eye không còn là bậc vũ khí cao nhất, và Silverheart không còn là bậc giáp cao nhất. Bậc thang vẫn tiếp tục đi lên. Cả hai vẫn là những bậc bạn bước qua, và khuôn nâng cấp mà chúng đặt ra chính là cách các bậc trên chúng được làm ra.
- Ice Dragon là Guardian thứ 2, không phải cái cuối cùng. Nó là một bước trên đường đi, và dòng kháng elite là thứ duy nhất ở nó còn tương tác với nội dung hiện tại.
- Earring of Honour là bông tai mastery thứ 3. Dòng này còn tiếp tục, nên hãy kiểm tra máy chủ của bạn đang cần cặp bông tai của season nào trước khi tiêu Ruud vào khuôn.
- Hai con muun thưởng cho việc đạt trần không còn lấy được. Elf Queen Runedil và Gaion Karein là lịch sử trong patch note.
- Cấp vào cửa 1,050 và 1,070 không còn nghĩa là endgame. Cả hai bản đồ được vẽ đối lại cái trần 1,250 và nay nằm ở giữa lộ trình.
- Các khoảng cấp của event được vẽ cho một thế giới trần 1,250. Bậc cao nhất 1,000+ của chúng chính là đỉnh của cái trần đó.
- Shock và Stun không tồn tại. Bất cứ hướng dẫn nào còn khuyên dùng chúng đều có từ trước season này, và đó là cách nhanh để xác định tuổi của một hướng dẫn build.
- Jewel of Chaos không phải tiền tệ. Season 15 đã bỏ nó khỏi vai trò giá bán trong cửa hàng, và việc đặt giá một jewel bằng chính jewel đó bị cấm từ đó tới nay.
Chưa bị vượt qua, và đây là danh sách dài hơn: cửa hàng cá nhân, cửa sổ Equipment Enhancement, Helper Plus, party xuyên channel, Simple UI, hệ thống debuff magic circle, Slayer và Slaughterer, cú tách Rage và Faith của Dark Knight, cùng thứ tự lắp socket vẫn đang quyết định dây chuyền của bạn cho bonus nào.
Vậy nên làm gì với Season 15
- Bật tự động sửa Guardian trong MU Helper [Other settings] trước phiên chơi dài đầu tiên của bạn. Nó tốn Jewel of Bless và cứu cả lượt chạy.
- Hãy đặt Helper Plus một cách có chủ ý thay vì để nguyên mặc định. Bốn ô đặt not registered để chơi một mình, hoặc tùy chọn yêu cầu Energy Elf nếu bạn muốn một người buff tìm tới bạn.
- Đừng bao giờ nâng cấp một Guardian hay một bông tai từ +11. Hãy đẩy nó lên +15 để có lần thử miễn phí; hình phạt khi thất bại đưa vật phẩm về +0 và ăn luôn số jewel.
- Hãy quyết định nguyên tố kháng elite của Guardian trước khi farm một khu elite, chứ không phải sau. Chính cái kháng đó là thứ khu elite nhắm vào.
- Lắp ngọc vào dây chuyền theo đúng thứ tự đã công bố: earth, wind, water cho sinh lực tối đa, hoặc water, earth, wind cho phòng thủ. Làm sai nghĩa là phải đi thêm một chuyến tới Seed Master ở Elbeland.
- Trong cây kỹ năng, hãy lấy tỉ lệ tạo magic circle lên 10P trước và thời gian hiệu lực thứ hai. Không có gì khác mở khóa cho tới khi tỉ lệ tạo vòng xong.
- Nếu là Dark Knight, hãy chọn Rage hay Faith một cách có chủ ý. Các ngưỡng chỉ số là 1,060 Strength và 1,040 Energy, và không build nào đạt được cả hai.
- Nếu bạn muốn thử Slayer, hãy thử ngay chứ đừng để sau. Chẳng có gì phải mở khóa, Alex tại (115, 120) ở Lorencia bán các viên ngọc, và các nhiệm vụ chuyển class trao cho bạn con muun bạn cần.
- Đừng tính chuyện ở lâu trong Scorched Canyon hay Crimson Icarus. Hãy đi vì đồ rơi Silverheart và vì nguyên liệu khu elite, rồi đi tiếp.
Máy chủ của chúng tôi chạy Season 22 trên bộ server files mới nhất, mở vào ngày 30 tháng 10 năm 2026, với exp cao, chỉ số giới hạn ở 32,700, event và mini-boss suốt ngày, cùng một hệ thống jewel riêng. Mọi thứ trên trang này đều đã có trong client đó. Tạo một tài khoản và thử Slayer đi.
- Vẫn đang gánh hệ thống: cửa hàng cá nhân dạng danh sách, cửa sổ Equipment Enhancement +1 tới +15, Helper Plus và Simple UI.
- Slayer vẫn mở sẵn từ đầu. Chọn nó, bắt đầu ở Lorencia, mua bốn viên ngọc kỹ năng từ Alex tại (115, 120).
- Vũ khí Blue Eye và giáp Ancestral Silverheart là bậc mastery 5 và 6, cả hai đều nâng cấp với tỉ lệ bảo đảm 100% từ nền +11 / 16 tùy chọn.
- Scorched Canyon ở cấp 1,050 và Crimson Icarus ở cấp 1,070 nay nằm giữa lộ trình, ghé vì Silverheart và nguyên liệu khu elite.
- Dòng kháng elite duy nhất của Guardian quyết định bạn sống nổi ở khu elite nào, nên hãy chọn nguyên tố trước khi farm.
- Mất hẳn: Shock và Stun, Jewel of Chaos trong vai tiền tệ, và cả hai con muun thưởng cho việc đạt trần.