You are playing more of Season 15 than of almost any other season, without being told. The window you sell in, the window you enhance gear in, the crown button that hunts while you are away, the debuff layer every class now carries, and one of the classes on your creation screen were all built across 2019 and 2020 and never replaced. Its hunting grounds, its level cap and its mastery tiers are another matter. This guide sorts the two-part release into what you touch every session, what you walk through once, and what expired with the numbers it was drawn for.
What the two parts shipped, and why so much of it stuck
Season 15 arrived in two halves, together the heaviest drop since the Grow Lancer: a new class with its own 4th class change, a fifth mastery weapon tier and a sixth mastery armour tier, two hunting grounds that later grew elite zones, a second Guardian mount, a third mastery earring, four necklaces carrying Excellent options and sockets at once, a rebuilt personal store, an auto-hunting system, a Dark Knight split in two, and two cap raises.
Before the detail, the thing worth noticing. Places and items get outscaled; interfaces and rules get inherited. Season 15 spent most of its budget on the second kind, which is why a 2019 patch note describes your 2026 client so well while its level bands describe nothing you will ever stand in. Season 16 and everything after it built on the plumbing laid here.
The four windows you open every session
None of this is optional content you can decide to skip. It is the furniture of the client, and three of the four are the only version of themselves you have ever seen.
The personal store is a Season 15 rebuild
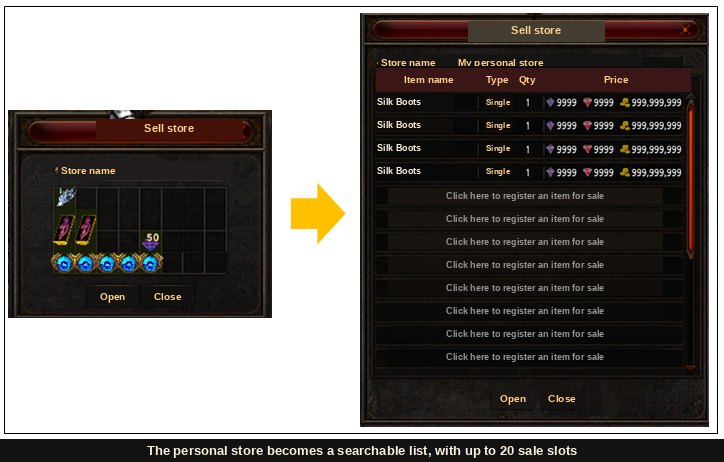
Before this season, selling meant parking a character under a grid of inventory slots and waiting for buyers to walk to it. Season 15 replaced the grid with a list and decoupled browsing from travelling: buyers search and buy across every channel and every hunting ground without going anywhere.
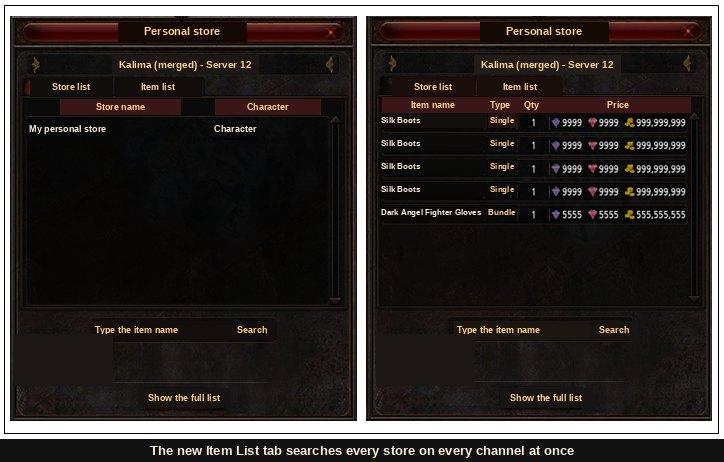
The rules below are the ones that still govern a sale, buried in the patch note as small print.
| Rule | What it means when you sell |
|---|---|
| Store is a list, not a grid | Up to 20 entries, each one priced individually |
| Where you may open one | Safe zones only: Loren Market, Lorencia, Elbeland, Noria, Devias |
| Leaving an allowed spot | The store shuts itself down the moment the seller moves somewhere it is not permitted |
| Registering an item | A price window opens and the item leaves your inventory while it is listed |
| Editing a listing | Close the store, click the entry, then change the price or pull the item back |
| Bundle selling | Two to five items register as a single lot, so five Blood Angel sets for 100 Jewels of Bless is one trade rather than five |
| Where the money lands | A Gremory Case — Personal Store tab, capped at 150 items, collected inside 7 days, roughly a one minute delay per trade |
| Hitting that cap | Selling and buying both stop until you empty the tab |
| Searching | Keywords from two characters up, with autocomplete still covering single characters |
| Searches that know the difference | Agility and energy Elf items, wizard and knight Magic Gladiator items, and seed spheres by tier |
| Two things now banned | Pricing a jewel in that same jewel, and the Jewel of Chaos as a currency at all |
Two of those rules cost people money. The 7-day collection window means a seller who stops logging in loses the proceeds, and the 150-item cap blocks buying as well as selling once it fills. When the rebuild went live, every existing store was closed into the Gremory Case, which is also when the Jewel of Chaos stopped being money.
Equipment Enhancement: the window that replaced guesswork
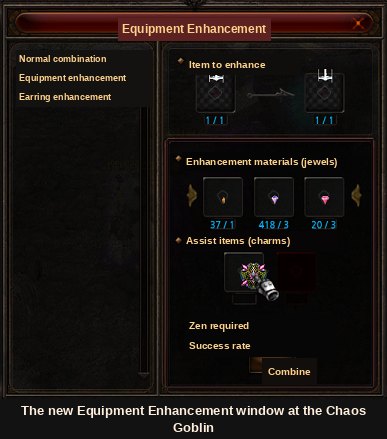
Item enhancement used to live inside Normal Combination, where you supplied the jewel yourself and found out afterwards if you were wrong. Season 15 gave it a dedicated [Equipment Enhancement] button at the Chaos Goblin, covering +1 to +15 in one place and registering materials on its own.
What goes in it is close to everything: normal items, Excellent items, set items, socket items, 380 items, pentagram items, wings and capes from 1st through 4th including bound ones, monster wings, the Cape of Conqueror, mastery gear, and the Earring of Rage and Earring of Ancestors.
| Band | Jewel the window uses | What you still add by hand |
|---|---|---|
| +1 to +6 | Bless or Soul, chosen with a radio button | Nothing |
| +7 to +9 | Soul only; Bless is refused | Nothing |
| +10 to +15 | The layout switches over at +9 | Lucky Charm, Chaos Combination Charm and their elemental versions. A Lucky Charm and a Chaos Combination Charm may sit in the window together |
Helper Plus, and parties that survive you logging off
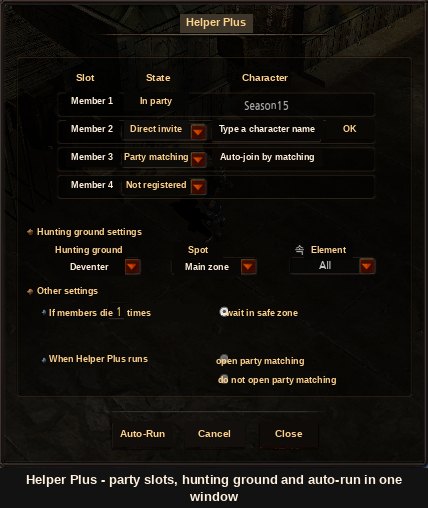
The crown-shaped button beside the MU Helper button is Helper Plus, and it does the three things you would otherwise do by hand before an AFK session: it recruits a party, it finds somewhere to hunt, and it starts hunting. You run it solo or as party leader. A party member cannot start it.
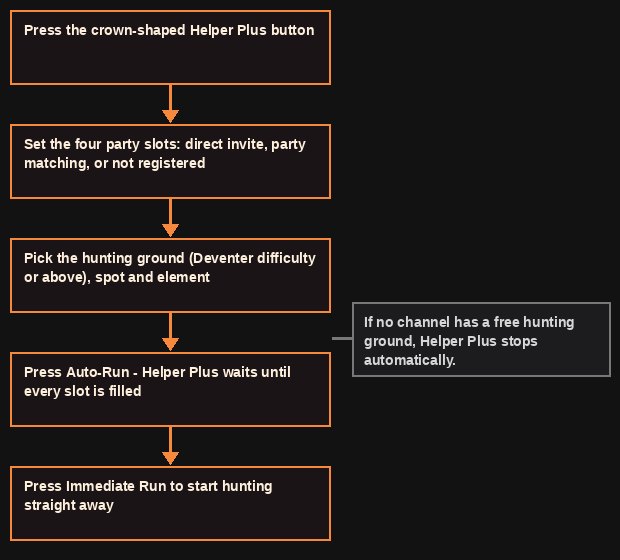
Each of the four party slots gets set independently, and setting all four the same way is how you get a clean solo run.
| Slot setting | Who fills it |
|---|---|
| Direct registration | A name you type, invited automatically when the run starts |
| Party matching | Anyone, listed publicly under the matching settings you saved |
| Not registered | Nobody. Four of these means solo play |
Ground selection covers hunting grounds of Deventer difficulty or above, and you can pin the spot and the monster element. It searches your own channel first, then the rest, and shuts itself down if no channel has a free spot. Grounds handed out through the MU Helper never overlap between players. Four maps are off limits: Valley of Loren, Loren Market, the Event Map Square and the Labyrinth of Dimensions.
Making that work meant loosening the party system, and those changes help you even when you never press the crown.
| Party change | Effect |
|---|---|
| Parties persist | A party no longer dissolves when everyone logs off |
| Inactive member | Dropped after 30 days without a login |
| Inactive leader | The party disbands after 30 days without a login |
| Members on different channels | Stay in the party and keep access to party content; experience and MU Helper buffs share once they stand in the same place |
| Helper delegation and auto-move | Work across channels, and inside Valley of Loren and Crywolf |
| Friends list | Invites a distant friend directly, with no travel |
| Energy Elf required | A matching option reserving one slot for a character whose Energy beats its Agility, or is at least 1,500 |
| Check Info | Shows a party's composition before you apply to it |
Simple UI and a long list of small mercies
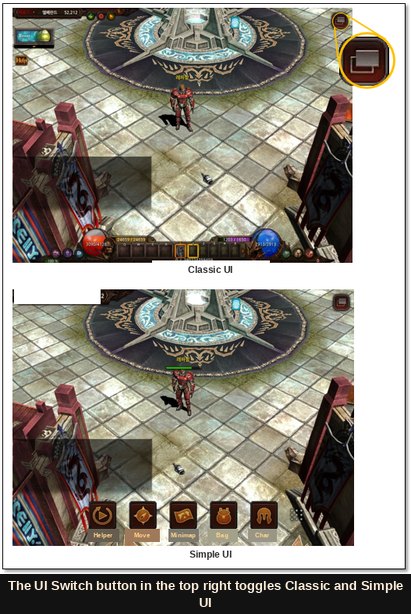
Simple UI strips the HUD down to a short quick menu you build yourself. Open the full menu and the bar enters edit mode: click a quick-menu button, then the full-menu button that should replace it, or click two quick-menu buttons to swap them. Closing the full menu ends editing.
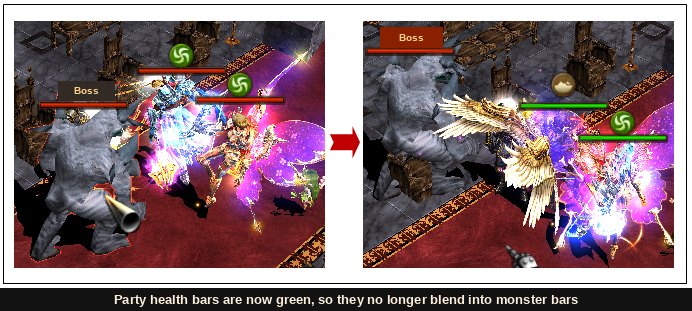
The rest of the live pass is a list of things you would only notice by their absence.
| Change | Where you notice it |
|---|---|
| Party health bars turned green | Crowded screens, where they used to read as monster bars |
| Character slots reorder | The arrow beside each slot, which cannot jump a slot over an empty one |
| Redrawn icons | Repair, split and dismantle |
| Brighter free channel-move text | The channel list |
| Lucky item refining | Moved onto the inventory Dismantle button instead of a right-click |
| Right-click to equip | Works alongside drag and drop |
| Jewels of Extension | Stack to 10 |
| MU Helper pathing | No longer jams one tile from its start point when another character stands there |
| MU Helper repairs your Guardian | Automatically, with Jewels of Bless, when Guardian life hits 1. The switch is under MU Helper [Other settings] |
The Slayer, read as a class choice rather than a news item
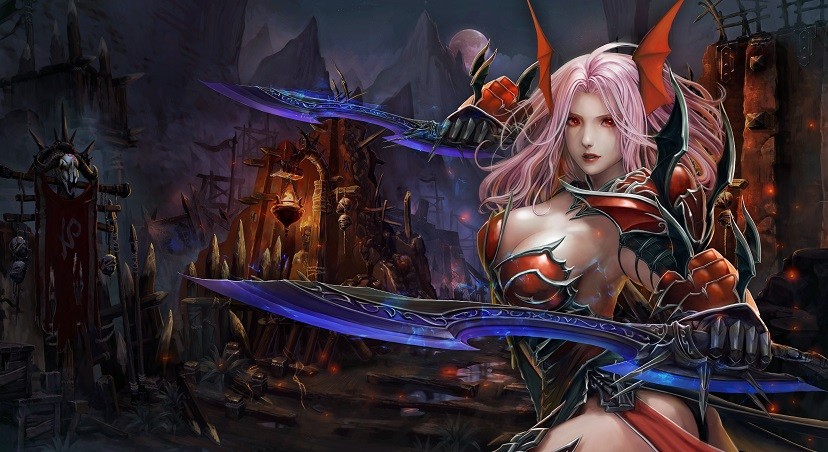
Of everything here, the Slayer is the piece most likely to change what you actually do, because it still sits on the character creation screen with no unlock condition. No high-level character on the account, no quest, no item. You pick it and start in Lorencia.
Mechanically it is a short-sword fighter that throws the blade at range and then closes on packs at speed, so it plays as an assassin that never fully commits to melee. Its highest number at creation is Agility, and Agility is what every one of its own skills measures you against.
| At creation | Slayer |
|---|---|
| Class ladder | Slayer → Royal Slayer → Master Slayer → Slaughterer |
| Unlock | None. Available by default |
| Starting town | Lorencia |
| Strength / Agility / Vitality / Energy | 28 / 30 / 15 / 10 |
| Life / mana | 130 / 10 |
| Set party | Slayer, Dark Knight, Summoner |
| Starter shop | Wandering Merchant Alex at (115, 120) in Lorencia: low-level short swords, wings, and all four skill orbs |
Desmodus, the muun nobody else can have
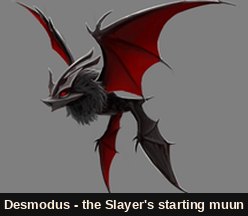
Every Slayer is handed a Special Muun Egg, which hatches Desmodus, a grade 3 muun exclusive to the class. Its base ability lets the muun use attack skills, though not in PvP, and its 30-day period ability doubles their speed. The class change quests grow it for you.
| Class change | What it hands back |
|---|---|
| 1st | A level 1 Desmodus |
| 2nd | A level 1 Desmodus |
| 3rd | A level 1 Desmodus |
| 4th | A Desmodus Evolution Stone |
The skill list: five borrowed, six its own
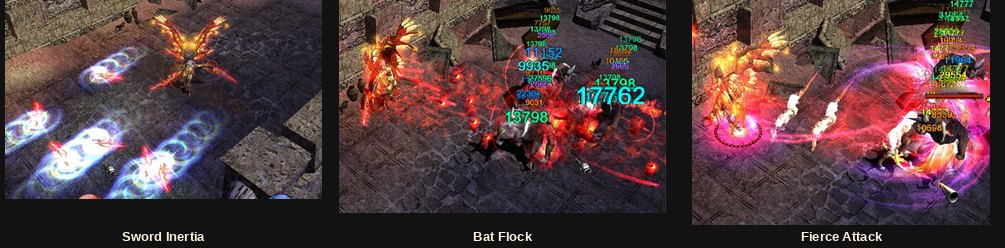
Five slots come straight from the Dark Knight: Twisting Slash, Uppercut, Lunge, Cyclone and Rageful Blow. Below is the class proper, with the four base skills and the two mastery-only ones in one table so the whole arc is visible at once. Buy the orbs from Alex before you leave Lorencia.
| Skill | Element | Gate | What it does |
|---|---|---|---|
| Sword Inertia | Darkness | Level 30, Str 50, Agi 100 | You dash left and right releasing three short swords, each of which flies out and boomerangs home for a single hit apiece |
| Bat Flock | Darkness | Level 270, Str 100, Agi 380 | A flock goes forward, lands two hits, and leaves damage over time behind it |
| Fierce Attack | Darkness | Str 300, Agi 1,100, plus Bat Flock and Bat Flock Mastery 10 | Blink in for two melee hits and return. If the target is already bleeding damage over time from Bat Flock, you strike the weak point for two more |
| Detection | None | Level 300, Agi 800 | Paints every living thing near you onto the mini-map, on a 5 second cooldown |
| Detection enhancement | None | Mastery node, 10/10 | Pushes the same scan out to 500 tiles |
| Demolish | None | Level 400, Agi 1,450, Master Slayer | Spends 3% of your own skill attack power to hand yourself and the party a partial ignore-defence effect for 40 seconds on a 60 second cooldown. Two master skills trim the cooldown and raise the value |
Demolish is bought rather than learned: Priest James in Elbeland sells it for Ruud, which makes it the only part of the kit gated behind a currency instead of a level. In play, use Bat Flock before Fierce Attack, always, because the extra hits only land on a target the flock has already poisoned.
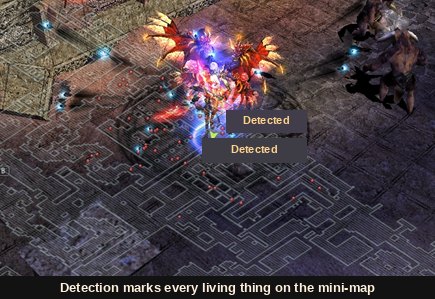
Detection is worth more on a busy private server than on an official one. A 500-tile sweep finds spawned mini-bosses, free spots and other players' trains without walking the map, and on our Season 22 server mini-bosses run all day, so seeing one arrive means getting there first.
Slaughterer: the 4th class change
The Slayer's fourth class is the Slaughterer, and the line opens at level 800 once the third class change is behind you. All three quests are taken from Cent (131, 147) in Lorencia, and all three are fights rather than fetch errands.
| Quest | The fight | Paid in |
|---|---|---|
| Cent's Qualification Test | A straight 1 vs 1 against Cent himself | 20 stat points |
| New Battle (1) | Outlast a timer against Deep Dungeon Larva, Skeleton Warrior and Cyclops | 30 stat points |
| New Battle (2) | Cent again, this time with Deep Dungeon monsters alongside him, inside a time limit | 50 stat points and a Grey Scroll of Oblivion |
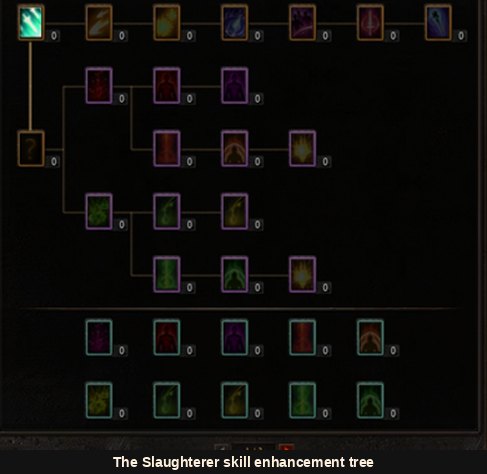
Each of the three signature skills gets its own branch, and every branch carries the same seven nodes at the same costs. The table is ordered by what they cost.
| Points | Node | On Sword Inertia | On Bat Flock and Fierce Attack |
|---|---|---|---|
| 1/20 | Enhancement | Skill attack power | Skill attack power |
| 1/20 | Additional damage rate | Chance of additional damage | Chance of additional damage |
| 1/20 | Skill damage | Skill damage | Skill damage |
| 1/20 | Weapon attack power | Equipped weapon attack power, as a percentage | Equipped weapon attack power, as a percentage |
| 15/15 | Second node | Damage count +1 | Cast range +1 tile |
| 10/10 | Fourth node | Splash damage added | Attack range +1 tile |
| 10/10 | Target increase | +1 target | +1 target |
The three fixed-cost nodes are where a farming build and a duelling build separate: Sword Inertia's extra damage count and splash beat an extra tile of range on Bat Flock in a pack. The debuff branches follow this season's standard layout, Sword Inertia carrying Bleeding and Poison, Bat Flock and Fierce Attack both carrying Poison and Frost.
Slayer wings, armour and the matching blade
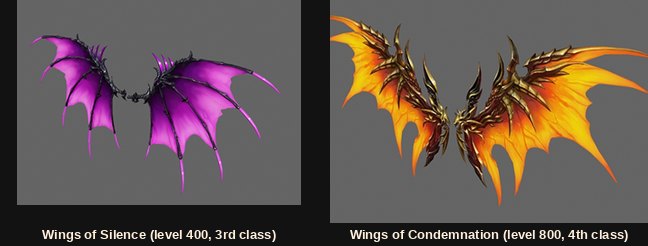
Two wings, one per class change, with the usual rule that the fourth pair is where the real rolls live.
| Wings | Gate | Defence | Damage up / down | Options it can roll |
|---|---|---|---|---|
| Wings of Silence | Level 400, 3rd class change | 60 | 39% / 39% | Up to two, from complete mana recovery +5%, complete life recovery +5%, reflect +5% and ignore defence +5% |
| Wings of Condemnation | Level 800, 4th class change | 140, plus attack 100 | 55% / 43% | 4th-wing rules: one to four of eleven random options, plus zero or one elemental option over the elemental defence base |
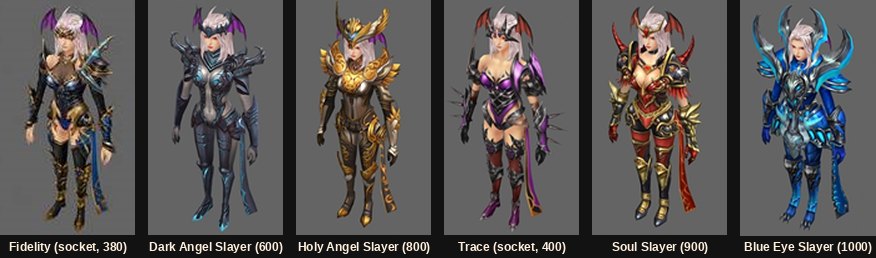
The armour ladder and the weapon line move in lockstep, so they belong in one table. Defence is listed helm, armour, pants, gloves, boots; every short sword in the last column runs at attack speed 45.
| Tier | Level | Defence, five pieces | Matching short sword |
|---|---|---|---|
| Fidelity (socket) | 380 | 65 / 77 / 70 / 47 / 59 | – |
| Trace (socket) | 400 | 74 / 86 / 79 / 56 / 68 | – |
| Blood Angel Slayer | 400 | 112 / 135 / 127 / 103 / 116 | Blood Angel Short Sword, 296–306 |
| Dark Angel Slayer | 600 | 133 / 146 / 138 / 113 / 126 | Dark Angel Short Sword, 351–361 |
| Holy Angel Slayer | 800 | 187 / 200 / 192 / 167 / 180 | Holy Angel Short Sword, 415–425 |
| Soul Slayer | 900 | 235 / 248 / 241 / 216 / 229 | Soul Short Sword, 477–497 |
| Blue Eye Slayer | 1000 | 284 / 297 / 289 / 265 / 278 | Blue Eye Short Sword, 539–570 |
Those are the plain versions, and not where you stop. Four tiers have an upgraded four-part counterpart worth roughly ten more defence per piece, and the upgraded version carries the set bonuses that matter. The 4-set column is why anyone chases them.
| Upgraded set | 4 set | 3 set | 2 set |
|---|---|---|---|
| Frigid Blue Eye Slayer | Ignore enemy defence 9%, triple damage +4%, mastery max life, +20% on both critical and excellent damage rate | Mastery attack power, double damage rate 18% | Mastery skill attack power, mastery Strength |
| Soul Slayer of Awakening | Ignore enemy defence 9%, triple damage 2%, all stats +25, +20% on both critical and excellent damage rate | Mastery attack power, double damage rate 18% | Strength +100, skill attack power +40 |
| Holy Angel Slayer of Punishment | Ignore enemy defence 9%, all stats +20, base defence +40, +20% on both critical and excellent damage rate | Attack power +100, double damage rate 18% | Strength +90, skill attack power +35 |
| Harsh Dark Angel Slayer | Ignore enemy defence 7%, all stats +15, base defence +30, +18% on both critical and excellent damage rate | Attack power +75, double damage rate 15% | Strength +70, skill attack power +30 |
Watch what stops improving. Ignore enemy defence caps at 9% two tiers from the top and the critical and excellent damage rates cap at 20%, while triple damage and the mastery-scaled lines keep growing with the item's enhancement level. That is the argument for enhancing a lower set rather than wearing a bare higher one.
Two hunting grounds, and where they land on your route
The Scorched Canyon arrived in the first half of the season and Crimson Icarus in the second, built to be climbed in that order. Both were the top of the map list at launch, drawn around a level cap of 1,250. Later seasons pushed the cap further, so read these entry levels as the position of a rung rather than of the ceiling.
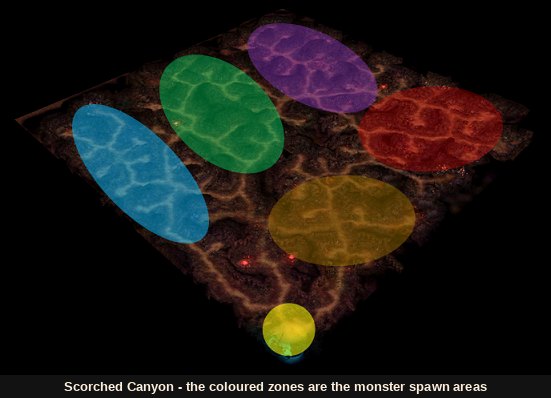
The canyon carries one of the better stories in the game. Refugees who fled Feria during the Kanturu disaster settled it and began preparing their revenge on Kundun. The faction that wanted to surrender was taken by Lemuria, emptied into soulless soldiers, and sent back to destroy the slum. Everything you kill here used to live here.
Crimson Icarus has a quieter origin: scholars of Medea mapping Icarus found a second sky one step below it, full of red cloud and ill-boding energy.
Side by side, the two maps differ on exactly the points that decide whether you can walk in today.
| Scorched Canyon | Crimson Icarus | |
|---|---|---|
| Entry level | 1,050 | 1,070 |
| Level you stop taking a penalty | 1,070 | 1,100 |
| Routes in | Move command window (M), or walk the north portal out of the Tarkan safe zone | Move command window, or walk in through Lost Tower at (1, 238) |
| Move cost | 50,000 zen | 50,000 zen |
| Extra requirement | None | Wings or a mount must be equipped |
| What it drops | Silverheart armour, raw | Excellent Silverheart armour and Excellent socket necklaces |
| Death or reconnect | Puts you back in the canyon safe zone | – |
| Elite zones | Three, added later in the season | Five, one per element |
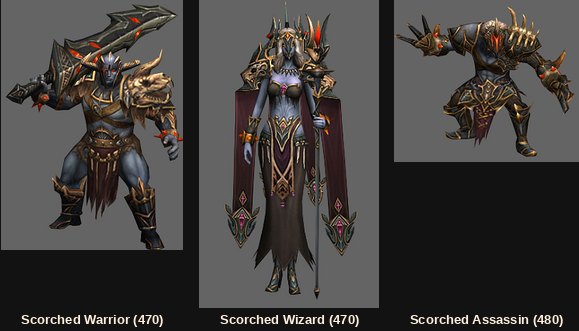
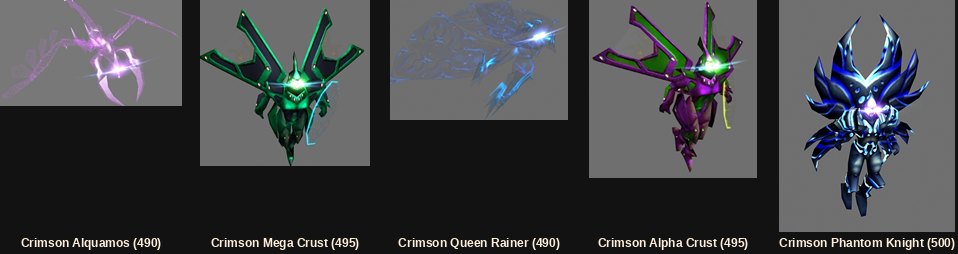
Eight ordinary monsters across the two maps, in one ladder from 470 to 500 so you can see the whole climb in a single column.
| Lv | Monster | Map | How it fights |
|---|---|---|---|
| 470 | Scorched Warrior | Scorched Canyon | Oversized brute, great sword, strictly melee |
| 470 | Scorched Wizard | Scorched Canyon | Stands off and throws area magic |
| 480 | Scorched Assassin | Scorched Canyon | Closes fast, claws, melee |
| 490 | Crimson Alquamos | Crimson Icarus | Ranged |
| 490 | Crimson Queen Rainer | Crimson Icarus | Ranged |
| 495 | Crimson Mega Crust | Crimson Icarus | Area attacks |
| 495 | Crimson Alpha Crust | Crimson Icarus | Area attacks |
| 500 | Crimson Phantom Knight | Crimson Icarus | Melee |
All three canyon residents carry fire, water, earth, wind and darkness at once, so no single attribute setup beats the map. Crimson Icarus is a proper elemental hunting ground instead, its monsters carrying attributes plus excellent damage rate resistance, critical damage rate resistance, damage absorption and debuff rate resistance. If your damage collapses when you move up from the canyon, that resistance block is why, not your gear tier.
Elite zones: the real reason to go
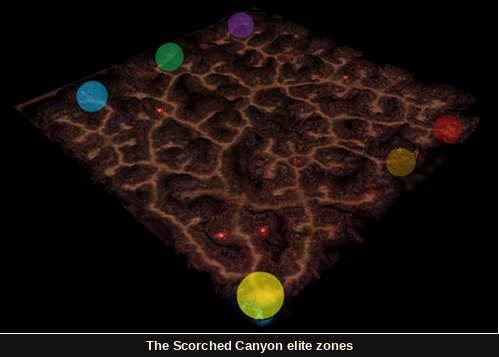
Elite zones were added to both maps later in the season, and they are a different kind of content from the ground around them. The canyon's three hold (Elite) Scorched Warrior, (Elite) Scorched Assassin and (Elite) Scorched Wizard, carrying elite debuff options and elite skills. The part that catches people out: every hit they land applies their debuff with a 100% chance.
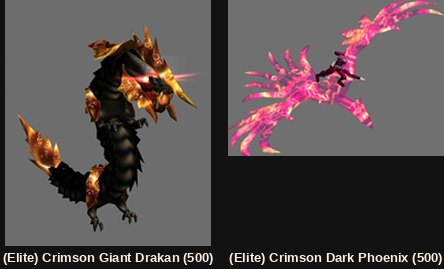
Crimson Icarus splits its five zones by element, each holding the same two level 500 elites and applying its element's debuff pair on every attack. Those elites are immune to the same effects boss monsters are. Only the elite resistance option on your Guardian reduces the incoming debuff, and a Guardian rolls one of the five, so the zone you intend to farm chooses your Guardian.
| Element | Zone entrance | What it does to you | Guardian roll that counters it |
|---|---|---|---|
| Fire | (41, 18) | Bleeding, attack power decrease | Fire: bleeding damage and attack power decrease resistance |
| Water | (52, 205) | Deadly poison, attack power decrease | Water: deadly poison damage and attack power decrease resistance |
| Earth | (157, 20) | Bleeding, attack speed decrease | Earth: bleeding damage and attack speed decrease resistance |
| Wind | (148, 206) | Deadly poison, defence decrease | Wind: deadly poison damage and defence decrease resistance |
| Dark | (188, 98) | Bleeding, defence decrease | Dark: bleeding damage and defence decrease resistance |
The payoff is four drops that exist nowhere else. Some of them are capped per week, and the cap resets weekly, so this is content you visit on a schedule rather than grind in one sitting.
| Drop | How many | What it turns into |
|---|---|---|
| Elite Option Change Fragment | 50 | An Elite Option Change Stone, which rerolls the elite option on a Guardian. This is how you fix the wrong-element problem above |
| Sealed Armour Fragment | 50 | One part of Scratched Blood Angel armour. That crafts Blood Angel armour without a Soul of Blood Angel, and a success comes out at +13 |
| Golden Crest | – | Crafting material for 4th wings and capes |
| Elite Guardian Enhancement Stone | – | The only way to push a Guardian past enhancement level 11 |
Blue Eye and Silverheart: the two mastery tiers this season added
Season 15 is responsible for two rungs of the mastery ladder: the fifth mastery weapon, called Blue Eye, and the sixth mastery armour, called Ancestral Silverheart. Neither is the top any more, which is exactly why they are worth understanding. Every later tier is built the same way, from the same materials, at the same NPC, at the same guaranteed rate.
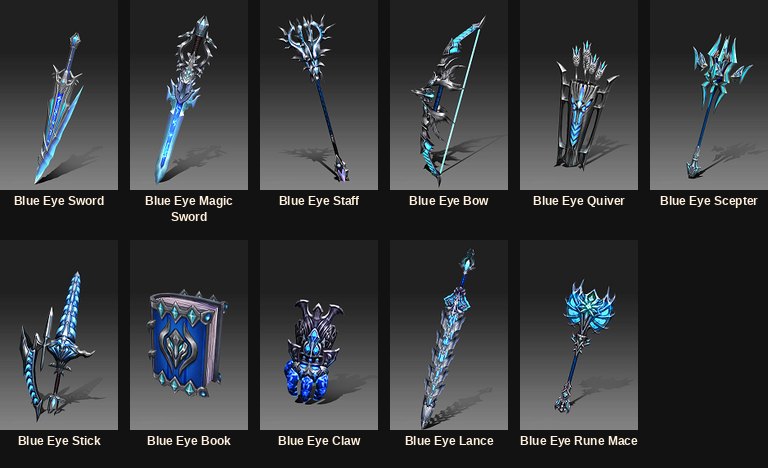
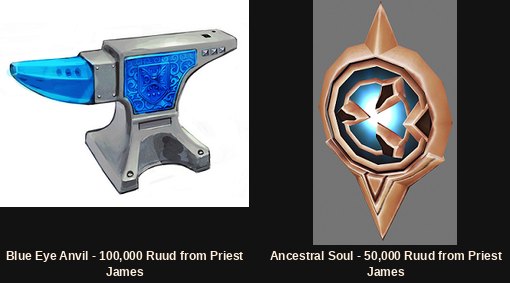
The two recipes are identical in shape: bring a mastery item already at +11 with 16 options, buy the catalyst from Priest James in Elbeland with Ruud, add the jewels, and the Chaos Goblin delivers at a flat 100%.
| What you want | What you feed it | Catalyst | Jewels | Rate |
|---|---|---|---|---|
| Blue Eye weapon (5th mastery) | A Soul Excellent weapon at +11 / 16 options | Blue Eye Anvil, 100,000 Ruud | Bless ×30, Soul ×30, Chaos ×1, Creation ×1 | 100% |
| Ancestral Silverheart armour (6th mastery) | A Frigid Blue Eye set piece at +11 / 16 options | Ancestral Soul, 50,000 Ruud | Bless ×30, Soul ×30, Chaos ×1, Creation ×1 | 100% |
The weapon upgrade carries over the weapon type, Luck and every Excellent option; the armour upgrade carries over the wearing class, the equipment slot, Luck and the all-stats option. So the real cost of a mastery tier is the +11 and 16 options underneath it, not the catalyst on top.
The eleven Blue Eye weapons
Every one of them wants level 1,000, and every one carries the same Excellent block: excellent damage rate +10%, attack or magic speed +7, life and mana recovery worth (stat/8) on each kill, attack or wizardry +2.2 per 20 levels, and attack power +62. The Blue Eye Book is the single exception, where the per-20-levels line reads curse power instead.
The table is grouped by how the weapon is used rather than by class order, and the last column answers whether it brings a skill with it.
| Weapon | Class | Attack power | Speed | Stat requirement | Skill it keeps |
|---|---|---|---|---|---|
| Blue Eye Short Sword | Slaughterer | 539–570 | 45 | Str 336 / Agi 1,067 | – |
| Blue Eye Sword | Blade Master | 552–562 | 40 | Str 1,014 / Agi 322 | Twisting Slash |
| Blue Eye Magic Sword | Duel Master | 551–561, wizardry 80% | 45 | Str 731 / Agi 448 / Ene 156 | Power Slash |
| Blue Eye Claw | Fist Master | 454–464 | 35 | Str 606 / Agi 197 | Phoenix Shot |
| Blue Eye Lance | Mirage Lancer | 345–357 | 40 | Str 461 / Agi 315 | Lunge |
| Blue Eye Scepter | Lord Emperor | 550–564, pet 88% | 40 | Str 716 / Agi 164 | Force Wave |
| Blue Eye Bow | High Elf | 704–722 | 45 | Str 224 / Agi 1,193 | Triple Shot |
| Blue Eye Quiver | High Elf | 507–531 | 55 | Str 217 / Agi 1,179 | – |
| Blue Eye Staff | Grand Master | 204–218, wizardry 136% | 30 | Str 322 / Agi 103 | – |
| Blue Eye Stick | Dimension Master | 187–195, wizardry 138% | 30 | Str 274 / Agi 108 | – |
| Blue Eye Book | Dimension Master | Curse power 135% | 50 | Agi 192 / Ene 984 | – |
| Blue Eye Rune Mace | Majestic Rune Wizard | 178–183, wizardry 111% | 50 | Str 308 / Agi 108 / Ene 1,102 | – |
Do not compare attack numbers across classes: a staff multiplies wizardry and a scepter multiplies pet damage, while a bow multiplies nothing. The Quiver at speed 55 is the fastest item on the list and the Staff and Stick at 30 the slowest, which is the clearest illustration of why attack speed matters more to some classes than others.
Ancestral Silverheart, the 6th mastery armour
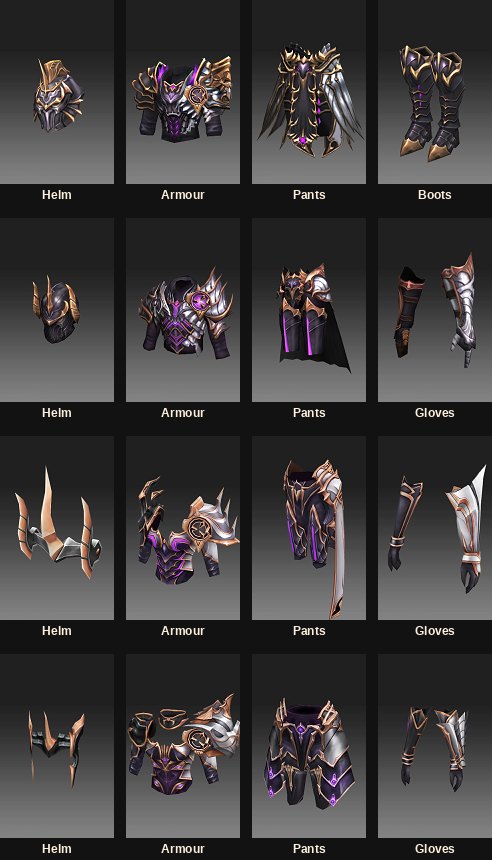
Silverheart is worn at level 1,100, and you either run the guaranteed upgrade above or pick it up: it drops raw in the Scorched Canyon, and the Excellent version drops in Crimson Icarus. That is the thread tying the season together, with the two new maps feeding the new armour tier.
The tier also introduced mastery damage decrease, an option that did not exist before it. Like all mastery options it grows with the item's enhancement level, at a rate set per class and per item type, so the same piece at two different plus levels is not the same item.
| Pieces worn | Set bonus |
|---|---|
| 4 set | Mastery critical damage, mastery excellent damage, mastery all stats, mastery base defence, mastery max life, mastery damage decrease, ignore enemy defence +9%, critical damage rate +20%, excellent damage rate +20%, triple damage +6% |
| 3 set | Double damage rate +18%, mastery attack power or wizardry |
| 2 set | Mastery skill attack power, mastery main stat, meaning Strength or Energy depending on the class |
Defence on the pieces themselves sits between 310 and 365 whichever class you play, and since the classes wear different combinations of helm, armour, pants, gloves and boots, the total is the only fair comparison:
| Class | Four pieces it wears | Defence, in that order | Total |
|---|---|---|---|
| Dragon Knight | Helm, armour, pants, boots | 341 / 364 / 354 / 340 | 1,399 |
| Magic Knight (strength) | Armour, pants, gloves, boots | 363 / 339 / 333 / 338 | 1,373 |
| Noble Elf (attack) | Helm, armour, pants, gloves | 336 / 342 / 338 / 327 | 1,343 |
| Fist Blazer | Helm, armour, pants, boots | 317 / 345 / 334 / 323 | 1,319 |
| Rune Wizard | Helm, armour, pants, gloves | 326 / 335 / 332 / 322 | 1,315 |
| Empire Lord | Helm, armour, pants, gloves | 319 / 339 / 326 / 315 | 1,299 |
| Dimension Summoner | Helm, armour, pants, gloves | 323 / 335 / 326 / 314 | 1,298 |
| Soul Wizard | Helm, armour, pants, gloves | 321 / 329 / 326 / 315 | 1,291 |
| Shining Lancer | Helm, armour, pants, gloves | 311 / 313 / 324 / 321 | 1,269 |
One set is missing from it on purpose. The energy Elf version drops the damage bonuses for a support package: defence improvement +51%, attack power improvement +51%, +45% defence while a shield is equipped, defence +270 and max life +550. If you buff for a party, that is the only Silverheart row that matters to you.
Three accessory slots, one shared upgrade rule
Season 15 touched the Guardian slot, the earring slots and the necklace slot, and two of the three run on the same upgrade machine. Learn that machine once.
| Plus level of the item you feed in | Chance it works |
|---|---|
| +15 | 100% |
| +14 | 90% |
| +13 | 80% |
| +12 | 70% |
| +11 | 60% |
That ladder governs both the Ice Dragon Guardian and the Earring of Honour. Both take Bless ×20, Soul ×20, Chaos ×1 and Creation ×1 with a catalyst from the Ruud shop, and both punish failure the same way: the materials are destroyed and the base item drops to +0. A 60% attempt is not a 40% chance of nothing, it is a 40% chance of losing eleven enhancement levels as well. At +15 the problem disappears.
The Ice Dragon, your second Guardian

The second Guardian is an Ice Dragon, equipped from the inventory like the first and worn from level 900. An Ice Dragon (Rare) comes out of the same combination at a low rate, differing only in colour, so treat it as a trophy rather than a target.

You do not find one. You upgrade your 1st Guardian at the Trainer NPC in Lorencia (122, 110), with the Seal of the Ice Dragon from the Ruud shop and the jewel set above, against the success ladder above.
What it rolls matters more than what it is. Fixed: movement speed increase and attack speed +7. On top, one to three normal options from defence per 20 levels, attack, wizardry or curse power per 20 levels, both counting to level 1,100, elemental defence and elemental attack power. Then exactly one of the five elite resistance sets above, the option deciding which part of Crimson Icarus you survive.
Two consequences of a success are easy to miss. The normal options reroll, three becoming at least two, and the elite resistance option always rerolls, so a Guardian tuned for one element hands you a random element back. One other change: dismantling a Guardian now returns only the Guardian Enhancement Stone.
The Earring of Honour, 3rd mastery earring
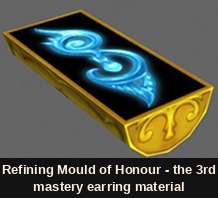
The third mastery earring is the Earring of Honour, made by running a 2nd mastery earring through that machine with the Refining Mould of Honour from the Ruud shop. A left produces a left and a right produces a right, so there is no shortcut to a pair. Both halves enhance to +15 at the Chaos Goblin with refining stones, and a spare earring is itself refining-stone material.
The upgrade rerolls the options, and a three-option earring comes out with at least two. The halves are not symmetrical: the left is the defensive, mastery-scaling piece and the right is rates and speed.
| Earring of Honour (right) | Earring of Honour (left) | |
|---|---|---|
| Level to wear | 800 | 750 |
| Base option | Attack, wizardry or curse power 172–175, with elemental defence 160 | Attack, wizardry or curse power 132–135, with elemental defence 102 |
| Random options, 1 to 3 of | Max mana +600, excellent damage rate +6%, critical damage rate +6%, AG recovery +10, attack speed +7 | Max life +600, skill attack power +21, mastery attack power or wizardry +56, mastery excellent damage +95, mastery critical damage +95 |
| Season bonus | Ignore enemy defence 3%, all stats +6 | Ignore enemy defence 3%, all stats +6 |
Wear a matched pair for the season bonus: a left and a right from the same season switch it on. A Season 15 left beside another season's right gives you base options only, quietly costing you ignore enemy defence 3% and all stats +6.
Socket necklaces, where the mounting order is the stat
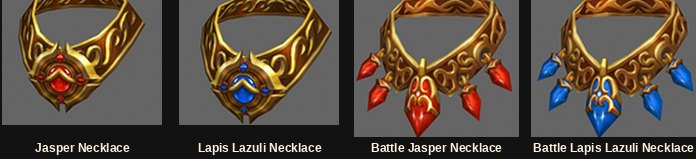
These four are the first necklaces to carry Excellent options and sockets at the same time, up to three sockets, and they only accept water, wind and earth seed spheres. Mounting and extraction happen at the Seed Master in Elbeland (46, 242). They cannot be put through refining-stone combination at all, so do not buy one planning to feed it to something later.
All four want level 850. The split is simply attack against wizardry, and plain against PvP.
| Necklace | Scales | PvP option |
|---|---|---|
| Battle Jasper Necklace | Attack | Ignore defence rate resistance 3% |
| Battle Lapis Lazuli Necklace | Wizardry | Ignore SD rate resistance 3% |
| Jasper Necklace | Attack | – |
| Lapis Lazuli Necklace | Wizardry | – |
Up to two Excellent options roll on them, from excellent damage rate 10%, attack or wizardry +1 per 20 levels, attack or wizardry power 2%, attack and magic speed +7, and life or mana worth (stat/8) on a kill. The socket options are the familiar defensive list, from defence and defence success rate through reflect and damage decrease to max AG and the four stats.
Then the part worth memorising, because most players lose it. Two set bonuses fire only if the spheres go in in the right order, and the two orders are different permutations of the same three elements.
| Bonus you want | Socket 1 | Socket 2 | Socket 3 |
|---|---|---|---|
| Max life increase | Earth | Wind | Water |
| Defence increase | Water | Earth | Wind |
You do not have to craft one, either. They drop with up to two Excellent options and up to three sockets already open, plus a chance of a 0–3% auto life recovery option, in Deep Dungeon 1–5, the Abyss of Atlans 1–3 and Crimson Icarus. Two of those three are maps you were already running.
The Dark Knight fork, and why it still decides your build
This is the part of Season 15 with the longest shadow. The Dark Knight was not buffed, it was split: one skill makes you a damage character with a wider reach, another makes you a shield-carrying party tank, and the skill stays on once you use it. That makes it a build decision rather than a rotation.
| Build | Skill | Stat gate | What switching it on does |
|---|---|---|---|
| Rage Knight | Rage of the Sword | Strength 1,060 | Widens the usable range of your attack skills, and the damage range of the Blow series on top of that |
| Rage Knight | Sword Blow | Strength 1,090 | A water-element Blow that covers a wide area, where Fire Blow puts everything into one burst |
| Faith Knight | Strong Faith | Energy 1,040 | Requires a shield. Converts the character: stats turn into defence far more efficiently than normal, and you gain a flat base defence bonus |
| Faith Knight | Solid Protection | Energy 1,052 | Pulls part of the party's max life into your own using your Agility, soaks a share of their incoming damage using your Energy, and raises their attack power while it runs |
The stat gates decide it for you. A Rage Knight pays in Strength, a Faith Knight in Energy, and no character reaches both gates by accident. The Faith side is the genuinely new idea: a melee class whose job is holding someone else's life bar.
The master tree was extended to match: Rage of the Sword Mastery adds +1 tile of attack range, Strong Faith Enhancement adds base defence, three nodes cover Solid Protection's conversion amount, the damage you take for others and the party attack power it grants, and two cover Destruction Strike. Weapon-skill enhancement options were removed and some skills moved, so a pre-Season 15 build guide will not match your client. The tree also gained branches for Destruction Strike (deadly poison, freeze), Sword Blow (deadly poison, bleeding) and Solid Protection.
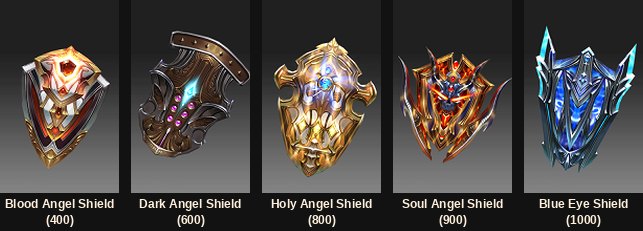
A Faith Knight needs a shield, so five mastery shields arrived with it, all carrying the same new option: damage taken on another's behalf is reduced by shield defence × 0.1. Your shield's defence is therefore not a defensive stat, it is the efficiency of your party role. Listed top down, the direction you shop in.
| Shield | Level | Defence (rate) | Base defence per 20 levels | Requirements |
|---|---|---|---|---|
| Blue Eye Shield | 1000 | 81 (118) | +2.2 | Str 239 / Agi 175 / Ene 940 |
| Soul Angel Shield | 900 | 72 (116) | +2.0 | Str 236 / Agi 161 / Ene 965 |
| Holy Angel Shield | 800 | 63 (114) | +1.8 | Str 222 / Agi 155 / Ene 930 |
| Dark Angel Shield | 600 | 54 (112) | +1.6 | Str 214 / Agi 153 / Ene 885 |
| Blood Angel Shield | 400 | 45 (110) | +1.5 | Str 203 / Agi 151 / Ene 860 |
Each shield also rolls up to two random Excellent options out of reflect 5%, defence success rate +10%, max life, max mana and damage decrease. The three numeric ones scale with the tier, running from 165 / 165 / 45 on the Blood Angel Shield to 242 / 242 / 66 on the Blue Eye Shield.
A matching Faith armour line runs beside the shields, every piece asking for Agi 125–135 and Ene 755–769, which is a reminder that this is an Energy build wearing plate. Defence is given in the order helm, armour, pants, boots.
| Faith set | Level | Defence, four pieces | Headline set bonus |
|---|---|---|---|
| Silverheart Knight | — | 361 / 384 / 375 / 360 | Solid Protection party attack +200, triple damage +3% |
| Blue Eye Knight | — | 311 / 335 / 325 / 310 | Solid Protection party attack +170, triple damage +2% |
| Soul Knight | 900 | 263 / 285 / 276 / 262 | Solid Protection party attack +140, triple damage +1% |
| Holy Angel Knight | 800 | 213 / 237 / 226 / 210 | Solid Protection party attack +110, all stats +20 |
| Dark Angel Knight | 600 | 158 / 182 / 171 / 155 | Solid Protection party attack +80, all stats +15 |
| Blood Angel Knight | 400 | 131 / 155 / 144 / 127 | Solid Protection party attack +50, all stats +10 |
The top two rows carry no wear level because the patch note printed none, so check them in your client. The progression shows what a Faith Knight is paid in: party attack power climbing in even steps from +50 to +200, with all stats swapped for triple damage at the top three tiers. One renewal change helps everybody: mastery swords may be worn on Strength or Energy, either one alone.
The debuff rework you inherited without noticing
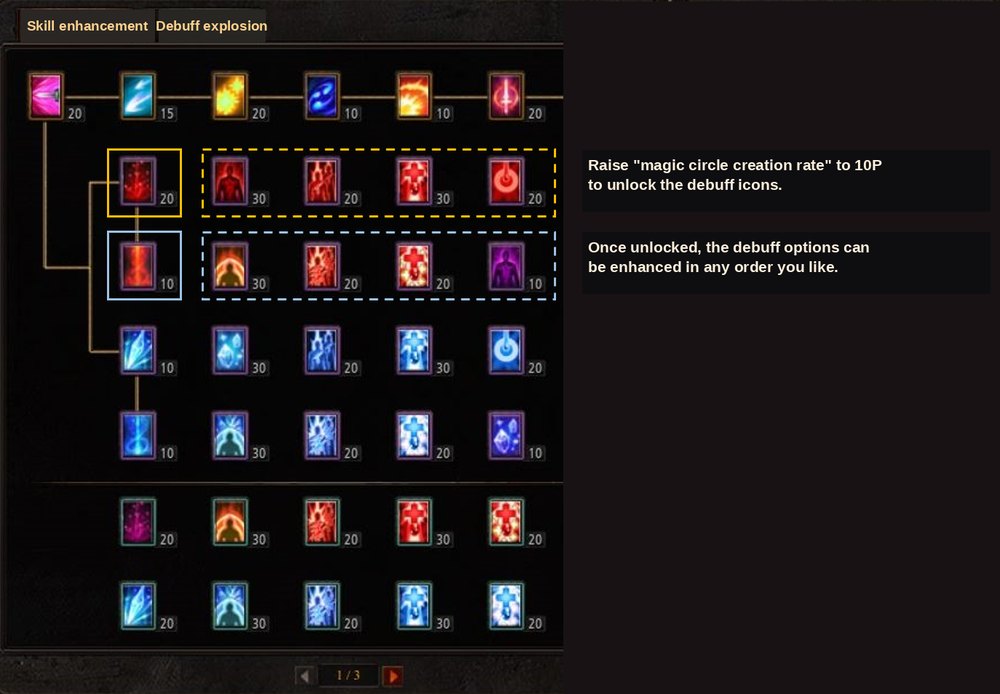
Every class on a modern server applies debuffs through a magic circle that forms on your character as you keep using skills, and that circle is a Season 15 invention. Before it, the debuff half of the tree worked differently and included two effects that no longer exist. A build guide that still recommends Shock and Stun predates this patch.
| Property | Value |
|---|---|
| Duration | 10 seconds |
| Cooldown | 20 seconds |
| Base debuff success rate | 100 |
| Radius | 6 tiles |
| Targets | 7 maximum |
| Tick | Applies its debuff once per second, against the monster's debuff defence rate |
| Debuff option | What it buys |
|---|---|
| Magic circle creation rate increase | A better chance of the circle forming at all. This is the gate: at 10P the remaining debuff icons unlock and can then be taken in any order you like |
| Magic circle duration increase | A longer circle. Enough of it and the uptime swallows the cooldown |
| Debuff range increase | A wider circle than the 6-tile base |
| Debuff target increase | More than the 7-target cap |
| Debuff success rate increase | Points to spend one at a time, whenever a new monster starts resisting you |
| Upper debuff effect added | Lets the circle apply the upper tier: Poison becomes Intoxication, Frost becomes Freeze, Bleeding becomes Hemorrhage |
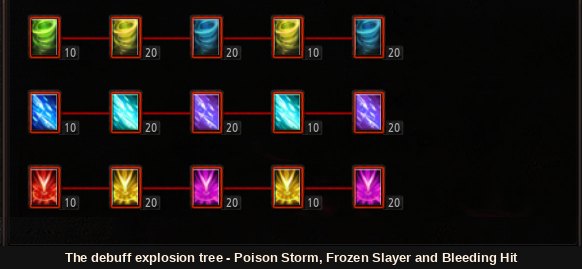
The explosion branch is what the upper debuffs are for: each upper state has exactly one active skill that sets it off.
| Base debuff | Upper state | Skill that detonates it |
|---|---|---|
| Poison | Intoxication | Poison Storm |
| Frost | Freeze | Frozen Slayer |
| Bleeding | Hemorrhage | Bleeding Hit |
Two options widen the blast. Explosion range effect spreads the damage to everything in range with no reduction for extra targets. Explosion infection effect passes the debuff to anything within 3 tiles of the target you detonated and steps it up a stage, so clean monsters become poisoned and poisoned ones intoxicated. Chained, one detonation sets up the next.
Two side options cover the 4th wings, one raising defence and one raising attack, wizardry or curse power while 4th wings or a cape are equipped, and the side option cap rose from 30 to 40 points at the same stage. With Shock and Stun removed, monsters carry a debuff defence rate instead of a resistance percentage, readable by hovering over them.
Each class then had its emptied Shock and Stun slots refilled with the same three-debuff layout. Your own row is the one to read.
| Class | Skills and the debuffs they now carry |
|---|---|
| Slayer | Sword Inertia: poison, bleeding · Bat Flock: poison, frost · Fierce Attack: poison, frost |
| Dark Knight | Blow: bleeding, frost · Fire Blow: poison, bleeding · Rageful Blow: poison, frost |
| Dark Wizard | Meteor Strike: frost, bleeding · Evil Spirit: frost, poison · Meteor Storm: poison, frost |
| Elf | Triple Shot: bleeding, frost · Multi-Shot: bleeding, poison · Focus Shot: poison, bleeding |
| Magic Gladiator | Fire Blood: bleeding, poison · Ice Blood: frost, bleeding · Blood Attack: poison, bleeding |
| Dark Lord | Chaotic Diseier: bleeding, frost · Wind Soul: frost, bleeding · Fire Burst: poison, bleeding |
| Summoner | Death Side: bleeding, frost · Lightning Shock: bleeding, frost · Aqua Beast: frost, poison · Fire Beast: poison, bleeding |
| Rage Fighter | Spirit Hook: bleeding, frost · Dark Side: frost, poison · Dragon Roar: poison, frost |
| Grow Lancer | Breche: bleeding, poison · Magic Pin: frost, bleeding · Shining Pick: frost, poison |
| Rune Wizard | Magic Arrow: poison, frost · Plasma Ball: frost, poison · Lightning Storm: bleeding, poison |
The level cap, the rewards that expired, and the event bands
Season 15 raised the ceiling twice, once per part: 1,150 to 1,200 in the first half and 1,200 to 1,250 in the second. Each raise paid out a season reward muun for reaching the old cap, and both are gone for good, which makes them the cleanest example here of content you can read about but never have.
| Level reached | Muun | What it gave | How it was claimed |
|---|---|---|---|
| 1,150 | Elf Queen Runedil | Skill attack power +15, multiplied 20 times over for 30 days | Gremory Case, 30-day claim window, 14 days of validity once claimed |
| 1,200 | Magic Gladiator Gaion Karein | Elemental defence +10, with the same 30-day multiplier | Gremory Case, 30-day claim window, 14 days of validity once claimed |
A claim window that short, on a reward for reaching a cap that has since moved twice, means both muuns exist only in patch notes now. Be suspicious of any guide that lists them as obtainable.
The cap raise did leave something you will meet. Every grade band in the recurring event maps was redrawn for a 1,250-level game, with the Mastery Box payout pinned to the new grades. Both rebandings sit in one table, since it was the same operation twice.
| Content | Grade | Old band | Season 15 band | Mastery Boxes |
|---|---|---|---|---|
| Chaos Castle, Blood Castle, Devil Square, Doppelganger | 1 | 50–199 | 50–399 | – |
| The same four | 2 | 200–299 | 400–599 | 1 |
| The same four | 3 | 300–399 | 600–699 | 1 |
| The same four | 4 | 400–549 | 700–799 | 1 |
| The same four | 5 | 550–649 | 800–899 | 2 |
| The same four | 6 | 650–769 | 900–999 | 2 |
| The same four | 7 | 770+ | 1,000+ | 2 |
| Illusion Temple | 1 | 180–299 | 180–399 | – |
| Illusion Temple | 2 | 300–399 | 400–599 | 1 |
| Illusion Temple | 3 | 400–599 | 600–799 | 2 |
| Illusion Temple | 4 | 600–769 | 800–999 | 2 |
| Illusion Temple | 5 | 770+ | 1,000+ | 2 |
The pattern is the same twice: grade 1 stretches out to swallow everything up to level 399, and the top grade's floor moves from 770 to 1,000. Monster statistics, the quests attached to these events and the Blood Castle and Devil Square ticket drop levels all shifted onto the new bands. The two-Mastery-Box grades start at 800, which is where running events becomes worth scheduling.
Those bands were drawn for a 1,250 cap and the cap has moved since, so read them as the shape of the system and check the grade list in your own client before planning a run.
What Season 15 content has since been superseded
- Blue Eye is no longer the top weapon tier, and Silverheart no longer the top armour tier. The ladder kept going. Both are still rungs you pass through, and the upgrade pattern they set is how the tiers above them are made.
- The Ice Dragon is the 2nd Guardian, not the last one. It is a step on the way, and the elite resistance roll is the only thing about it that interacts with current content.
- The Earring of Honour is the 3rd mastery earring. The line continued, so check which season's pair your server expects before spending Ruud on moulds.
- The two cap-reward muuns are unobtainable. Elf Queen Runedil and Gaion Karein are patch-note history.
- The 1,050 and 1,070 entry levels no longer mean endgame. Both maps were drawn against a 1,250 ceiling and now sit mid-route.
- The event grade bands were drawn for a 1,250 world. Their 1,000+ top grade was that cap's ceiling.
- Shock and Stun do not exist. Any guide still recommending them predates this season, which is a quick way to date a build guide.
- The Jewel of Chaos is not a currency. Season 15 removed it as a store price, and pricing a jewel in that same jewel has been banned ever since.
Not superseded, and this is the longer list: the personal store, the Equipment Enhancement window, Helper Plus, cross-channel parties, Simple UI, the magic circle debuff system, the Slayer and the Slaughterer, the Dark Knight's Rage and Faith split, and the socket mounting order that still decides which bonus your necklace gives you.
What to actually do about Season 15
- Turn on automatic Guardian repair under MU Helper [Other settings] before your first long session. It costs Jewels of Bless and saves the whole run.
- Set Helper Plus deliberately rather than leaving it on defaults. Four slots on not registered for solo, or the Energy Elf required option if you want a buffer to find you.
- Never upgrade a Guardian or an earring from +11. Push it to +15 for the free attempt; the failure penalty resets the item to +0 and eats the jewels.
- Decide your Guardian's elite resistance element before you farm an elite zone, not after. The resistance is what the zone attacks.
- Mount necklace spheres in the published order: earth, wind, water for max life, or water, earth, wind for defence. Getting it wrong means a second trip to the Seed Master in Elbeland.
- In the skill tree, take magic circle creation rate to 10P first and duration second. Nothing else unlocks until creation rate is done.
- As a Dark Knight, pick Rage or Faith on purpose. The stat gates are 1,060 Strength and 1,040 Energy, and no build reaches both.
- If you want to try the Slayer, do it now rather than later. There is nothing to unlock, Alex at (115, 120) in Lorencia sells the orbs, and the class change quests hand you the muun you need.
- Do not plan a stay in the Scorched Canyon or Crimson Icarus. Go for Silverheart drops and for the elite zone materials, then move on.
Our server runs Season 22 on the latest server files, opens on 30 October 2026, with high exp, stats capped at 32,700, events and mini-bosses all day, and a custom jewel system. Everything on this page is in that client already. Make an account and try the Slayer.
- Still load-bearing: the list-format personal store, the +1 to +15 Equipment Enhancement window, Helper Plus and Simple UI.
- The Slayer is still unlocked by default. Pick it, start in Lorencia, buy the four skill orbs from Alex at (115, 120).
- Blue Eye weapons and Ancestral Silverheart armour are mastery tiers 5 and 6, both upgraded at a guaranteed 100% from a +11 / 16 option base.
- Scorched Canyon at 1,050 and Crimson Icarus at 1,070 are mid-route now, visited for Silverheart and elite zone materials.
- Your Guardian's single elite resistance roll decides which elite zone you can survive, so choose the element before you farm.
- Gone for good: Shock and Stun, the Jewel of Chaos as currency, and both cap-reward muuns.