On a Season 22 server, Season 6 is the floor you stand on: a class you can still roll, the master skill window you open after 400, capes you chase for hundreds of levels. This guide sorts it into what is still load-bearing, what later versions replaced, and where each piece lands on the climb.
Season 6 in one minute
Two halves, aged differently. Part 1 was content: a class, a ruined kingdom, the first named set bonuses. Part 2 was plumbing: the master skill window rebuilt, a repeatable quest layer, level 380 gear, more bag and warehouse space. Content gets outranked, and every season since has stacked higher tiers on top of Part 1. Plumbing gets extended instead, which is why Part 2 is the half you still use without noticing.
The Rage Fighter, still a first-pick
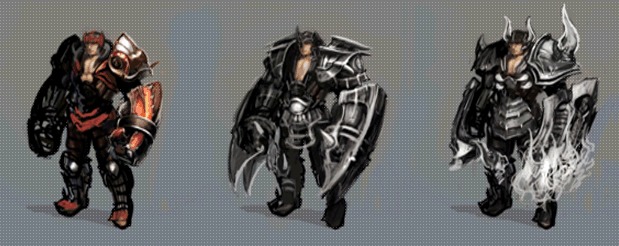
The one piece of Season 6 that has lost nothing. He brawls at Dark Knight range, but half his output comes from making the target worse rather than from raw hit numbers: the kit stacks debuffs while it damages, and his PvP tools strip a shield rather than grind it down. His power reads as stamina, not mana, and the divine beast he releases from inside his own body is how a melee class ends up with reach.

Rolling one on a high-exp server
The gate is an account requirement, not a character one: you need a character at level 150 on the account before the creation screen offers you a Rage Fighter. On high exp that is a short detour, but he cannot be your first login.
| Starting detail | Value |
|---|---|
| Account requirement | One character of level 150 or above already on the account |
| Spawn town | Lorencia |
| Second class change | Rage Fighter |
| Third class change | Fist Master |
| Base HP | 100 |
| Base MP | 40 |
| Base Strength | 32 |
| Base Agility | 27 |
| Base Vitality | 25 |
| Base Energy | 20 |
| Base Command | 0 |
Which build, and for how long it matters
Vitality feeds single-target debuff pressure; Energy feeds area skills, buffs and the PvP finisher.
| Where you are | Stat to feed | What you get |
|---|---|---|
| Hunting one target at a time | Vitality | Big single-target numbers while debuffs pile up, so kills come fast |
| Clearing packs alone | Energy | Several enemies per cast, plus self-buffs that raise your own stats |
| In a party | Energy | Defence Success Rate and Vitality buffs land on the group |
| Event maps | Energy | Buff first, then clear with the area skills |
| Open PvP | Energy | Raises divine-beast power and skill success rate, so Dragon Slasher cuts through SD into HP |
| Castle Siege | Energy | Group buffs plus the PvP kit, aimed at the enemy commander or guild master |
On our Season 22 server stats cap at 32,700, so the choice has a shelf life: early on you commit to one column, late on you own both. Undecided, start Energy, because four of the six rows want it.
The nine skills, sorted by when you get them
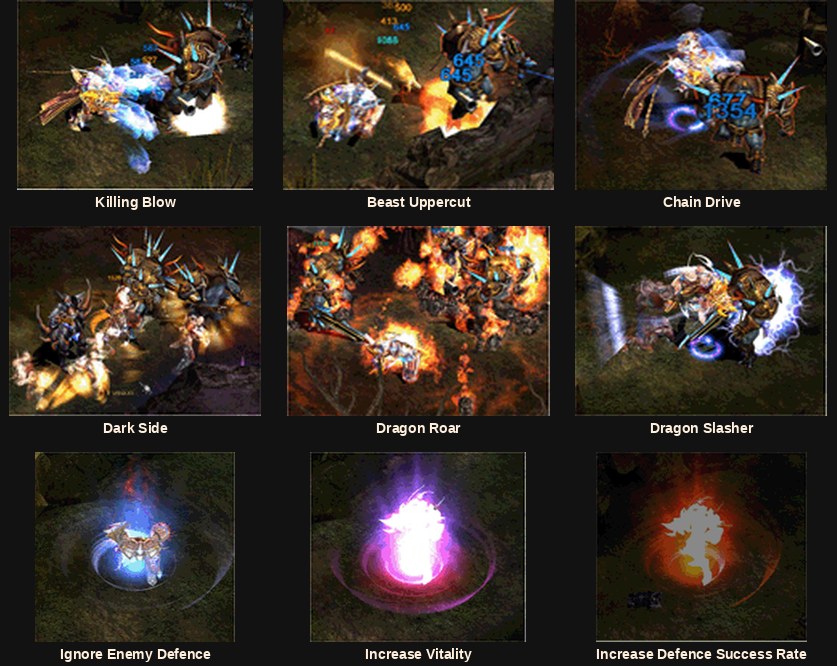
By unlock level you can see what your bar looks like at each stage: two attacks free, a party buff at 70, the middle at 150, the heavy end at 200.
| Skill | Kind | Unlocks | Mana | AG | Element | What it is for |
|---|---|---|---|---|---|---|
| Killing Blow | Weapon | 0 | 9 | 0 | Earth | Bread and butter: a quick flurry that also drags attack power down |
| Beast Uppercut | Weapon | 0 | 9 | 0 | Fire | The other opener, one hard shake of the target |
| Increase Defence Success Rate | Buff | 70 | 50 | 10 | — | Lands on the party. Size and duration scale off Energy |
| Chain Drive | Area | 150 | 15 | 20 | Ice | Kick into punch, fast, and leaves the target sluggish |
| Dragon Roar | Area | 150 | 50 | 30 | Earth | Hits your target plus everything near it |
| Increase Vitality | Buff | 150 | 50 | 10 | — | Party buff, again scaling with Energy |
| Dark Side | Area | 200 | 70 | 0 | Wind | Hits everything inside a radius centred on you, repeatedly |
| Dragon Slasher | PvP | 200 | 100 | 100 | Wind | The finisher: a vital-point kick that can damage SD and HP together |
| Ignore Enemy Defence | Buff | 200 | 50 | 10 | — | Self only, the one buff you do not share |
He also carries the shared siege toolkit: Charge at 90 damage for 20 mana and 15 AG, plus Remove Stun, Swell Mana, Remove Invisibility, Stun and Invisibility. Chain Drive and Dark Side are what you hold down while levelling; Dragon Slasher you save for a player.
The health cost is what people get wrong
Equip wings or a Satan and his skills bill him in health as well as mana. It is by design, and a Rage Fighter with no life recovery can kill himself on his own rotation.
| Skill | Cost per hit | Hits | Health gone |
|---|---|---|---|
| Dragon Slasher | 100 | 1 | 100 |
| Chain Drive | 4 | 8 | 32 |
| Dark Side | 4 | 2 per monster hit | 8 per monster hit |
| Dragon Roar | 2 | 4 per monster hit | 8 per monster hit |
| Killing Blow | 2 | 4 | 8 |
| Beast Uppercut | 2 | 4 | 8 |
| Charge | 4 | 1 | 4 |
The per-monster rows are the dangerous ones: Dark Side into a packed spawn multiplies the cost by every body you caught, which is exactly what an event map is. Hence Increase Automatic HP Recovery, below, is not filler here.
Skill scrolls: a gate you barely feel
His exclusive skills come off parchments dropped by monsters, each with a level requirement and, for buffs, an Energy requirement.
| Parchment | Level needed | Energy needed | Drops from monsters of level |
|---|---|---|---|
| Increase Defence Success Rate | 50 | 80 | 70 |
| Increase Vitality | 80 | 132 | 90 |
| Ignore Enemy Defence | 120 | 404 | 100 |
| Chain Drive | 150 | 0 | 80 |
| Dragon Roar | 150 | 0 | 90 |
| Dark Side | 180 | 0 | 100 |
| Dragon Slasher | 200 | 0 | 90 |
In 2010 the drop-level column was the problem. On high exp you outrun the level column long before the parchments appear, so the advice inverts: do not plan a farming trip, read scrolls as they drop, and watch the Energy column, the one gate that still bites a Vitality build.
Gear: three tiers you outgrow, two capes you keep
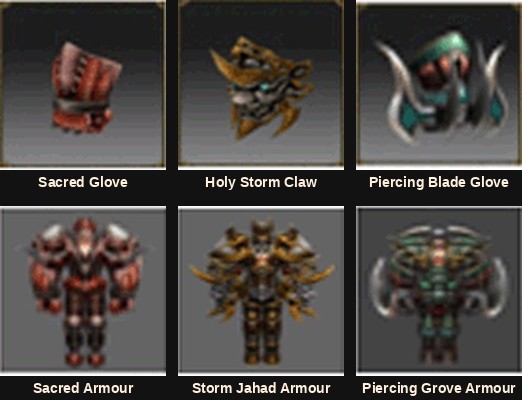
His weapons are gloves and claws in a straight ladder: the Sacred Glove, treated red sheep hide that absorbs his own recoil; the Holy Storm Claw, modelled on the divine beast White Tiger and alloying the wind metal Sinide with Grobo; and the Piercing Blade Glove, a restored Kalutan relic bladed in Grobo so it defends while you attack.
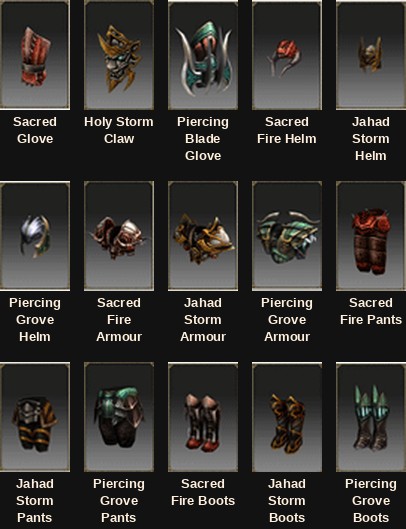
| Tier | Piece | Drops from level | Excellent from level | Attack speed |
|---|---|---|---|---|
| Sacred Fire | Sacred Glove | 52 | 77 | 25 |
| Sacred Fire | Sacred Fire Boots | 50 | 75 | — |
| Sacred Fire | Sacred Fire Helm | 54 | 79 | — |
| Sacred Fire | Sacred Fire Pants | 62 | 87 | — |
| Sacred Fire | Sacred Fire Armour | 66 | 91 | — |
| Jahad Storm | Holy Storm Claw | 82 | 107 | 30 |
| Jahad Storm | Jahad Storm Boots | 62 | 87 | — |
| Jahad Storm | Jahad Storm Helm | 70 | 95 | — |
| Jahad Storm | Jahad Storm Pants | 78 | 103 | — |
| Jahad Storm | Jahad Storm Armour | 82 | 107 | — |
| Piercing Grove | Piercing Blade Glove | 105 | 130 | 35 |
| Piercing Grove | Piercing Grove Boots | 82 | 107 | — |
| Piercing Grove | Piercing Grove Helm | 90 | 115 | — |
| Piercing Grove | Piercing Grove Pants | 95 | 120 | — |
| Piercing Grove | Piercing Grove Armour | 101 | 126 | — |
The ladder is finished by the time a level 130 monster hands you an Excellent piece, so on high exp you clear all three tiers in a sitting. Do not spend jewels here. He can also wear the shared kit: Kris, Short Sword, Small Axe, Hand Axe, Tomahawk, Mace, Morning Star, Flail, Great Hammer and Crystal Morning Star, plus Leather, Scale, Brass and Plate armour.
The capes, which are the part that lasts
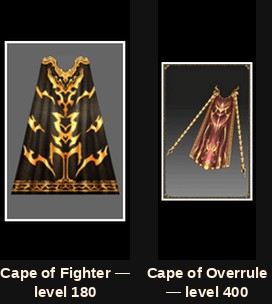
Where the armour tiers are a weekend, the capes are a project. He does not wear wings the way other classes do; these take that slot, and the second stays relevant deep into the range.
| Cape | Level needed | Defence | Damage added | Damage absorbed |
|---|---|---|---|---|
| Cape of Fighter | 180 + (wing level × 4) | 15 + (level × 2) | 20 + (level × 2) | 10 + (level × 2) |
| Cape of Overrule | 400 | 45 + (level × 4) | 39 + (level × 2) | 39 + (level × 2) |
Both gain an extra defence bonus past +10: +4 to +9 on the Cape of Fighter, +5 to +10 on the Cape of Overrule. The Cape of Fighter is a Chaos Goblin Normal Combination craft rolling one of three options: Increase Life at 50 + level × 5, Increase Mana on the same formula, or a 3% chance to ignore enemy defence. The Cape of Overrule rolls from four at 5% each: ignore enemy defence, reflect damage, full Life recovery, full Mana recovery. Either can also come out with no option, which is the part to budget for.
Vega and Chamer, a bonus for your first few hours
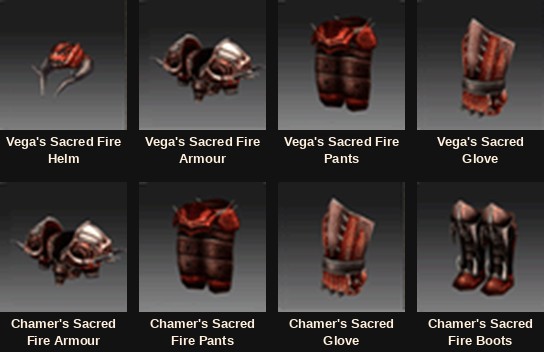
The clearest superseded thing here: both sets are built from the Sacred Fire line, tier one, so the bonus lives on gear you are about to replace. They share three pieces and differ only in whether the fourth is the helm or the boots, so which one you run is usually an accident of what dropped.
| Set | The four pieces |
|---|---|
| Vega | Sacred Fire Helm, Sacred Fire Armour, Sacred Fire Pants, Sacred Glove |
| Chamer | Sacred Fire Armour, Sacred Fire Pants, Sacred Glove, Sacred Fire Boots |
| Pieces worn | Vega gives | Chamer gives |
|---|---|---|
| 2 pieces | Attack rate +50 | Defence +50 |
| 3 pieces | Vitality +50 | Double damage rate +5% |
| 4 pieces | Max attack power +30 | Damage +30 |
| Full set, option 1 | Excellent damage rate +15% | Critical damage +30 |
| Full set, option 2 | Double damage rate +5% | Excellent damage rate +15% |
| Full set, option 3 | Ignore enemy defence 5% | Skill attack power +30 |
Given a choice, Chamer suits a new character better: Vega's excellent damage rate only pays once you own excellent items.
Master skills: the window you are still filling in
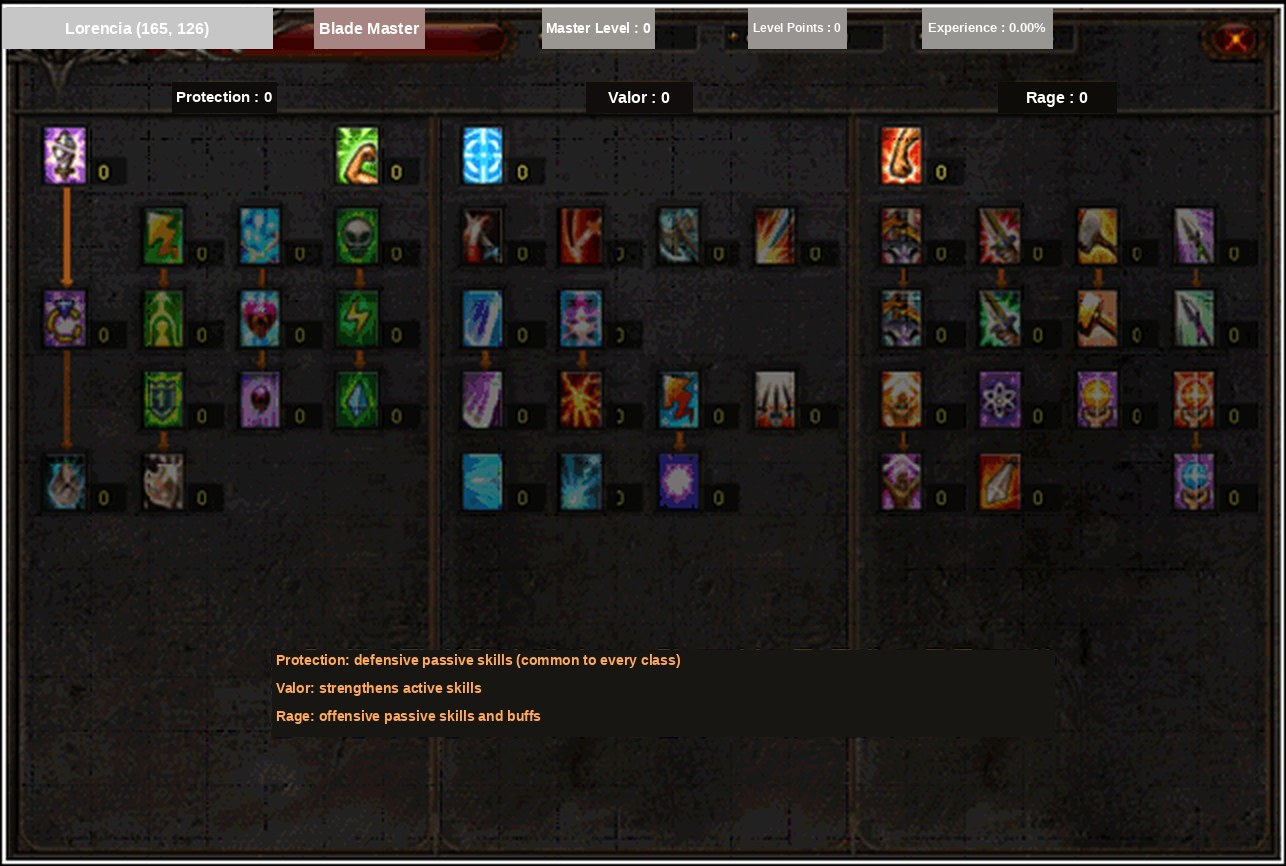
The most durable thing in the release. Part 2 scrapped the four-tree layout for three and standardised the shape for every class: shared defensive passives left, enhancements for your existing actives centre, offensive passives and buffs right. Open the master window on a Season 22 server and you are looking at this screen's descendant.
| How the window works | Value |
|---|---|
| Maximum grade per skill | 20 |
| Cost to raise one grade | 1 point |
| Trees after the rebuild | 3 |
| Trees before the rebuild | 4 |
| Ranks published at the time | 1 – 5 |
Learn the tree names; build guides still use them as shorthand. Grouped by how the class fights:
| Master class | Left: defensive passives | Middle: active enhancement | Right: offence and buffs |
|---|---|---|---|
| Blade Master (Dark Knight) | Protection | Valor | Rage |
| Duel Master (Magic Gladiator) | Solidity | Fighting Spirit | Ultimate |
| Lord Emperor (Dark Lord) | Resolve | Justice | Conquest |
| Grand Master (Dark Wizard) | Serenity | Wisdom | Meadow |
| High Elf (Elf) | Blessing | Salvation | Gale |
| Dimension Master (Summoner) | Guardianship | Chaos | Honour |
One gap for Rage Fighters: the Fist Master was left out of this rebuild, so nothing above applies to him. His master tree arrived after Season 6.
The common tree, and your first points
Fourteen skills on the left are identical for every class across five ranks, grouped below by family, which is how you should plan them.
| Shared skill | Opens at rank | Worth an early point? |
|---|---|---|
| Durability Reduction (1): weapons and armour | 1 | Yes, it pays for itself in repair bills |
| Durability Reduction (2): wings and accessories | 3 | Yes, once you own wings |
| Durability Reduction (3): Satan, Guardian Angel, Horn of Uniria, Horn of Dinorant, Horn of Fenrir | 5 | Only if you ride and pet-fight |
| Increase Automatic Mana Recovery | 2 | Casters first |
| Increase Automatic HP Recovery | 3 | Yes, and non-negotiable on a Rage Fighter |
| Increase Automatic AG Recovery | 4 | Yes if your rotation is AG-hungry |
| Increase Maximum SD | 2 | Yes for PvP |
| Increase SD Recovery Speed | 3 | Yes for PvP |
| Increase PvP Defence Rate | 1 | Only if you fight players |
| Increase Poison Resistance | 2 | Situational, map by map |
| Increase Lightning Resistance | 3 | Situational, map by map |
| Increase Ice Resistance | 4 | Situational, map by map |
| Increase Defence | 4 | Yes, flat and always on |
| Increase Defence Success Rate | 5 | Yes, flat and always on |
| Tree | Skills disclosed |
|---|---|
| Common, all classes | 14 |
| Blade Master: Valor / Rage | 14 / 16 |
| Duel Master: Fighting Spirit / Ultimate | 15 / 15 |
| Lord Emperor: Justice / Conquest | 14 / 16 |
| Grand Master: Wisdom / Meadow | 15 / 14 |
| High Elf: Salvation / Gale | 15 / 13 |
| Dimension Master: Chaos / Honour | 14 / 12 |
Those counts are how much of each tree was revealed at the time. Only a few hard numbers came with them: Rageful Blow Mastery trims 10% off one armour piece's durability loss, Multi-Shot Mastery adds +1 arrow, the Wind-attribute Book Mastery stuns for 3 seconds, the Lightning-attribute Book Mastery knocks back 2 tiles, and the One-handed Sword Strengthener applies at 50% per sword when dual-wielding. Values and structure were flagged as provisional and did move later, so check the window in-game.
Kalutan: somewhere you pass through
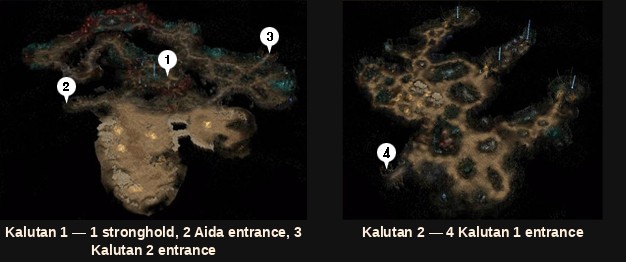
Two halves. Kalutan 1 is the useful one: a stronghold village with a General Goods Merchant, a Weapons Merchant and, unusually, three Warehouse Keepers. Kalutan 2 is empty field. Walking in always drops you into Kalutan 1, and either can be reached through the move command window for 13,000 Zen.
On the entry requirement, the original notice printed “level 1600 or above” for walking in against “level 170 or above” for the move command window. The first is almost certainly a typo for 160, and it is reproduced here as printed rather than silently corrected.
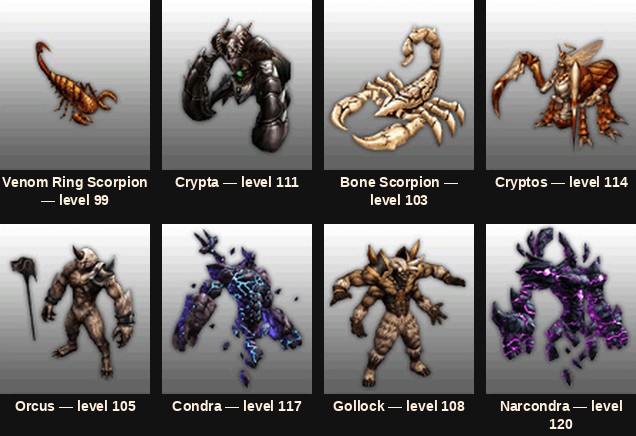
| Monster | Level | HP | Attack, low | Attack, high | Defence | Defence success |
|---|---|---|---|---|---|---|
| Narcondra | 120 | 96,000 | 750 | 815 | 640 | 425 |
| Condra | 117 | 90,000 | 735 | 790 | 610 | 405 |
| Cryptos | 114 | 83,000 | 720 | 770 | 575 | 375 |
| Crypta | 111 | 78,000 | 705 | 755 | 560 | 340 |
| Gollock | 108 | 72,000 | 685 | 735 | 545 | 315 |
| Orcus | 105 | 65,000 | 618 | 655 | 518 | 293 |
| Bone Scorpion | 103 | 60,000 | 595 | 635 | 485 | 283 |
| Venom Ring Scorpion | 99 | 5,000 | 555 | 590 | 45 | 248 |
Sorted that way the shape is obvious: the Venom Ring Scorpion has 5,000 HP and almost no defence, then the floor drops out and everything above sits between 60,000 and 96,000. That one step is the whole difficulty curve.
The lore is better than the loot: Crypta and Cryptos are swarm insects from Kalutan's south, Orcus and Gollock are demons out of Kardamahal that loiter by the magic circle sealing it, and Condra is a stone spirit grown from Kalutan's own energy to protect it, with Narcondra as the stronger form.
In 2010 this was endgame-adjacent farming. On high exp a 99 to 120 band is something you cross: stop in Kalutan 1 for the Warehouse Keepers, take any parchments that drop, move on. Maps that still pay at the cap start around Season 7.
Eternal Wing and Phoenix Soul: your level 380 marker
Part 2 added a gear tier for two classes short of one, pinned at level 380. That makes these sets a waypoint: the first Season 6 items you cannot simply walk into.
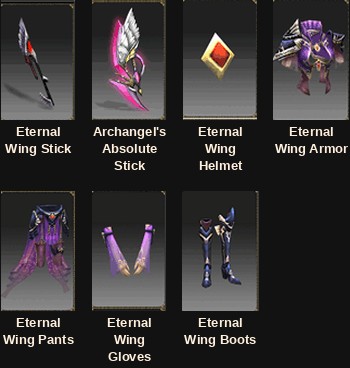
| Summoner piece | Drop level | Magic power | Defence | Needs level | Str | Agi | Ene |
|---|---|---|---|---|---|---|---|
| Eternal Wing Armor | 131 | — | 49 | 380 | 263 | 98 | 910 |
| Eternal Wing Pants | 122 | — | 41 | 380 | 246 | 93 | 849 |
| Eternal Wing Helmet | 116 | — | 35 | 380 | 235 | 89 | 808 |
| Eternal Wing Gloves | 102 | — | 29 | 380 | 209 | 81 | 713 |
| Eternal Wing Boots | 99 | — | 32 | 380 | 222 | 86 | 693 |
| Eternal Wing Stick | 147 | 53 | — | 380 | 271 | 77 | — |
| Archangel's Absolute Stick | — | 73 | — | — | 191 | 60 | — |
Drop level is where an item appears in the world, not what you need to wear it, so a piece off a level 99 monster still sits behind level 380. The Archangel's Absolute Stick is the odd one out: more magic power than the Eternal Wing Stick, lower requirements, no drop level at all.

| Rage Fighter piece | Drop level | Attack power | Defence | Needs level | Str | Vit |
|---|---|---|---|---|---|---|
| Phoenix Soul Armor | 143 | — | 78 | 380 | 436 | 384 |
| Phoenix Soul Pants | 134 | — | 68 | 380 | 409 | 361 |
| Phoenix Soul Helm | 128 | — | 60 | 380 | 392 | 346 |
| Phoenix Soul Boots | 119 | — | 57 | 380 | 366 | 323 |
| Phoenix Soul Star | 147 | 122 ~ 128 | — | 380 | 465 | Agi 244 |

The Star is the piece to care about, because Phoenix Shot is a weapon skill: you never learn it, and it is on your bar only while the weapon is in your hand. For a melee class that is a real ranged option with knockback attached.
| Phoenix Shot | Value |
|---|---|
| Attack type | Ranged |
| Range | 4 cells |
| Targets | Your target plus anything within 2 cells of it |
| Cast delay | 1.2 seconds |
| Mana | 30 |
| Side effect | Knocks the target back and drops its defence success rate |
Daily and Hero quests: largely overtaken
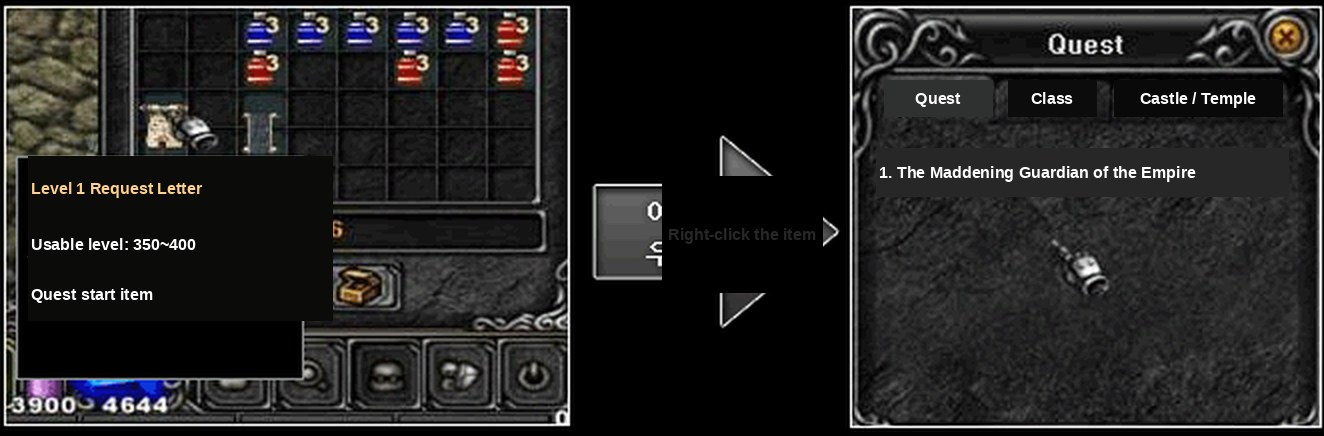
Part 2 introduced the quest you can only repeat after a cooldown, and the completed state survives logging out. The daily line targets levels 350 to 400 and starts with paperwork in Devias.
| What you do | Who you see | What it costs |
|---|---|---|
| Register as a free mercenary | Caretaker Tersia, Devias | 2,000,000 Zen |
| Collect the Level 1 Request Letter | Caretaker Tersia, Devias | 500,000 Zen deposit, refundable |
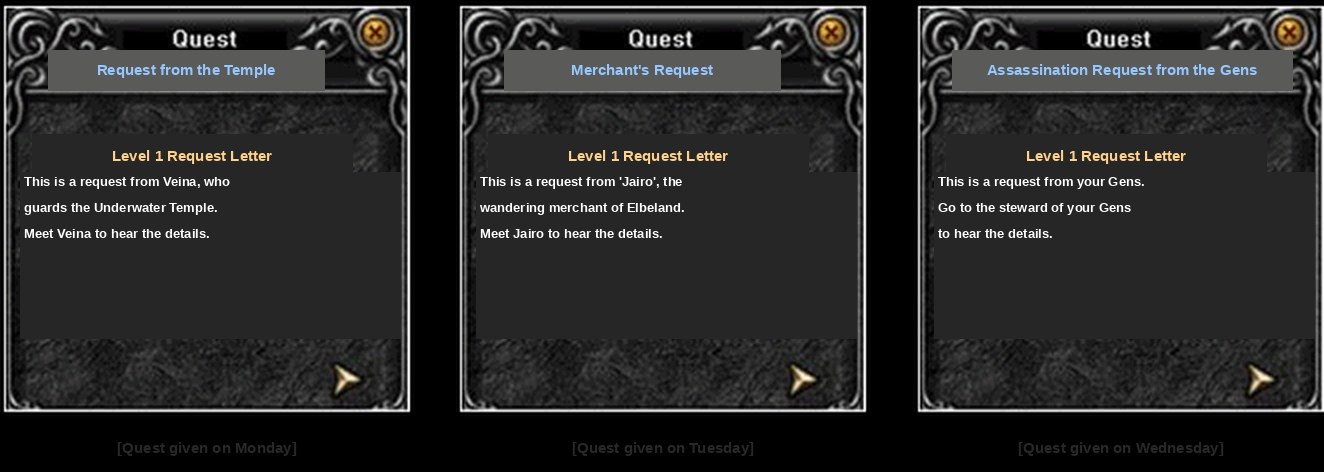
The letter opens a quest window, the day of the week decides which quest you get, and it only works inside a town. Grouped below by destination, since that decides whether a day is worth the trip.
| Day | Quest | Sends you to | Reward group | Chest |
|---|---|---|---|---|
| Monday | Change in the Underwater Temple | Veina, in Kalima 6 | Experience 500,000 / Jewel of Soul / Jewel of Bless | Red |
| Thursday | Crisis of the Underwater Temple | Veina, in Kalima 6 | Experience 500,000 / Jewel of Bless / Jewel of Life | Red |
| Tuesday | The Relentless Trader | Jairo, the travelling merchant | 1,000,000 Zen / Jewel of Soul / Jewel of Life | Green |
| Friday | War Merchant | Jairo, the travelling merchant | 1,000,000 Zen / Jewel of Creation / Jewel of Life | Green |
| Wednesday | Glory of the Gens | Your Gens steward | Contribution 500 / Jewel of Creation / Jewel of Chaos | Purple |
| Saturday | Business of the Gens | Your Gens steward | Contribution 500 / Jewel of Creation / Jewel of Chaos | Purple |
| Sunday | Secret History of the Mercenary Guild | Tersia herself | Experience 1,000,000 / Jewel of Chaos | Purple and Red |
One item comes at random from each group, chests open by throwing them on the ground, and all seven end back at Tersia. Wednesday and Saturday are the same errand renamed; Sunday is the only day paying two chests.
A longer line runs across the four event maps at six repeating tiers, from the low 200s to master level, each asking the same four things: a Chaos Castle kill count, a Blood Castle clear, a Devil Square clear and an Illusion Temple win.
| Tier | Level, 1st class | Level, 2nd class | Chaos Castle asks for | Illusion Temple pays | Jewel pool for the other three |
|---|---|---|---|---|---|
| Qualities of a Hero | 240 ~ 270 | 220 ~ 260 | Kill 5 monsters | Experience 800,000 | Jewel of Chaos x1 / Jewel of Soul x1 / Jewel of Bless x1 |
| Courage of a Hero | 300 ~ 320 | 271 ~ 320 | Kill 10 monsters | Experience 3,000,000 | Jewel of Chaos x1 / Jewel of Soul x1 / Jewel of Bless x1 / Jewel of Harmony x1 |
| Fighting Spirit of a Hero | 331 ~ 350 | 331 ~ 350 | Kill 20 monsters | Experience 5,000,000 | Jewel of Chaos x1 / Jewel of Soul x2 / Jewel of Bless x1 / Jewel of Life x1 |
| Spirit of a Hero | 351 ~ 380 | 351 ~ 380 | Kill 30 monsters | Experience 8,000,000 | Jewel of Soul x2 / Jewel of Bless x1 / Jewel of Harmony x1 / Jewel of Chaos x1 |
| Perseverance of a Hero | 381 ~ 400 | 381 ~ 400 | Clear Chaos Castle | Experience 8,000,000 | Jewel of Soul x2 / Jewel of Bless x1 / Jewel of Harmony x1 / Jewel of Life x1 |
| Hero's Final Verification | Master level + | Master level + | Clear Chaos Castle | Experience 5,000,000 | Jewel of Soul x2 / Jewel of Bless x1 / Jewel of Life x2 |
The honest modern reading: the experience figures are the overtaken part, since on high exp 500,000 experience is not worth crossing a map for and the tier bands pass faster than the cooldowns reset. The jewel income is not, because jewels are what you spend. Our server runs a custom jewel system, so check what each one does before deciding a tier is worth running. Scheduling changed too: we run events and mini-bosses all day, so four clears fits around whatever else you are doing.
The small changes you would miss if they vanished

Extra inventory and warehouse space arrived as quest rewards, and both items need a reconnect before the space appears. Nothing on screen says the item worked, so this still trips people up.
| Level | Quest | What you get | Item to fetch | Taken from |
|---|---|---|---|---|
| 50 | Trade Expansion with the Merchant Guild | Warehouse Expansion Certificate | Ancient Statue | Death Knight |
| 150 | Magic Cloth | Magic Bag | Magic Cloth | Silver Valkyrie |
| 300 | Cloth of Space | Magic Bag | Cloth of Space | Alquamos |
None of the three fetch items can be traded, so a guildmate cannot hand you one. Do them as you pass the levels: every storage-hungry system added later assumes you have this space. The rest of Part 2's housekeeping is short and all still in the client.
| Change | What it does |
|---|---|
| Party after a disconnect | Reconnect inside 5 minutes and the party is still yours. Past that you are dropped. Does not apply on Chaos Castle, Castle Siege and similar maps |
| Trading | Right-click moves an item straight into the trade window |
| Zen trade ceiling | Lifted from 8 digits to 9 |
| Gens chat | Start the line with $ and it goes to your Gens |
| Key | Chat channel it toggles |
|---|---|
| F6 | Normal chat |
| F7 | Party chat |
| F8 | Guild chat |
| F9 | Gens chat |
| F2 | Everything at once |
The five-minute party grace is worth knowing by heart. The 9-digit trade ceiling dates the release hardest, since Zen stops being scarce quickly on high exp.
What to do with Season 6, in order
Do. Get a character to 150 early if the Rage Fighter interests you; the gate is account-wide and you pay it once. Read parchments as they drop. Spend your first master points on Durability Reduction (1) and Increase Automatic HP Recovery. Finish the storage quests at 50, 150 and 300, reconnecting each time.
Skip. Investing in the Sacred Fire, Jahad Storm or Piercing Grove tiers beyond wearing what drops. Travelling to Kalutan for experience. Chasing a Vega or Chamer full set, since you leave that gear before you complete one.
The mistake people make. Equipping wings or a Satan and wondering why trash mobs keep killing them. The health cost table is the answer, and Dark Side into a large pack is the moment it happens. Fix it with HP recovery and a habit of watching your own bar, not with more damage.
Our server runs Season 22 on the latest server files and opens on 30 October 2026. To try the Rage Fighter as he plays now, create an account and roll one.
- The Rage Fighter is the one piece of Season 6 that nothing has replaced, and he needs a level 150 character on your account before you can roll him.
- Wings or a Satan turn his health bar into a second mana bar: Dragon Slasher alone bills him 100 HP a cast.
- The three-column master skill window from Part 2 is the one you still open on a Season 22 server, tree names and all.
- Capes outlast armour here: the Cape of Overrule at level 400 is worth chasing, the Sacred Fire tier is not.
- Kalutan runs level 99 to 120, so on high exp it is a visit for the three Warehouse Keepers rather than a grind.
- Finish the storage quests at 50, 150 and 300 as you pass them, and reconnect afterwards or the space never appears.